Welcome to this step-by-step tutorial on how to draw a cat eye. Whether you are an aspiring artist or just want to try your hand at drawing, creating a cat eye is a great place to start. With a few simple techniques and some practice, you can capture the essence of a cat’s eye in no time. So grab your materials, and let’s get started!
Materials Required
To begin drawing a cat eye, you’ll need the following materials:
- Pencil – A medium-grade pencil is recommended for sketching and shading.
- Paper – Choose a smooth-surfaced paper that can handle pencil work.
- Eraser – A kneaded eraser is ideal for easily correcting mistakes.
- Blending tool – You can use a blending stump, cotton swab, or even your finger for blending and smudging.
Now that you have your materials ready, let’s dive into the step-by-step process of drawing a cat eye.
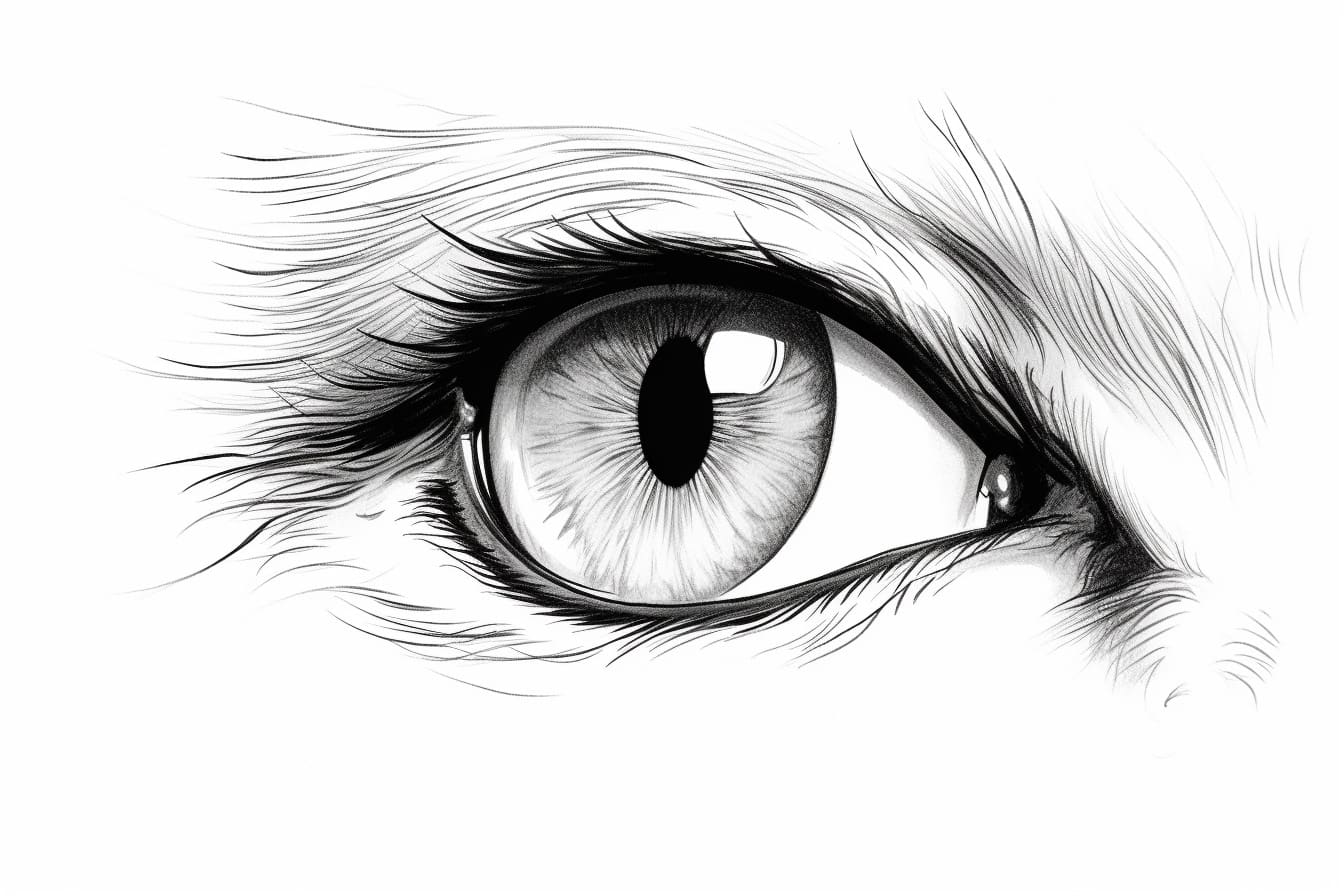
Step 1: Outlining the Basic Shape
Begin by lightly sketching a horizontal oval shape on your paper. This will be the outline of the cat eye. Keep the shape slightly elongated, as cat eyes are often more oval than round.
Step 2: Adding the Iris
Within the outline, draw a smaller oval shape on the left side of the larger oval. This will be the iris of the cat eye. Fill in the iris with a solid shade of color using your pencil or shading tool.
Step 3: Creating Depth with Pupil and Reflection
At the very center of the iris, draw a small and dark circular shape for the pupil. Leave a tiny white space within the pupil to indicate reflection. This reflection adds depth and brings the eye to life.
Step 4: Detailing the Iris
Around the iris, lightly sketch small lines or curves to represent the fibers of the iris. These lines should radiate outwards from the pupil towards the outer edge of the iris. Make sure the lines are unevenly spaced to create a natural look.
Step 5: Shading the Eye
To add depth and dimension to the eye, it’s important to shade the areas around the iris and pupil. Start by shading the area closest to the iris with a slightly darker tone. Gradually lighten the shade as you move away from the iris, blending the transition with your blending tool. This shading creates a gradual fade from the center of the eye to the outer edges.
Step 6: Drawing the Eyelids
On the top and bottom edges of the eye, draw the eyelids. Cat eyelids are often more curved than human eyelids. Sketch a smooth curve above and below the eye, leaving a small space between the eyelids and the iris. The upper eyelid should be thicker and more prominent than the lower one.
Step 7: Adding Eyelashes
To make the eye more realistic, draw some eyelashes extending from the upper eyelid. These lashes should be thin, curved lines that taper towards the ends. Add a few shorter lashes to the lower eyelid as well.
Step 8: Fine-Tuning the Details
Now it’s time to refine and finalize the drawing. Take a closer look at your work and make any necessary adjustments. Pay attention to the shape, proportions, and overall symmetry of the eye. Use your eraser to gently erase any unwanted lines or smudges. Take your time with this step to ensure a polished finish.
Conclusion
Drawing a cat eye can be a challenging yet rewarding experience. By following the step-by-step instructions outlined in this tutorial and practicing regularly, you’ll improve your artistic skills and be able to create captivating drawings of cat eyes. Remember to be patient with yourself, as mastery comes with time and dedication. So grab your materials and start sketching those mesmerizing cat eyes today!