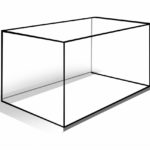
Do you want to learn how to draw a 3D rectangle? Whether you are a beginner or an experienced artist, mastering the art of drawing three-dimensional shapes can greatly enhance your artistic skills. In this step-by-step tutorial, we will guide you through the process of creating a realistic-looking 3D rectangle on paper. So grab your drawing materials and let’s get started!
Materials Required
To begin this drawing tutorial, you will need the following materials:
- Drawing paper
- Pencil
- Ruler
- Eraser
Now that you have gathered all the necessary materials, let’s begin the journey of drawing a 3D rectangle!
Step 1: Start with a Horizontal Line
Begin by drawing a horizontal line at the center of your paper. Use your ruler to ensure the line is straight and neat. This line will serve as the base of our 3D rectangle.
Step 2: Add Vertical Lines
Next, draw two vertical lines perpendicular to the horizontal line you just created. The length of these lines will determine the height of your rectangle. Make sure the lines are parallel and evenly spaced from each other.
Step 3: Connect the Lines
Now, connect the top ends of the vertical lines with a straight horizontal line. This line should be parallel to the base horizontal line, completing the outline of your rectangle.
Step 4: Add Depth
To make your rectangle appear three-dimensional, we need to add depth. Start by drawing two diagonal lines connecting the top corners of the rectangle to the base. These lines should be slightly slanted.
Step 5: Create the Side Faces
To complete the three-dimensional look, draw two vertical lines that connect the top corners of the rectangle to the corresponding corners on the base line. These lines will form the side faces of your 3D rectangle.
Step 6: Add Dimension
To give your 3D rectangle more dimension, sketch diagonal lines from the bottom corners of the side faces to the base line. These lines will create the illusion of depth and perspective.
Step 7: Erase Unnecessary Lines
Now that you have the basic structure of your 3D rectangle, take your eraser and gently remove any lines that are no longer needed. Erase the extra lines inside the shape, leaving only the outline and the essential details of the rectangle.
Step 8: Shade and Add Details
To make your 3D rectangle appear more realistic, we need to add shading and details. Begin by shading the side faces of the rectangle to create a sense of depth. Use your pencil to darken these areas, gradually building up the shading to achieve the desired effect.
Next, add any additional details you want to include, such as highlights or shadows. Pay attention to where the light source is coming from and shade accordingly.
Conclusion
Congratulations! You have successfully learned how to draw a 3D rectangle. By following these step-by-step instructions, you can now create realistic-looking three-dimensional shapes in your artwork. Remember to practice regularly to improve your drawing skills and explore other variations of 3D shapes.
Drawing three-dimensional objects can be challenging at first, but with patience and practice, you will soon master this skill. So grab your pencil and paper, and start creating amazing 3D artwork today!