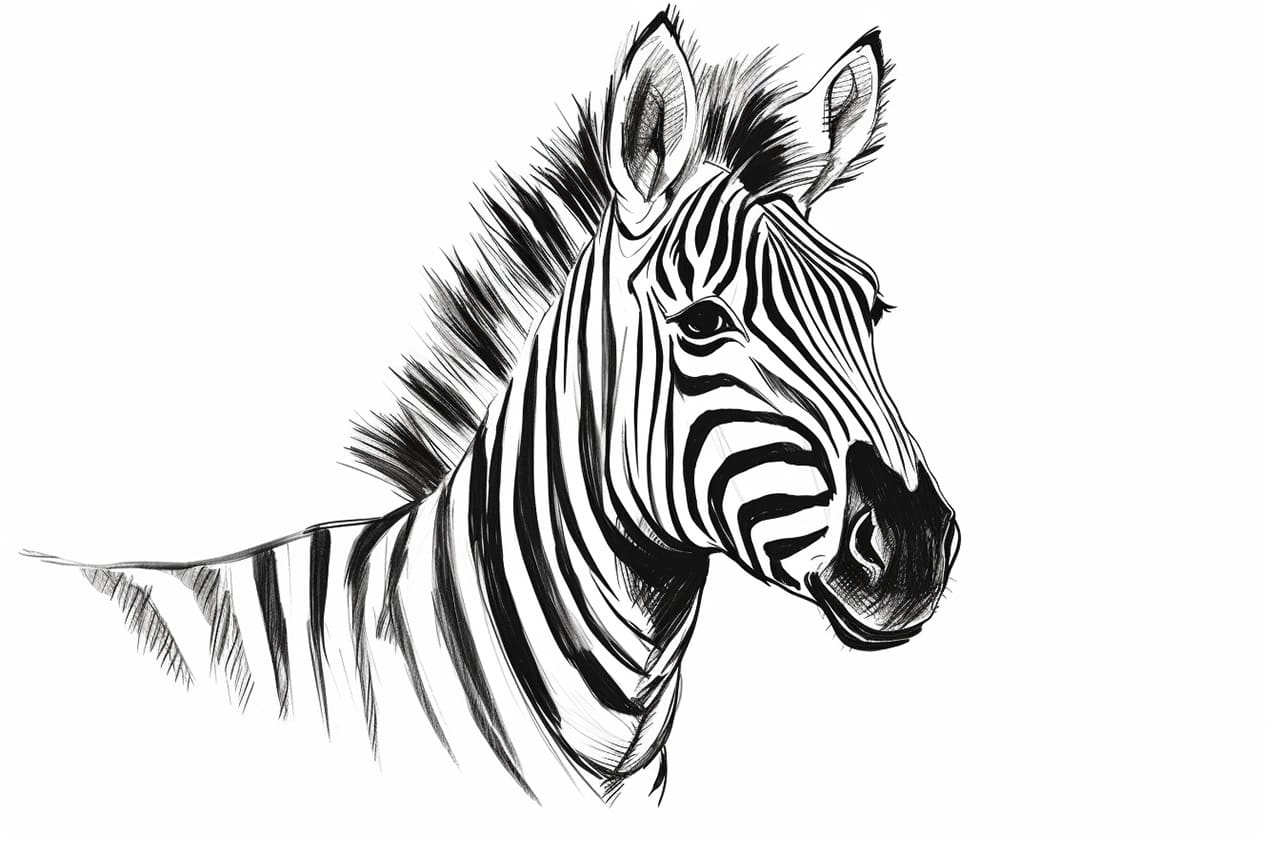
Welcome to this engaging step-by-step tutorial designed to teach you how to draw a zebra! Zebras are not only captivating animals known for their striking black and white striped coats, but they also carry an air of grace and playfulness. They are iconic symbols of the African savanna and have fascinated artists and nature enthusiasts alike for centuries. In this tutorial, you’ll learn to capture their essence on paper.
Drawing a zebra may seem daunting at first, but with a few straightforward techniques and a little patience, you’ll be able to create your own stunning zebra artwork. This guide will walk you through each stage of the drawing process, breaking it down into manageable steps that are suitable for all skill levels. Whether you are a beginner picking up a pencil for the first time, or an experienced artist looking to refine your skills, you’ll find valuable tips and tricks that can help.
So, gather your drawing materials, find a comfortable space, and let your creativity flow! We’re about to embark on an artistic journey, and before you know it, you’ll have a beautiful zebra drawing that showcases both your talent and your unique style. Let’s get started!
Materials Required
Before we begin, make sure you have the following materials ready:
- Drawing paper or sketchbook
- Pencil (preferably an HB or 2B for sketching)
- Eraser
- Fine-tipped black marker or pen (optional for outlining)
Now that you have your materials ready, let’s dive into the steps to draw a zebra!
Step 1: Sketch the Basic Shapes
Start by lightly sketching the basic shapes of the zebra’s body. Draw a slightly elongated oval shape for the body and a smaller circle for the head. Place the head on one end of the oval, leaving enough space for the neck. You can use very light lines as these will be erased later.
Step 2: Outline the Body
Using the basic shapes as a guide, start sketching the outline of the zebra’s body. Pay attention to the proportions and the curves of the body. Zebras have a slender and agile build, so try to capture that in your drawing. Don’t worry about the stripes just yet, as we’ll add those in later steps.
Step 3: Add Facial Features
Now, let’s focus on the zebra’s face. Sketch two small circles for the eyes, leaving some space between them. Add a slightly curved line below the eyes for the nose. Then, draw two curved lines that start from the sides of the face, meeting at a point for the snout. Zebras have long ears, so add two elongated ovals on top of the head.
Step 4: Refine the Details
Take your time to refine the details of the zebra’s face and body. Add a small dot within each eye to represent the pupils. Sketch the nostrils below the snout using two small ovals. Don’t forget to add small tufts of hair on the top of the head to represent the mane. Refine the outline of the body, making it smooth and graceful.
Step 5: Draw the Stripes
Now comes the iconic part of drawing a zebra – the stripes! Zebras have unique patterns of black and white stripes that vary from individual to individual. Start adding the stripes by drawing curved lines across the body and head, following the contours of the zebra’s form. The stripes should be irregular and slightly wavy, giving them a natural look.
Step 6: Erase Unnecessary Lines
Once you have completed the outline and added the stripes, erase any unnecessary lines that are no longer needed. Be careful not to erase the stripes or any essential details. Use a soft eraser or gently dab the lines with a kneaded eraser to remove the pencil marks cleanly.
Step 7: Add Shading (Optional)
To add depth and dimension to your zebra drawing, you can choose to add shading. Determine the direction of the light source and shade one side of the zebra’s body accordingly. Use light, hatching strokes to create a sense of volume. Remember to blend the shading softly for a more realistic look.
Step 8: Outline with a Marker (Optional)
If you want to give your drawing a clean and finished look, you can outline it with a fine-tipped black marker or pen. Trace over the final pencil lines, including the zebra’s body, facial features, and stripes. This step is optional but can enhance the overall appearance of your artwork.
Conclusion
Congratulations! You’ve successfully drawn a zebra, capturing its distinctive black and white stripes. Remember, drawing takes practice, so don’t be discouraged if your first attempt isn’t perfect. Keep trying, experimenting, and adding your personal touch to create unique zebra drawings. Soon, you’ll be able to create stunning zebra artwork that will impress everyone. Happy drawing!