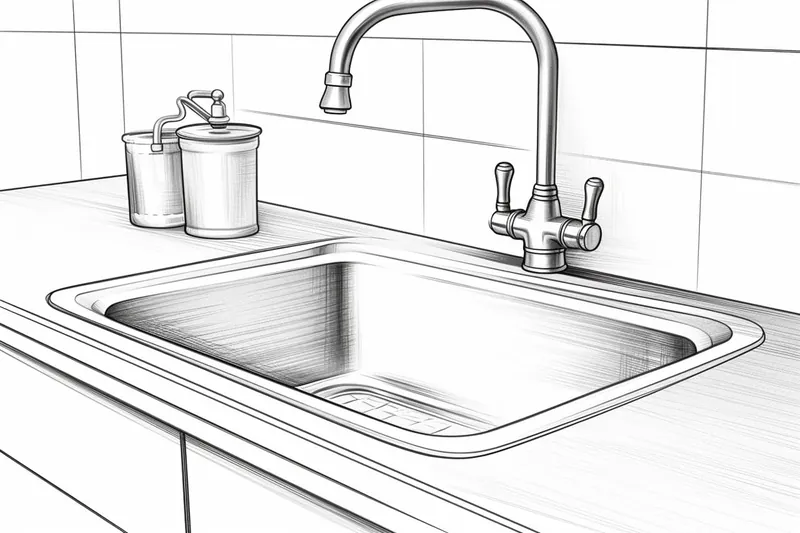
How to Draw a Sink
Learn how to draw a sink step-by-step with this helpful tutorial. Improve your drawing skills and create a realistic representation of a sink.
Materials You'll Need
- Pencil
- Paper
- Eraser
Drawing everyday objects is a wonderful way to enhance your artistic skills while exploring the beauty in the mundane. One such object that offers both interesting shapes and subtle details is the sink—a common fixture found in kitchens and bathrooms around the world. Learning how to draw a sink not only helps you practice perspective, shading, and proportion but also trains your eye to observe and replicate real-life objects with accuracy. Whether you want to improve your technical drawing abilities or add realistic elements to your artwork, mastering the sink can be surprisingly rewarding.
The sink, with its smooth curves, reflective surfaces, and functional design, presents unique challenges and opportunities for artists at various skill levels. From capturing the sleek basin to the intricate faucet details, this tutorial will guide you through each step, helping you develop essential techniques such as contour drawing, light and shadow rendering, and spatial awareness. Whether you are a beginner aiming to build confidence in sketching or an experienced artist looking to refine your realism skills, following this how to draw a sink tutorial will provide you with a solid foundation and valuable practice.
By the end of this tutorial, you will have created a detailed and lifelike drawing of a sink that showcases your growing artistic abilities. Remember, every great artist started with simple subjects and gradually worked their way to more complex compositions. So grab your pencil, paper, and eraser, and let's embark on this creative journey together—your next masterpiece awaits!
Materials Required
Before we begin, make sure you have the following materials:
- A pencil
- Paper
- Eraser
- Ruler
- Compass (optional)
- Colored pencils or markers (optional)
Now that we have all the necessary materials, let's move on to the drawing process.
Step 1: Sketch the Basic Shape of the Sink
Start by drawing a vertical rectangle in the center of your paper. This will serve as the basic shape of the sink. Use light and loose pencil strokes, as we will be refining the details later on.
Step 2: Add the Faucet and Handle
At the top of the sink, draw a small rectangle for the faucet. Then, add a curved line below the faucet to represent the handle. Make sure the handle is proportionate to the size of the sink.
Step 3: Draw the Sink Bowl
To create the sink bowl, draw two curved lines that connect to the bottom corners of the vertical rectangle. These lines should form an elongated oval shape. Make the lines smooth and symmetrical for a realistic look.
Step 4: Add the Drain
Tip: As you work through the steps of drawing the sink, take frequent breaks to step back and assess your drawing from a distance; this will help you see proportions and perspective more clearly. Additionally, consider using reference images of sinks to better understand the nuances of light, shadow, and texture, which can significantly enhance the realism of your final piece.
Inside the sink bowl, draw a small circle to represent the drain. Place the drain slightly off-center towards the back of the sink. You can use a compass to ensure a perfect circle, but freehand drawing works just as well.
Step 5: Sketch the Countertop
Step 6: Draw the Cabinet Below the Sink
Underneath the countertop, draw a rectangle to represent the cabinet. The cabinet should be slightly wider and taller than the sink. Make the corners of the cabinet slightly rounded for a more realistic appearance.
Step 7: Add Details to the Cabinet
To add more depth and dimension to the cabinet, draw vertical lines along the front surface. These lines represent the panels of the cabinet doors. You can also add small knobs or handles to the doors for extra detail.
Step 8: Shade and Add Texture
Now that you have the basic structure of the sink, it's time to add shading and texture to make it look more realistic. Use your pencil to lightly shade the areas that would be in shadow, such as the underside of the sink bowl and the inside of the cabinet.
Step 9: Refine the Lines and Erase Guidelines
Take a closer look at your drawing and refine any lines that need more detail or precision. Use an eraser to remove any unnecessary guidelines and smudges.
Step 10: Optional - Add Color
If you want to make your drawing more vibrant, you can add color using colored pencils or markers. Experiment with different shades to achieve a realistic representation of the sink. Pay attention to the reflective properties of metal and the texture of the cabinet.
Conclusion
Congratulations! You have successfully learned how to draw a sink. By following these step-by-step instructions, you have created a realistic and detailed representation of a sink. Drawing everyday objects can be a great way to improve your artistic skills and enhance your creativity. So keep practicing, and soon you'll be able to draw even more complex objects with ease.
Remember, this tutorial is just a starting point. Feel free to experiment and add your own personal touch to make your drawings unique. Keep exploring and practicing, and before you know it, you'll be able to draw anything you set your mind to.
Happy drawing!
Fun Facts About Sink
- The modern sink design dates back to the late 19th century, evolving with advances in plumbing technology.
- Sinks are commonly made from materials like stainless steel, porcelain, and composite granite for durability and aesthetics.
- The term "sink" originally referred to a basin that "sinks" water away, highlighting its drainage function.
- Kitchen sinks often have multiple bowls to allow multitasking, such as washing and rinsing dishes simultaneously.
- Some sinks are equipped with touchless faucets that use sensors to reduce water waste and improve hygiene.
- The average household sink uses about 1.5 to 2 gallons of water per minute when the faucet is running.
- In art, drawing a sink helps artists practice perspective, shading, and capturing reflective surfaces.
- Bathroom sinks are often designed with overflow holes to prevent accidental flooding.
- Some modern sinks incorporate built-in soap dispensers and cutting boards for added kitchen efficiency.
Suggestions for Scenes and Settings for Sink Drawings
- A modern kitchen sink with a sleek stainless steel faucet and reflections of nearby utensils.
- A vintage bathroom sink with ornate handles, surrounded by textured tiles and a foggy mirror.
- A rustic outdoor sink setup with a wooden countertop, garden tools, and plants around it.
- A close-up view focusing on water droplets splashing inside a ceramic sink basin.
- A minimalist sink scene featuring a monochrome palette and clean geometric shapes.
- A cluttered artist's studio sink area with paintbrushes, colorful stains, and soap suds.
- A futuristic sink design with digital controls and glowing elements in a sci-fi setting.
- A sink in use during a busy family breakfast, with dishes, fruit, and spilled water nearby.
- A sink with a worn and chipped enamel basin, emphasizing texture and age in a vintage kitchen.
- An eco-friendly sink setup featuring plants growing around it and a rainwater collection system.