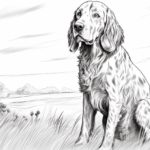
Welcome to this step-by-step guide on how to draw a Plott, a type of dog known for its sleek and muscular build. Whether you are a beginner or an experienced artist, this tutorial will provide you with all the instructions you need to create a beautiful and lifelike drawing of a Plott. So let’s grab our pencils and get started!
Materials Required
To begin drawing a Plott, you will need the following materials:
- Pencil: A medium-soft graphite pencil (2B or 4B) is recommended for the initial sketching and shading.
- Paper: Choose a smooth, heavyweight paper that can handle multiple layers of shading.
- Eraser: A kneaded eraser is ideal for lifting and adjusting graphite without damaging the paper.
- Blending Tools: You can use a blending stump or a tortillon to smooth out shading and create subtle gradients.
- Reference Image: Find a clear and well-lit photograph of a Plott to use as a reference during the drawing process.
Now that we have our materials ready, let’s move on to the step-by-step instructions.
Step 1: Basic Outline
Start by lightly sketching the basic outline of the Plott using your pencil. Begin with a large circle for the head, followed by a rectangular shape for the body. Add two circles for the front and hind legs, and a long oval for the tail. Remember to keep your lines light and loose, as we will refine them later.
Step 2: Facial Features
Next, let’s focus on the Plott’s facial features. Using your reference image, carefully sketch the placement of the eyes, nose, and mouth. Pay attention to the proportions and shape of these features, as they play a crucial role in capturing the unique expression of the Plott. Once you are satisfied with the placement, darken the lines slightly to make them more defined.
Step 3: Body Proportions
Now, let’s work on the body proportions of the Plott. Use your reference image to guide you in sketching the correct length and width of the body, as well as the position of the legs and tail. Take your time to get these proportions right, as they will determine the overall balance and realism of your drawing.
Step 4: Muscular Structure
Plotts are known for their muscular build, so it’s important to capture this in your drawing. Begin by adding subtle curved lines to indicate the muscles on the Plott’s body. Pay attention to the areas where muscles are more prominent, such as the neck, chest, and hindquarters. Use light, feathery strokes to suggest the texture of the fur and muscles.
Step 5: Fur Texture
To add depth and realism to your drawing, focus on the fur texture of the Plott. Start by shading the darker areas, such as the ears and around the eyes, using short and controlled strokes. Then, use your blending tool to smooth out the shading and create a seamless transition between the light and dark areas. Continue this process, gradually adding more layers of shading to build up the fur texture.
Step 6: Fine Details
Now that the basic structure and shading are in place, it’s time to add the fine details that will bring your Plott drawing to life. Pay attention to the unique markings and patterns on the Plott’s coat, such as spots or brindle patterns. Use your pencil to carefully add these details, referring to your reference image for accuracy. Remember to keep your lines thin and precise, as these details can make a significant difference in capturing the essence of the breed.
Step 7: Final Touches
Take a step back and assess your drawing so far. Look for any areas that need refining or adjusting. Use your eraser to lift and adjust any lines or shading that may need correction. Take your time with these final touches, as they can greatly enhance the overall quality of your drawing.
Conclusion
Congratulations, you have successfully learned how to draw a Plott! By following these step-by-step instructions and using reference images, you have created a beautiful and realistic representation of this magnificent dog breed. Remember to practice regularly and experiment with different techniques to further improve your skills as an artist. Enjoy the process and have fun bringing more amazing creatures to life on paper!