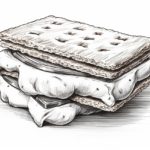
Welcome to this step-by-step guide on how to draw a marshmallow! Whether you’re an experienced artist or just starting out, this tutorial will walk you through the process of creating a realistic and mouth-watering marshmallow drawing. So grab your art supplies and let’s get started!
Materials Required
To create your marshmallow masterpiece, you will need the following materials:
- Drawing paper: Use a smooth, heavyweight paper that can handle different techniques and mediums.
- Pencil: A regular HB pencil or a mechanical pencil will work fine for sketching.
- Eraser: Have a good-quality eraser handy to correct any mistakes or smudges.
- Fine-tip pen: This will be used for adding details to your drawing.
- Colored pencils or markers: Choose your preferred medium for adding color to your marshmallow.
Now that you have all your materials ready, let’s begin the creative process!
Step 1: Outline the Basic Shape
Start by lightly sketching an oval or circle shape in the center of your paper to represent the outline of the marshmallow. Keep the lines light and loose, as this will only serve as a guide for your drawing.
Step 2: Add a Curved Base
To give your marshmallow a realistic look, add a curved base at the bottom of the oval shape. This will create the illusion of the marshmallow resting on a surface. The curve should be subtle and follow the shape of the oval.
Step 3: Define the Marshmallow’s Texture
Marshmallows have a unique texture that is soft and fluffy. To capture this, lightly draw short, curved lines across the entire surface of the marshmallow. These lines should mimic the texture of a real marshmallow, creating a sense of dimension and softness. Vary the length and direction of the lines to make it look more natural.
Step 4: Add Shadows and Highlights
To make your marshmallow drawing more realistic, it’s important to add shading. Identify the direction of your light source and imagine where the shadows would fall on the marshmallow. Using your pencil, lightly shade the areas that would be in shadow, such as the sides and bottom of the marshmallow.
Next, determine the areas that would catch the most light and add highlights accordingly. Leave these areas untouched or use an eraser to create highlights. By carefully balancing the shadows and highlights, you’ll give your marshmallow depth and dimension.
Step 5: Refine the Shape and Contours
Go back to your initial outline and refine the shape of your marshmallow. Erase any unnecessary lines and make sure the proportions are accurate. Pay attention to the contour of the marshmallow, ensuring that it looks smooth and rounded. Take your time during this step as it will greatly impact the final result.
Step 6: Draw the Wrapper (Optional)
If you want to add an extra element to your marshmallow drawing, you can draw a wrapper around it. Start by sketching the shape of the wrapper using straight lines and gentle curves. Then, add folds and creases to make it appear realistic. Remember to be mindful of perspective and the way the wrapper wraps around the marshmallow.
Step 7: Add Color and Details
Now it’s time to bring your marshmallow to life with color! Use your colored pencils or markers to add a soft, pale hue to the marshmallow. Marshmallows usually have shades of white, cream, or light pink. Apply the color lightly and gradually build up the layers to create a smooth and gradient effect.
Once you’re satisfied with the base color, use a fine-tip pen or colored pencils to add any necessary details. This may include the reflection of light, small cracks, or any other elements specific to your marshmallow. Be patient and precise during this step, as it will enhance the overall realism of your drawing.
Conclusion
Congratulations! You have successfully learned how to draw a mouth-watering marshmallow. By following these step-by-step instructions and using your artistic skills, you’ve created a realistic representation of this fluffy treat. Now you can enjoy this delightful drawing or even share it with others.
Remember, practice makes perfect, so don’t be afraid to experiment with different styles, colors, and techniques. With time and dedication, you’ll continue to improve your drawing skills. Enjoy the process and have fun creating!