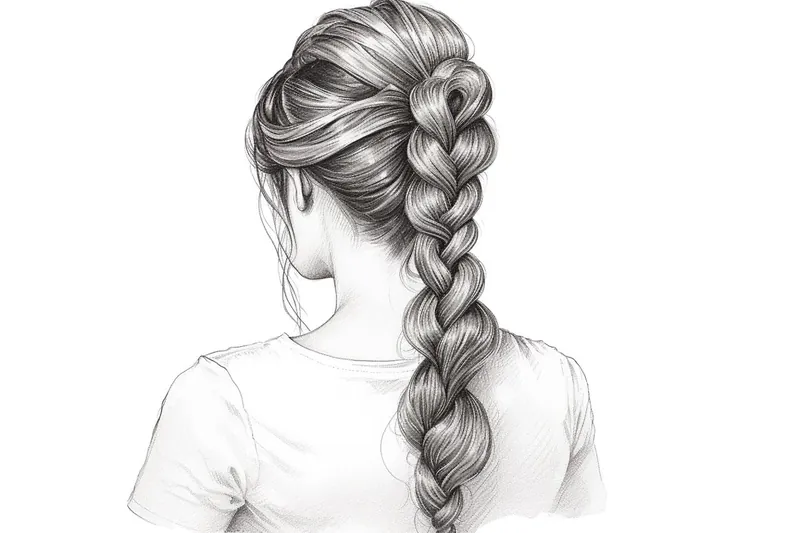
How to Draw a French Braid
Learn how to draw a French braid in this step-by-step tutorial. Add elegance to your drawings with this classic hairstyle. Perfect for portrait artists.
Materials You'll Need
- Pencil
- Paper
- Eraser
Drawing hairstyles can be both challenging and rewarding, and learning how to draw a French braid opens up a wonderful opportunity to add depth and character to your portraits or figure drawings. The French braid is a timeless and elegant hairstyle characterized by its intricate weaving pattern that starts at the crown of the head and gracefully follows the scalp. It's widely recognized for its neat, sophisticated look and is often associated with classic beauty and meticulous style. Whether you're illustrating a modern character or a historical figure, mastering this hairstyle can enhance the realism and visual interest of your artwork.
Understanding how to draw a French braid involves observing the way hair strands overlap and interlace, which can be a fantastic exercise in developing your skills in texture, layering, and shading. While it might seem complex at first glance, breaking down the braid into manageable sections and following a step-by-step approach makes the process much more approachable, even for artists who are still building their confidence with detailed hair techniques. This tutorial will guide you through everything from the initial sketch to the careful rendering of each braided section, helping you capture the braid's volume and flow with precision and style.
So, if you've ever wanted to bring a touch of elegance and intricacy to your drawings, now is the perfect time to learn how to draw a French braid. With practice and patience, you'll be able to create stunning, lifelike hairstyles that elevate your portraits to new heights. Grab your sketchbook and favorite pencils, and let's embark on this creative journey together—your artistic skills will thank you!
Materials Required
Before we begin, make sure you have the following materials:
- Pencil: Use a medium or soft pencil for sketching and shading.
- Eraser: Have a good quality eraser handy for any necessary corrections.
- Sketchbook: Choose a sketchbook with smooth paper that can handle pencil drawings.
- Reference Image: Find a clear reference image of a French braid hairstyle to guide you through the process.
Now that you have all your materials ready, let's dive into the step-by-step process of drawing a French braid.
Step 1: Outline the Head
Start by lightly sketching the basic outline of the head. Use simple shapes like circles and ovals to define the head shape, as well as the position and placement of the facial features. This will act as a guide for placing the French braid later on.
Step 2: Draw the Hairline
Next, draw the hairline. The hairline will determine where the French braid will begin. Use light, curved lines to create a natural-looking hairline that follows the shape of the head.
Step 3: Add Volume to the Hair
To give the French braid a three-dimensional look, add some volume to the hair. Start by lightly sketching the shape of the hair, taking into consideration the direction it will flow. You can use curved lines to indicate the general flow of the hair and add some loose strands for a more realistic effect.
Step 4: Divide the Hair into Three Sections
Now it's time to start drawing the French braid itself. Divide the hair into three equal sections. These sections will form the basis of the braid. Use light, curved lines to outline the three sections, making sure they are evenly spaced and parallel to each other.
Step 5: Begin Braiding
Start braiding the hair by taking the right section and crossing it over the middle section. Then, take the left section and cross it over the new middle section. Repeat this process, alternating between the right and left sections, until you reach the end of the hair. Keep the lines soft and flowing to capture the smoothness of the French braid.
Step 6: Define the Braid
To make the French braid more defined, darken the lines and curves that form the braid. Pay attention to the overlapping sections and the twists in the hair. Add some thickness to the braid by making the lines slightly wider, particularly where the hair crosses over each other.
Step 7: Add Texture
To make the French braid look more realistic, add some texture to the hair. Use small, curved lines to indicate strands and individual hair fibers. Keep the lines soft and wispy, following the natural flow of the braid. This will help give the illusion of movement and add depth to your drawing.
Step 8: Refine and Shade
At this stage, take a step back and evaluate your drawing. Make any necessary adjustments to the braid's shape and proportions. Once you're satisfied, you can start adding shading to give your drawing more dimension. Shade the areas where the hair overlaps, creating areas of shadow. Pay attention to the light source and add highlights to areas where the light hits the braid.
Step 9: Final Details
Now it's time to refine your drawing even further by adding some final details. Use your pencil to add more texture and definition to the braid, such as individual strands, flyaway hairs, or hair accessories. Take your time with this step, as it will make your drawing stand out and look more polished.
Conclusion
Drawing a French braid can be a fun and rewarding experience. By following these step-by-step instructions, you can create a realistic and beautifully braided hairstyle in your drawings. Remember to practice regularly and experiment with different styles and variations. So grab your pencil and sketchbook, and let your creativity flow as you master the art of drawing a French braid!
Fun Facts About French Braids
- The French braid is believed to have originated in Africa thousands of years ago, showcasing intricate braiding techniques passed down through generations.
- Despite its name, the French braid did not actually originate in France but gained popularity there in the 19th century.
- French braids are not only stylish but practical, keeping hair neat and secure during physical activities.
- The French braid technique involves weaving three sections of hair while gradually adding more hair from the scalp, creating a smooth, elegant look.
- French braids have been featured in art and literature as symbols of femininity, tradition, and cultural identity.
- Variations of the French braid include the Dutch braid, which is woven under rather than over, creating a raised braid effect.
- French braids can help protect hair from damage by reducing tangling and breakage, making them a popular protective hairstyle.
- Many cultures around the world have their own versions of braiding, but the French braid remains
Suggestions for Scenes and Settings for French Braid Drawings
- A young woman preparing for a classical ballet recital, her French braid neat and elegant under a soft spotlight.
- A medieval princess in a castle garden, her French braid adorned with delicate flowers and ribbons.
- An adventurous explorer trekking through a dense forest, her French braid practical yet stylish, keeping hair out of her face.
- A modern urban artist painting a mural, her French braid contrasting with colorful street art in the background.
- A historical figure from the Renaissance era, posed in period attire with a meticulously braided French hairstyle.
- A beach scene with a carefree girl wearing a loose French braid, strands gently blowing in the ocean breeze.
- A school portrait setting, capturing a child's first attempt at styling her own French braid with a shy smile.
- A fantasy character, such as an elf or warrior, with an intricate French braid decorated with beads and metallic accents.
- A cozy winter scene with a figure wearing a knitted scarf and a French braid peeking out from under a woolen hat.
- A sports setting, like a runner or gymnast, where the French braid keeps the hair secure during intense activity.