How to Draw a Cricket
Learn how to draw a cricket with this step-by-step drawing tutorial. Create a detailed and realistic representation of a cricket using simple instructions.
Materials You'll Need
- Pencil
- Paper
- Eraser
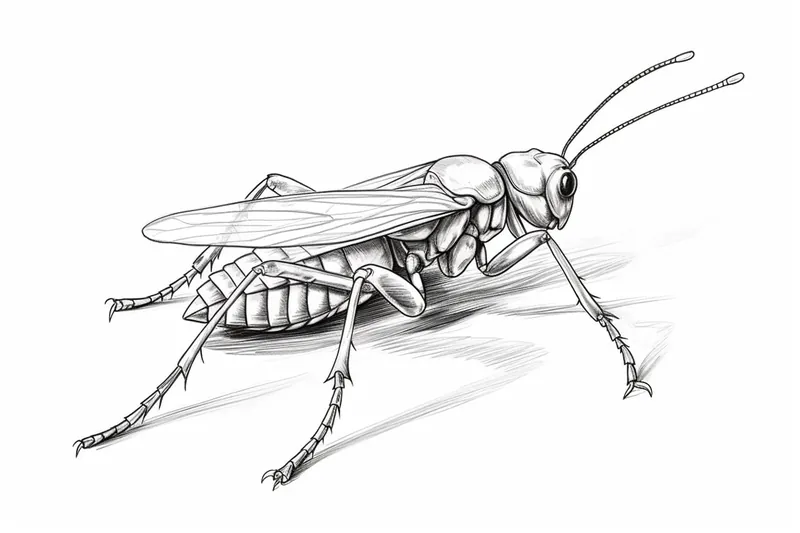
Crickets are small, jumping insects that are admired not only for their musical chirping on warm summer nights but also for their intricate body structure. Their long antennae, powerful hind legs, and delicately segmented bodies make them a fascinating subject for anyone interested in drawing insects or learning more about the natural world. Drawing a cricket can help you appreciate the complexity and beauty of these creatures, whether you are a budding artist, a student working on a biology project, or simply someone who enjoys sketching unique animals.
If you've ever wondered how to draw a cricket, you're in the right place! This tutorial is designed for artists of all skill levels, from beginners who are just starting out to more experienced artists looking to improve their observation and detailing skills. You'll learn how to break down the cricket's body into basic shapes, refine the outline, and add distinct features such as the segmented legs and textured wings. Along the way, you'll pick up useful techniques for drawing insects realistically, such as creating symmetry and emphasizing fine details with pen or pencil.
Learning how to draw a cricket not only sharpens your drawing abilities but also encourages a deeper appreciation for the small wonders of nature. With patience and practice, you'll find that even the most complex-looking insects can be drawn step by step. So, gather your drawing materials, follow along with the easy instructions, and let your creative confidence grow as you capture the charm of a cricket on paper!
Materials Required:
- Pencil
- Eraser
- Drawing paper
- Fine-tipped black pen or marker
- Colored pencils or markers (optional)
Step 1: Outline the Body
Tip: As you draw your cricket, take the time to observe real crickets or reference high-quality images; this will enhance your understanding of their anatomy and proportions, allowing you to capture more realistic details in your drawing. Pay close attention to the unique textures of their wings and the segmentation of their bodies, which can be emphasized with careful shading and line work in the later steps.
Start by drawing a small circle near the center of your paper. This will be the cricket's head. Then, draw an oval shape beneath the head for the body. Connect the head and the body with a curved line to create the cricket's neck.
Step 2: Draw the Eyes and Antennae
Inside the head, draw two large oval-shaped eyes. Leave a small white circle in the corner of each eye to give them a shiny look. Above the eyes, add two long, thin antennae by drawing two slightly curved lines on either side of the head.
Step 3: Sketch the Legs
Crickets have long and slender legs, which are an important part of their body structure. Start by drawing two front legs extending from the bottom of the head. These legs should be slightly longer than the cricket's body. Then, draw two middle legs just below the first pair, and two hind legs on the other side of the body. Make sure the hind legs are the longest.
Step 4: Add Details to the Head
To give your cricket a more realistic look, it's important to add details to its face. Draw a small "W" shape inside the head to represent the cricket's mouth. Then, add a few short lines near the mouth to indicate the mandibles. Draw a small dot inside each eye to depict the pupils.
Step 5: Define the Body
Now, it's time to refine the shape of the cricket's body. Start by adding segments to the oval-shaped body. Draw curved lines across the body, dividing it into several sections. These segments will give your drawing a more insect-like appearance.
Step 6: Draw the Wings
Crickets have wings that are located on their back. To draw the wings, start by sketching two small elongated shapes on each side of the body. These shapes should be slightly larger than the body segments. Next, add veins to the wings by drawing a series of parallel lines within the shapes.
Step 7: Erase Unnecessary Lines
Take your eraser and carefully erase any unnecessary pencil lines from your drawing. Keep the outline of the cricket's body and important details, such as the eyes, legs, and wings.
Step 8: Ink Your Drawing
Once you're happy with your pencil sketch, it's time to ink your drawing. Take your fine-tipped pen or marker and carefully trace over the pencil lines. Be patient and take your time to ensure smooth and controlled lines. Ink the most important features, such as the eyes, antennae, legs, and body segments.
Step 9: Add Shading and Texture (optional)
If you want to take your drawing to the next level, you can add shading and texture to your cricket. Use a light source as a reference and add shading to the body segments, legs, and wings. You can also experiment with different pencil strokes to create a textured effect. If desired, use colored pencils or markers to add vibrant colors to your drawing.
Conclusion
Drawing a cricket may seem challenging at first, but by following these step-by-step instructions, you can create a realistic and detailed representation of this fascinating insect. Remember to take your time, be patient, and enjoy the process of bringing a cricket to life on paper. Happy drawing!
Fun Facts About Cricket
- Crickets are known for their distinctive chirping, which is produced by rubbing their wings together, a process called stridulation.
- Only male crickets chirp, using their song to attract females and ward off other males.
- The number of cricket chirps per minute can be used to estimate the temperature, a phenomenon known as Dolbear's Law.
- Crickets have ears located on their front legs, allowing them to detect sound vibrations.
- There are over 900 species of crickets worldwide.
- Crickets are omnivores and will eat plants, fungi, and even other insects.
- In some cultures, crickets are considered symbols of good luck and are even kept as pets.
- Crickets can jump up to 20 times their body length thanks to their powerful hind legs.
- Some species of crickets are farmed and eaten as a sustainable source of protein.
Suggestions for Scenes and Settings for Cricket Drawings
- A close-up study of a cricket perched on a blade of grass, highlighting its intricate legs and antennae.
- A cricket hidden among leaves at dusk, with only its silhouette and antennae visible against the fading light.
- [[A group of crickets chirping together under a full moon, surrounded by summer foliage and insects](https://yonderoo.com/how-to-draw-an-insect/) and bugs](https://yonderoo.com/how-to-draw-a-bug/).
- A cricket exploring the forest floor, navigating around pebbles, twigs, and fallen leaves.
- A cricket viewed through a magnifying glass, emphasizing the detailed texture of its wings and body segments.
- A cricket interacting with other garden insects, such as ladybugs or ants, in a lively backyard setting.
- A cricket resting on a windowsill while rain gently falls outside, creating a cozy indoor-outdoor atmosphere.
- A stylized cricket with exaggerated features, set in a whimsical fantasy landscape filled with oversized mushrooms and plants.
- A cricket making music by rubbing its wings, with visible sound waves or musical notes swirling in the air.
- A side-by-side comparison of a cricket and a grasshopper, focusing on their similarities and differences in body structure.