How to Draw a Chook
Learn how to draw a chook step-by-step with this clear and concise drawing tutorial. Create charming chicken illustrations with ease using this helpful guide.
Materials You'll Need
- Pencil
- Paper
- Eraser
Drawing animals can be a rewarding and enjoyable experience, and learning how to draw a chook offers a perfect opportunity to explore both the charm and complexity of this familiar farmyard bird. Chooks, or chickens, are not only common creatures but also rich in character, with their distinctive feathers, combs, and expressive eyes. They have been a popular subject in art for centuries, symbolizing everything from domestic life to nature's simplicity. Whether you want to create a cute cartoonish chook or a more realistic portrayal, understanding their basic shapes and anatomy will greatly enhance your drawing skills.
This tutorial on how to draw a chook is designed to guide artists of various skill levels, from beginners eager to learn basic shapes and proportions to intermediate artists looking to refine their techniques. We will break down the drawing process into manageable steps, focusing on simple lines and shapes before adding details like feathers and texture. Techniques such as sketching light guidelines, shaping forms with curves, and gradually building up shading will be introduced to help you create depth and dimension. With patience and practice, you'll be able to capture the lively spirit of the chook in your artwork.
So, whether you're drawing for fun, improving your animal illustration skills, or preparing artwork for a project, this guide will provide clear instructions and helpful tips to make your drawing journey enjoyable and successful. Grab your pencils, paper, and a bit of creativity, and let's dive into the fascinating world of how to draw a chook. Remember, every great artist started with a single line—your charming chook illustration is just a few strokes away!
Materials Required
Before we begin, make sure you have the following materials handy:
- Drawing paper or sketchbook
- Pencils (HB, 2B, 4B)
- Eraser
- Sharpener
- Fine-tipped black pen (optional)
Now that we have our materials ready, let's dive into the step-by-step process of drawing a chook.
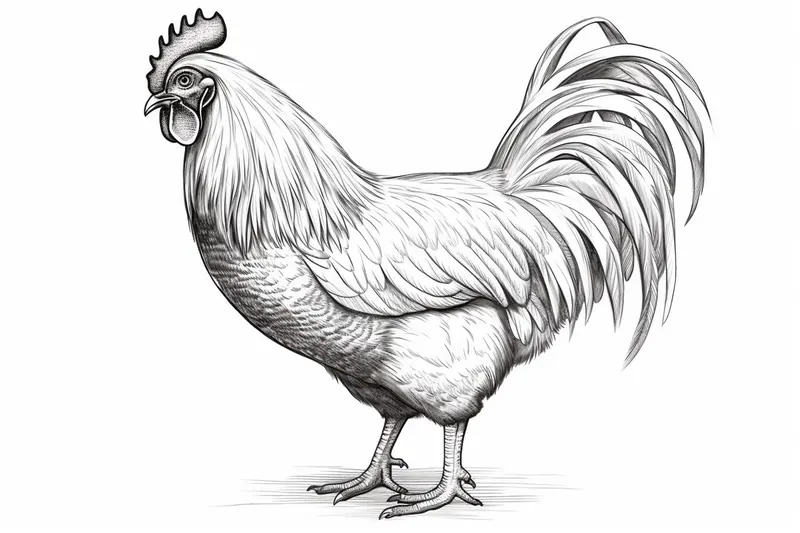
Step 1: Basic Shapes
Begin by lightly sketching the basic shapes that will serve as the chook's framework. Start with an oval shape for the body, followed by a smaller circle for the head. Connect the head and body using a curved line. These basic shapes will act as your guide throughout the drawing process.
Step 2: Adding Details
Next, let's add some details to our chook. Sketch a long curved line starting from the bottom of the head to form the beak. Then, draw a small circle for the eye on the side of the head. Add a small curved line beneath the eye to indicate the beak's opening.
Step 3: Feather Patterns
To make the chook look more realistic, let's add some feather patterns. Use short, curved lines to create the texture of feathers on the body. Start from the neck area and work your way down to the tail. Remember to follow the shape of the body and vary the size and direction of the lines to add depth and dimension.
Step 4: Wings and Tail
Now, it's time to draw the wings and tail. Sketch a curved line starting from the body's side and extending towards the back to represent the wing. Then, draw a series of short, curved lines at the chook's rear end to create the tail feathers. Remember to keep the lines light and gentle, as these are just guidelines for now.
Step 5: Refine the Details
With the foundation laid out, let's refine the details of our chook drawing. Use a darker pencil (2B or 4B) to darken the lines and add more definition to the body, beak, eye, and feathers. Pay attention to the reference photo or your imagination to capture the nuances of a chook's features.
Step 6: Shading and Texture
To give your chook a more three-dimensional appearance, let's add shading and texture. Identify the light source in your drawing (e.g., the top left corner) and imagine where the shadows would fall on the chook's body. Use light, hatching strokes to add shadows to the areas that would be darker, such as beneath the wings and between the feathers.
Step 7: Final Touches
Lastly, it's time for the final touches. Erase any unnecessary guide lines and adjust any proportions or details that need refining. If you'd like to outline your chook drawing with a black pen, now is the time to do so. This step is optional but can add a neat finishing touch to your artwork.
And there you have it! You've successfully drawn a chook. Don't forget to step back and admire your creation – you've done a fantastic job!
Conclusion
In this tutorial, we've explored the step-by-step process of drawing a chook. Starting with basic shapes, adding details, incorporating feather patterns, refining the drawing, and adding shading and texture, we've covered all the necessary steps to create a delightful chook illustration. Remember, practice makes perfect, so don't hesitate to experiment with different poses or expressions for your chook. Keep honing your drawing skills, and before you know it, you'll be creating beautiful chook illustrations with ease.
Now, grab your pencils and get ready to let your creativity soar as you draw your very own chook masterpiece!
Fun Facts About Chook
- The term "chook" is an Australian and New Zealand slang word for a chicken, commonly used in casual conversation.
- Chooks are descendants of the red junglefowl, which was first domesticated over 8,000 years ago in Southeast Asia.
- Chooks have excellent color vision and can see ultraviolet light, which helps them find food and recognize other chickens.
- Despite their small brains, chooks are capable of complex social behaviors and can remember over 100 individual chickens.
- Chooks communicate with more than 30 different vocalizations to express emotions like alarm, contentment, or hunger.
- In art, chooks have symbolized fertility, domesticity, and simplicity across many cultures for centuries.
- Chooks can run at speeds up to 9 miles per hour to escape predators.
- The average chook lays about 250 to 300 eggs per year, depending on the breed and environment.
Suggestions for Scenes and Settings for Chook Drawings
- [A playful chook exploring a sunny farm](https://yonderoo.com/how-to-draw-a-farm/)yard with scattered hay and a rustic wooden fence in the background.
- A mother chook surrounded by fluffy chicks, nestled comfortably in a cozy nest of straw.
- A cartoonish chook wearing a tiny farmer's hat, standing proudly next to a basket of colorful eggs.
- A realistic chook perched on a tree branch with autumn leaves gently falling around it.
- A curious chook pecking at the ground in a lush garden filled with blooming flowers and vegetables.
- A dynamic scene of a chook mid-flight, wings extended, against a bright blue sky with soft clouds.
- A chook standing under a vintage barn lantern in the twilight, with warm glowing light casting gentle shadows.
- A whimsical setting where a chook is reading a tiny book beside a miniature teapot and cup on a picnic blanket.
- A chook family crossing a quaint country road with rolling hills and a distant farmhouse in the background.
- A close-up portrait of a chook's expressive eye and detailed feathers, focusing on texture and shading.
Fun Facts About Chook
- The term "chook" is an Australian and New Zealand slang word for a chicken, commonly used in casual conversation.
- Chooks are descendants of the red junglefowl, which was first domesticated over 8,000 years ago in Southeast Asia.
- Chooks have excellent color vision and can see ultraviolet light, which helps them find food and recognize other chickens.
- Despite their small brains, chooks are capable of complex social behaviors and can remember over 100 individual chickens.
- Chooks communicate with more than 30 different vocalizations to express emotions like alarm, contentment, or hunger.
- In art, chooks have symbolized fertility, domesticity, and simplicity across many cultures for centuries.
- Chooks can run at speeds up to 9 miles per hour to escape predators.
- The average chook lays about 250 to 300 eggs per year, depending on the breed and environment.
Suggestions for Scenes and Settings for Chook Drawings
- [A playful chook exploring a sunny farm](https://yonderoo.com/how-to-draw-a-farm/)yard with scattered hay and a rustic wooden fence in the background.
- [A mother chook surrounded by fluffy chicks](https://yonderoo.com/how-to-draw-a-baby-chick/), nestled comfortably in a cozy nest of straw.
- A cartoonish chook wearing a tiny farmer's hat, standing proudly next to a basket of colorful eggs.
- A realistic chook perched on a tree branch with autumn leaves gently falling around it.
- A curious chook pecking at the ground in a lush garden filled with blooming flowers and vegetables.
- A dynamic scene of a chook mid-flight, wings extended, against a bright blue sky with soft clouds.
- A chook standing under a vintage barn lantern in the twilight, with warm glowing light casting gentle shadows.
- A whimsical setting where a chook is reading a tiny book beside a miniature teapot and cup on a picnic blanket.
- A chook family crossing a quaint country road with rolling hills and a distant farmhouse in the background.
- A close-up portrait of a chook's expressive eye and detailed feathers, focusing on texture and shading.