Welcome to this step-by-step guide on how to draw a cartoon person. Whether you’re an aspiring artist or just looking to have some fun, this tutorial will teach you the basics of creating your very own cartoon character. By following these easy instructions, you’ll be able to bring your imagination to life on paper. So, grab your drawing supplies and let’s get started!
Materials Required
Before we dive into the drawing process, let’s gather the materials you’ll need:
- Paper: Any type of paper will work, but a sketchbook or drawing pad is recommended for ease of use.
- Pencil: Use a regular pencil with a medium lead for sketching.
- Eraser: Have a good quality eraser on hand to correct any mistakes.
- Fine-tip marker or pen: This will be used for outlining and finalizing your drawing.
- Colored pencils or markers (optional): If you want to add color to your cartoon person, have some colored pencils or markers ready.
Now that you have everything you need, let’s start creating our cartoon person!
Step 1: Head and Body
Start by drawing a circle for the head. This will act as a guide for the proportions of the face. Then, draw a rectangular shape below the head for the body. The size and shape of the head and body can vary depending on the style of cartoon person you want to create. Feel free to experiment and let your creativity flow!
Step 2: Facial Features
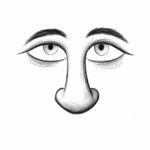
Next, let’s add some facial features to our cartoon person. Draw two large circles within the head for the eyes. Inside each eye, draw a smaller circle for the pupils. Add eyebrows above the eyes to give your character expression. Then, draw a small curved line for the nose, and a simple curved line for the mouth. Again, the style and shape of these features can be customized to your liking.
Step 3: Hair
Now, let’s give our cartoon person some hair. Feel free to get creative with different hairstyles and textures. You can draw spikey hair, long flowing hair, or any other style you can imagine. Remember to use simple and exaggerated shapes to maintain the cartoonish look.
Step 4: Clothing
To give your cartoon person some style, add clothing to the body. Draw basic shapes to represent a shirt, pants, or a dress. You can also add accessories like hats, scarves, or sunglasses to add personality to your character. Remember to keep the shapes and lines simple and clean.
Step 5: Limbs and Hands
Now, let’s add some limbs to our cartoon person. Draw simple lines extending from the body to represent the arms and legs. To create the hands, draw circular shapes at the end of the arms. These can be simplified versions of hands with just a few lines to represent the fingers.
Step 6: Feet
Lastly, let’s draw the feet of our cartoon person. Again, keep the shapes simple and exaggerated. Draw small oval shapes at the end of the legs to represent the feet. You can add some basic lines to suggest shoes or leave them as simple shapes.
Conclusion
Congratulations! You have successfully learned how to draw a cartoon person. By following these step-by-step instructions, you can create your own unique characters with ease. Remember, practice makes perfect, so don’t be afraid to experiment and try different styles and poses. With time, you’ll develop your own signature style and create amazing cartoon characters. So, grab your pencil, let your imagination run wild, and start drawing!