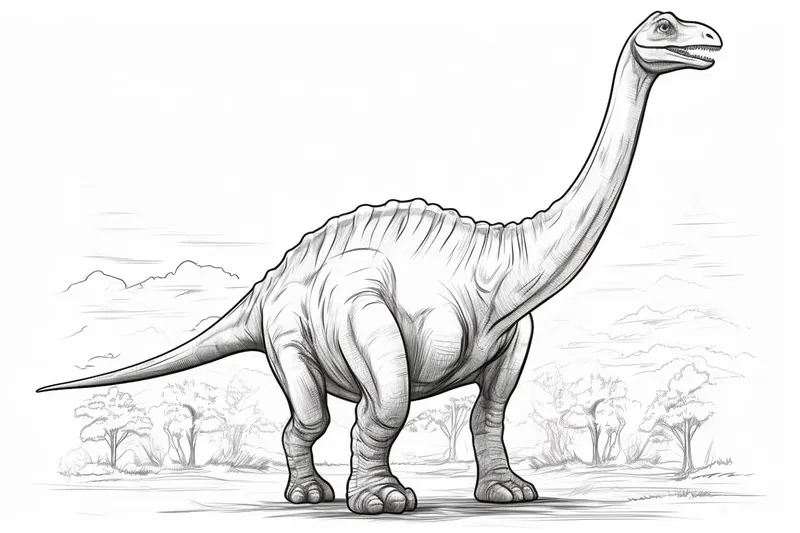
How to Draw a Brachiosaurus
Learn how to draw a Brachiosaurus with this step-by-step tutorial. Create a realistic representation of this ancient creature using simple instructions and your artistic skills.
Materials You'll Need
- Pencil
- Paper
- Eraser
Welcome to this comprehensive tutorial on how to draw a brachiosaurus, one of the most fascinating and iconic dinosaurs from the Jurassic period. Known for its extraordinarily long neck and massive body, the brachiosaurus stands out among prehistoric creatures, making it a captivating subject for artists interested in natural history and paleontology. Drawing this gentle giant allows you to explore unique anatomical features, such as its towering stance and distinctive limb proportions, which differ significantly from other dinosaurs.Whether you are a beginner eager to practice your sketching skills or an experienced artist looking to refine your technique, this tutorial will guide you through each step with clear instructions and helpful tips. Learning how to draw a brachiosaurus involves understanding basic shapes and proportions, as well as incorporating shading to convey the texture and volume of this magnificent creature. By breaking down its complex form into manageable parts, you will build confidence and improve your observational drawing abilities.So, gather your drawing tools and prepare to bring this prehistoric giant to life on paper. With patience and practice, you'll not only create an impressive artwork but also gain a deeper appreciation for the natural world's incredible diversity. Let's embark on this artistic journey together and discover just how rewarding it can be to learn how to draw a brachiosaurus!
Materials Required
Before we begin, make sure you have the following materials ready:
- Pencil: Preferably a medium or soft graphite pencil for sketching and shading.
- Eraser: A kneaded eraser is ideal for removing any mistakes or stray lines without damaging the paper.
- Paper: Choose a smooth and sturdy paper that can handle pencil work well. A drawing pad or sketchbook is suitable for this purpose.
- Reference Image: Having a reference image of a Brachiosaurus on hand is always helpful. You can find pictures online or in books to inspire your drawing.
Now that you have all your materials ready let's begin drawing a Brachiosaurus!
Step 1: Basic Shapes and Proportions
Start by lightly sketching the basic shapes and proportions of the Brachiosaurus. Begin with a large oval shape for the body, followed by a smaller oval for the head. Connect these two shapes with a long and slightly curved neck. Add a smaller oval at the end of the neck for the tail. Remember to keep your lines light so you can easily make changes as you progress.
Step 2: Outline the Body
Using the basic shapes as a guide, start outlining the main body of the Brachiosaurus. Define the curvature of the neck and body, making sure to capture its characteristic hump. Draw long and curved lines to outline the shape of the neck and back, gradually tapering it to the tail. Add another curved line to represent the underside of the body.
Step 3: Sketch the Head and Neck
Focus on the head and neck of the Brachiosaurus in this step. Refine the shape of the head, taking note of its elongated snout and eye placement. Add details such as the nostrils, mouth, and eye. Next, add texture to the neck by sketching small scales or bumps along its surface. Keep referring to your reference image to ensure accuracy.
Step 4: Draw the Legs and Feet
Now let's move on to drawing the legs and feet of the Brachiosaurus. Start by sketching the front leg closest to you. Break down the leg into basic shapes, such as cylinders and rectangles, representing the different sections of the leg. Pay attention to the proportions and angles. Repeat the same process for the other legs, considering that the back legs will appear smaller due to perspective.
Step 5: Refine the Details
Tip: As you work through your drawing of the Brachiosaurus, take frequent breaks to step back and view your artwork from a distance; this perspective can help you spot any proportion issues or areas needing refinement that might not be obvious up close. Additionally, using a mirror to flip your image can provide a fresh view and highlight areas for improvement, enhancing your overall composition and accuracy.
In this step, focus on adding more details and refining the overall appearance of the Brachiosaurus. Add scales or wrinkles to the body and limbs, making sure to follow the natural contours and anatomy of the dinosaur. Pay close attention to the joints and connections between different body parts. Refine the shapes of the legs and feet, adding more depth and definition.
Step 6: Shading and Texture
To add depth and dimension to your drawing, it's time to incorporate shading and texture. Study your reference image to identify areas of highlights and shadows on the Brachiosaurus. Use your pencil to lightly shade these areas, gradually building up layers for a realistic effect. Pay attention to the direction of light source to make the shading consistent throughout the drawing. Add texture to the skin by using small strokes to represent scales or wrinkles.
Step 7: Final Details
Now that your drawing is almost complete take a step back and assess the overall composition. Make any necessary adjustments to ensure the proportions and details are accurate. Use your eraser to remove any stray lines or streaks. Add any additional details, such as a background or foliage, to enhance the overall presentation of your Brachiosaurus drawing.
Conclusion
Congratulations! You have successfully learned how to draw a Brachiosaurus. Following these step-by-step instructions and utilizing your artistic skills, you have created a detailed and realistic representation of this magnificent dinosaur. Remember to practice regularly and explore different techniques to enhance your drawing abilities further. With dedication and perseverance, you will continue to improve and master the art of drawing. Enjoy the process, and have fun creating your own prehistoric world!
Fun Facts About the Brachiosaurus
- The Brachiosaurus had longer front legs than hind legs, giving it a distinctive upright posture.
- It is one of the tallest dinosaurs, with necks that could reach up to 40 feet in length.
- Brachiosaurus lived during the Late Jurassic period, approximately 154 to 150 million years ago.
- Unlike many other sauropods, Brachiosaurus had a large nasal opening on top of its head.
- Its name means "arm lizard" because its forelimbs were longer than its hind limbs.
- Brachiosaurus was a herbivore, feeding mainly on conifers, ginkgoes, and cycads.
- Its unique body shape allowed it to reach high vegetation that other dinosaurs could not access.
- Fossils of Brachiosaurus have been found primarily in North America and Africa.
Suggestions for Scenes and Settings for Brachiosaurus Drawings
- A Brachiosaurus reaching high into the treetops of a dense Jurassic forest to eat lush foliage.
- A peaceful herd of Brachiosauruses drinking from a prehistoric river with volcanoes in the background.
- A young Brachiosaurus learning to balance its long neck while surrounded by smaller dinosaurs.
- A dramatic sunset scene where a Brachiosaurus casts a long shadow across an open plain.
- A close-up study of the textured skin and scales of a Brachiosaurus in natural sunlight.
- A Brachiosaurus standing next to ancient giant cycads and ferns, highlighting its immense size.
- An adventurous scene showing a Brachiosaurus crossing a shallow swamp with ripples in the water.
- A night scene with a Brachiosaurus silhouetted against a starry sky and distant meteor shower.
- A playful interaction between a Brachiosaurus and smaller flying pterosaurs in a prehistoric landscape.
- A seasonal setting, such as a Brachiosaurus in a misty early morning with dew-covered plants around.