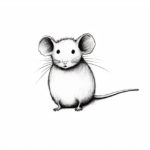
Do you love Beanie Boos? These adorable plush toys have captured the hearts of many with their big shiny eyes and cuddly designs. If you’re a fan, why not learn how to draw a Beanie Boo? In this step-by-step guide, we’ll walk you through the process of creating a cute and lifelike Beanie Boo drawing. So grab your pencils and let’s get started!
Materials Required
To begin your Beanie Boo drawing, gather the following materials:
- Sketchbook or drawing paper
- Pencils of different grades (HB, 2B, 4B)
- Eraser
- Fine-tip black marker
- Coloring tools (colored pencils, markers, or watercolors)
- Reference photo of your favorite Beanie Boo
Now that you have everything you need, let’s jump into the drawing process!
Step 1: Start with Basic Shapes
Begin by lightly sketching the basic shapes of your Beanie Boo. Start with a circle for the head and a larger oval shape for the body. Remember to keep your lines light and loose, as these are just guidelines for your drawing.
Step 2: Add Facial Features
Next, let’s add the facial features of your Beanie Boo. Create two large oval shapes for the eyes, leaving some space in between. Inside each eye, draw smaller circles for the pupils. Then, add a small triangular shape for the nose, and a curved line below it for the mouth. Don’t forget to include the signature glittery Beanie Boo eyes!
Step 3: Develop the Head and Ears
Now that the facial features are in place, start shaping the head. Use light, curved lines to connect the features and define the roundness of the head. Extend the top of the head to create the ears. Beanie Boos often have floppy ears, so you can make them droop down or add a slight curve for a cute effect.
Step 4: Refine the Body and Limbs
Continue refining your Beanie Boo by adding more details to the body and limbs. Use curved lines to define the shape of the body, keeping it soft and cuddly. Add short, stubby arms and legs, emphasizing their roundness. Remember to include any unique markings or patterns that your chosen Beanie Boo may have.
Step 5: Enhance the Facial Expression
To make your Beanie Boo drawing come to life, focus on enhancing the facial expression. Add eyelashes to the eyes, giving them a fluttery look. Use a darker pencil to shade around the eyes, creating depth and dimension. Add blush marks on the cheeks to give your Beanie Boo a rosy and sweet appearance.
Step 6: Finalize the Outline
With the main features and details in place, it’s time to finalize the outline of your Beanie Boo drawing. Carefully go over your sketch, using a fine-tip black marker or pen to trace the lines you want to keep. Erase any unnecessary pencil marks to clean up your drawing and create a polished look.
Step 7: Add Color and Texture
Now comes the fun part – adding color to your Beanie Boo drawing! Use colored pencils, markers, or watercolors to bring your creation to life. Refer to a reference photo to accurately choose and apply the right colors. Be creative and experiment with different shading techniques to add texture and depth to your drawing.
Step 8: Add Final Details
To add the finishing touches, zoom in on your Beanie Boo and add any final details. Pay attention to small features like fur texture, stitches, or embroidery on the toy. Take your time and be patient as you add these tiny details, as they will greatly contribute to the overall realism of your drawing.
Conclusion
Congratulations on completing your Beanie Boo drawing! By following these step-by-step instructions, you’ve created your very own cute and lifelike Beanie Boo artwork. Remember to have fun and enjoy the process of drawing. With practice, you’ll be able to capture the essence of these adorable plush toys in your own unique style. Keep exploring and experimenting, and don’t forget to share your creations with others who also love Beanie Boos!