Creating a captivating mountain range on paper is not just an artistic endeavor; it’s an experience that can bring a sense of peace and achievement. Imagine the grandeur of towering peaks, the play of light and shadow across rugged cliffs, and the serene beauty of a landscape that seems to stretch infinitely. Whether you are a seasoned artist or just starting out, capturing this natural wonder can be both fulfilling and enjoyable.
This step-by-step guide is designed to equip you with the skills and techniques needed to draw stunning mountain ranges. We will begin by outlining the essential materials to gather, ensuring you have everything you need for a smooth drawing process. From selecting the right type of paper and pencils to picking inspiring reference images, we’ve got you covered. With clear instructions and tips along the way, you’re sure to create a breathtaking piece of art.
As we progress through the stages of the drawing process, you’ll learn how to establish your composition, add depth and texture, and refine your work to perfection. Each step is crafted to build upon the last, allowing you to develop your artistic skills while exploring the beauty of mountain landscapes. Let’s embark on this creative journey together and unlock the artist within you!
Materials Required
Before we dive into the steps, let’s gather the materials you will need for this drawing:
- Drawing paper: Choose a heavyweight paper that can handle various drawing techniques, such as charcoal or pencil.
- Pencils: Get a range of pencils with different degrees of hardness, such as HB, 2B, and 4B. These will allow you to create different shades and textures.
- Erasers: Have both a kneaded eraser and a soft eraser handy. The kneaded eraser can be shaped and used for more precise corrections, while the soft eraser is ideal for larger areas.
- Blending tools: Consider using blending stumps, tortillons, or even a cotton swab to help blend and soften your pencil marks.
- Charcoal (optional): If you prefer working with charcoal, make sure to have different grades of charcoal sticks and some paper towels for blending.
- Reference images: Find some inspiring images of mountain ranges that you can use as references. These can be found online or in books.
Now that you have all the necessary materials, let’s get started on drawing a mountain range!
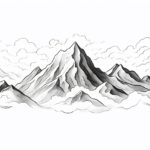
Step 1: Sketch the Basic Outline
Begin by lightly sketching the basic outline of your mountain range using a pencil. Start with a straight or slightly curved line to represent the horizon. Then, use gentle curved lines to outline the peaks and valleys of the mountains. Remember, mountains are not usually symmetrical, so vary the height and shape of each peak to create a more natural look.
Step 2: Add Detail to the Foreground Mountains
Focus on the foreground mountains first. Start by adding more definition to their shapes. Use shorter, overlapping lines to indicate rocks and ridges. Gradually darken the lines to create depth and dimension. Remember to keep your pencil strokes light and loose at this stage, as you can refine them later.
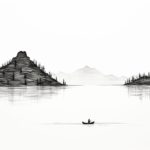
Step 3: Establish the Midground and Background Mountains
Move on to the midground and background mountains. These mountains will appear smaller and less detailed as they recede into the distance. Use lighter pencil pressure and less detail to suggest distance. You can also create atmospheric perspective by making the mountains in the background appear lighter or more blurred compared to the ones in the foreground.
Step 4: Add Texture and Detail
To make your mountain range look more realistic, add texture and detail. Start by using varying line weights to represent the different textures of rocks, cliffs, and vegetation. Experiment with hatching, cross-hatching, and stippling techniques to create different effects. Use lighter, shorter strokes for smoother surfaces and darker, longer strokes for rougher areas.
Step 5: Create Shadows and Highlights
Shadows and highlights play a crucial role in creating depth and volume in your drawing. Identify a light source in your composition, and then determine the areas that would be in shadow and those that would catch the light. Use a darker pencil or charcoal to shade the shadowed areas, and a kneaded eraser to lift or soften the highlights. Blend the shaded areas gently with a blending tool to achieve a more gradual transition between light and dark.
Step 6: Refine and Adjust
Take a step back and assess your drawing so far. Look for any areas that require adjustment or refinement. Use your erasers to lighten or remove any stray marks, and your pencils to darken or add more details if necessary. Don’t be afraid to make changes and experiment with different techniques until you are satisfied with the overall result.
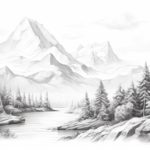
Step 7: Final Touches
Once you are happy with your mountain range, add any final touches to enhance the realism or atmosphere of your drawing. You can add trees, rivers, or other elements to the scene to create more visual interest. Pay attention to the small details and textures that make your mountains come to life.
Conclusion
Congratulations on completing your journey to learn how to draw a mountain range! By following this step-by-step guide, you have acquired the skills to create beautiful natural landscapes on paper. Remember to practice regularly and experiment with different techniques to further develop your artistic abilities. Whether you choose to frame and display your artwork or simply enjoy the process, drawing mountain ranges can be a truly rewarding experience.