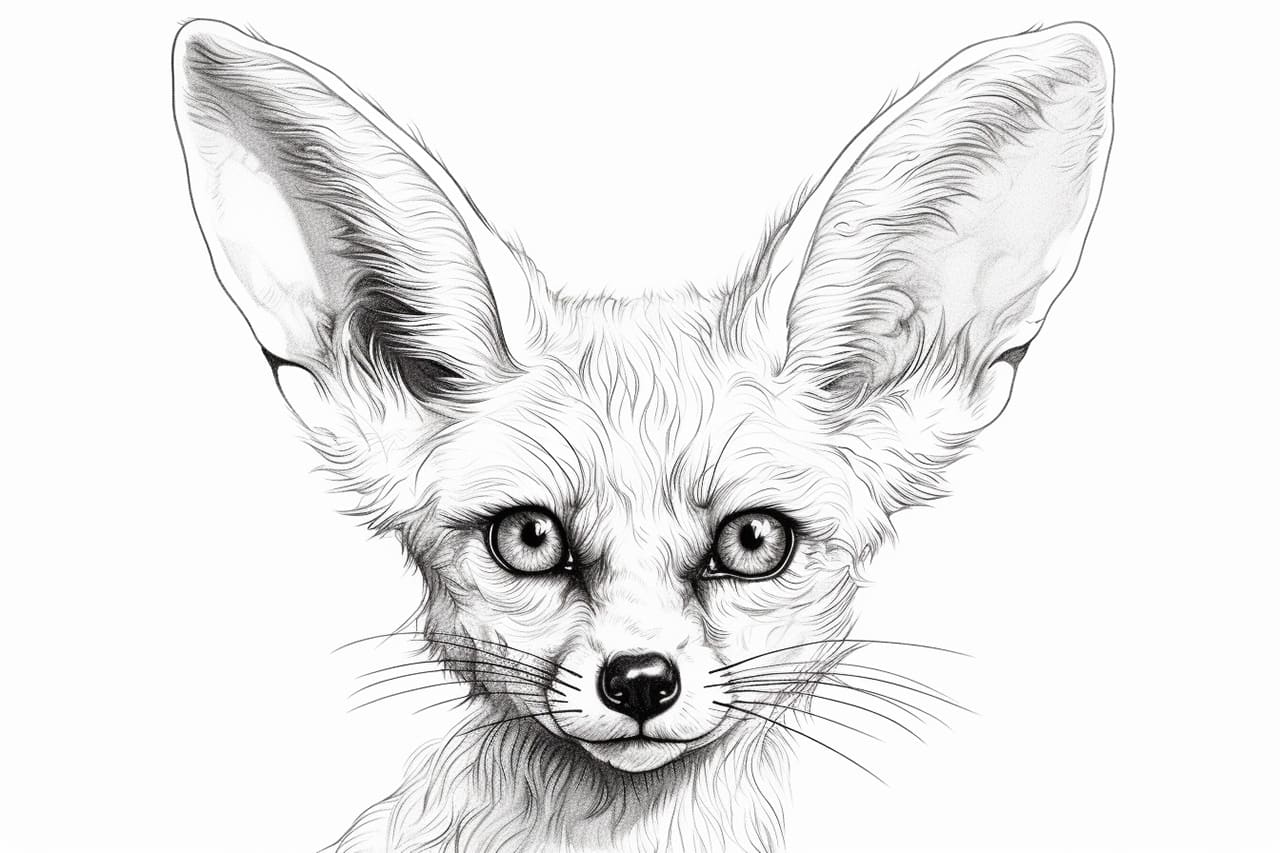
Welcome to an exciting journey into the world of wildlife art! In this step-by-step tutorial, we will explore how to draw a fennec fox on paper. These enchanting creatures are instantly recognizable thanks to their large, expressive ears and captivating eyes, making them a delightful subject for any artist.
As we delve into this drawing guide, you’ll discover not just the techniques to outline and shade a fennec fox, but also ways to capture its unique charm and personality. Drawing can be a wonderfully relaxing experience, and by following this guide, you will build your skills and confidence in representing the beauty of nature.
So, gather your pencils and drawing materials, and prepare to embark on this creative adventure with me. Let’s unleash our artistic talents and create a stunning depiction of these adorable foxes together!
Materials Required
Before we begin, make sure you have the following materials ready:
- Pencils (HB, 2B, 4B)
- Eraser
- Sharpener
- Drawing paper
- Reference image of a fennec fox
Having these materials at hand will ensure that you are well-equipped to create a beautiful and accurate representation of a fennec fox.
Step 1: Basic Shapes
To start, we will draw the basic shapes that will serve as the foundation for our fennec fox drawing. Begin by lightly sketching a circle for the head and a smaller circle for the body. Then, add an oval shape for the snout and two triangular shapes for the ears. These shapes will act as a guide for the proportions and positioning of the fox’s features.
Step 2: Detailing the Face
Next, let’s focus on the face of our fox. Using the basic shapes as a guide, start adding the details. Sketch the eyes by drawing two almond-shaped ovals, then add a smaller circle inside each eye for the pupils. Don’t forget to leave a small white highlight in each eye to give it a lifelike appearance.
Once the eyes are complete, draw a triangular shape for the nose, and add a curved line below it for the mouth. Fennec foxes have a distinct black nose and a wide mouth that extends to the sides of their face. Take your time to ensure that these features are accurately depicted.
Step 3: Ears and Fur
Now that we have the facial features in place, let’s move on to the ears and fur of our fennec fox. Start by drawing the detailed shape of the ears, paying attention to the unique curves and points. Fennec foxes’ ears are large and triangular, with a furry texture. Make sure to add some fur details within the ears to enhance their realistic appearance.
Once the ears are complete, start adding fur texture to the head and body. Use short, quick strokes with your pencil to mimic the soft fur of the fox. Pay attention to the direction of the fur, which typically radiates from the center of the face and flows downwards. Take your time with this step, as the fur details will greatly contribute to the lifelike quality of your drawing.
Step 4: Body and Tail
Moving on to the body and tail, start by outlining the shape of the fox’s body. Fennec foxes have a slender and elongated body, so keep that in mind as you sketch the contours. Once the body is complete, add some details such as the front legs and paws, as well as the fluffy tail.
To create a sense of depth and dimension, add shadows to the body and tail. This can be done by applying slightly darker pencil strokes along the areas that would naturally be in shadow, such as the underside of the body and the base of the tail. Gradually build up these shadows, blending them softly with your pencil or using a blending stump.
Step 5: Final Details and Refinement
Now that the main elements of your fennec fox drawing are complete, it’s time to add the final details and refine your work. Take a step back and evaluate your drawing, looking for any areas that may need adjustments or corrections.
Pay attention to the overall proportions, ensuring that the ears, eyes, and other features are in harmony with the rest of the drawing. Add any additional fur details or fine lines that will contribute to the realism of your artwork. Take your time to refine and enhance the drawing until you are satisfied with the result.
Conclusion
Congratulations on completing your fennec fox drawing! By following this step-by-step guide, you have learned how to create a realistic and detailed representation of these adorable creatures. Remember to have fun and experiment with different techniques as you continue to develop your artistic skills.
Drawing animals can be a fulfilling and enjoyable experience, allowing you to express your creativity while capturing the beauty of nature. With practice and patience, you will be able to draw a wide range of animals, each with its own unique characteristics.
So keep honing your skills, and enjoy the process of creating stunning animal drawings, starting with this charming fennec fox. Happy drawing!