How to Draw a Zucchini
Learn how to draw a zucchini with this step-by-step tutorial. Create a realistic and vibrant zucchini drawing using simple techniques. Perfect for beginners and experienced artists.
Materials You'll Need
- Pencil
- Paper
- Eraser
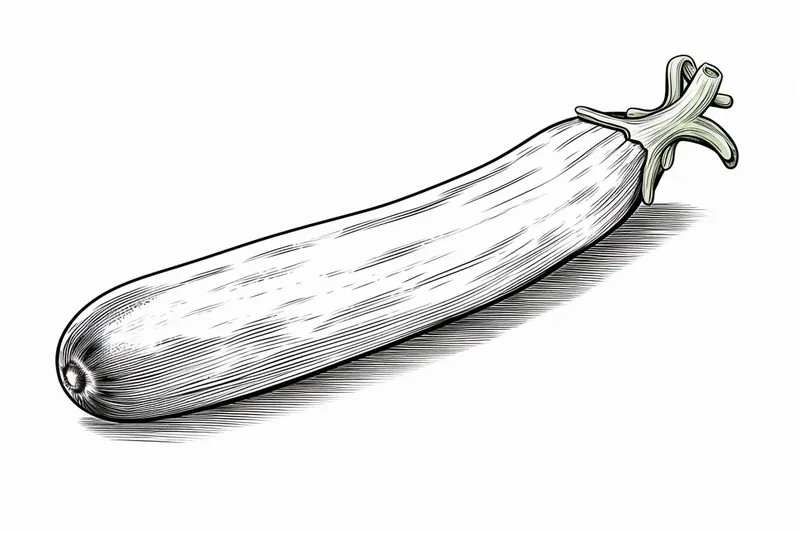
Zucchini, with its smooth curves and vibrant green skin, is not only a staple in kitchens around the world but also a fantastic subject for artists who want to practice drawing organic forms. Known for its elongated shape and subtle textural details, zucchini offers a blend of simplicity and challenge, making it ideal for artists at any level. By learning how to draw a zucchini, you'll gain experience in capturing natural proportions, rendering gradients of color, and experimenting with light and shadow on a three-dimensional object.
People may choose to draw zucchini for a variety of reasons: perhaps you're working on a botanical illustration, creating a food-themed art piece, or simply looking to enhance your still-life drawing skills. This tutorial is suitable for beginners who want to master basic shapes and shading, as well as for more advanced artists seeking to refine their observation and rendering techniques. We will guide you through each stage—from sketching the outline to layering in realistic shading and highlights—making the process approachable and enjoyable.
Whether you're drawing for fun, for school, or as part of a larger artwork, tackling a subject like zucchini helps build your confidence in drawing natural objects. Don't worry if it seems tricky at first—every artist improves with practice. So, gather your drawing tools, follow along with this detailed tutorial on how to draw a zucchini, and let yourself enjoy the creative journey. Remember, the joy of drawing lies not just in the final image, but in the process of observation and expression. Let's get started!
Materials Required
Before we begin, gather the following materials:
- Drawing paper
- Pencil
- Eraser
- Sharpener
- Drawing pens or fine liner markers
- Colored pencils or watercolor paints (optional)
Now that you have your materials ready, let's begin our zucchini drawing!
Step 1: Basic Shape
Start by sketching an oval shape for the body of the zucchini. This will serve as the base for your drawing. Take your time to ensure the proportions are accurate. Keep your pencil light and loose, as we will be refining the shape in the following steps.
Step 2: Adding Details
Next, add the stem and the blossom end to your zucchini. The stem is a curved line that extends from the top of the oval shape, while the blossom end is a smaller oval shape at the bottom. These details will give your zucchini drawing a more realistic appearance.
Step 3: Refining the Shape
Now it's time to refine the shape of your zucchini. Use your pencil to carefully smooth out any rough lines and adjust the proportions as needed. Pay close attention to the curves and contours of the vegetable, as this will make your drawing more lifelike.
Step 4: Outlining
Once you are satisfied with the shape, it's time to outline your zucchini drawing. Go over your pencil sketch with a pen or fine liner marker, making bold, confident lines. Start with the main outline of the zucchini body, then add the stem and blossom end. This will give your drawing a more defined and finished look.
Step 5: Shading
To add depth and dimension to your zucchini drawing, let's move on to shading. Start by determining the direction of the light source. This will help you create realistic shadows and highlights. Shade the sides of the zucchini, making the areas closer to the light source lighter and the areas farther away darker.
Step 6: Adding Texture
Zucchinis have a unique texture with subtle bumps and ridges. To capture this texture in your drawing, lightly sketch lines or small curves along the surface of the zucchini. Pay attention to the natural curves and contours, and use a light touch to avoid making the texture too harsh.
Step 7: Refining the Details
Now it's time to refine the details of your zucchini drawing. Use your pen or fine liner marker to outline the texture lines you sketched in the previous step. Be careful not to make the lines too thick or heavy, as we want to maintain a level of realism. Add any additional details, such as creases or small imperfections, to make your drawing more authentic.
Step 8: Color (Optional)
If you would like to add color to your zucchini drawing, now is the time to do so. You can use colored pencils or watercolor paints to bring your zucchini to life. Start by applying a light base color and gradually build up the layers to create depth and variation. Pay attention to the natural color of a zucchini, which is a vibrant green with hints of yellow.
Tip: To effectively capture the smooth, organic shape of a zucchini, start by lightly sketching its basic outline using a soft pencil, such as a 2B or 4B, to allow for easy adjustments. Focus on the gentle curves and tapered ends, ensuring that the proportions feel natural. Once you're satisfied with the shape, use a blending stump or your fingertip to softly smudge the pencil lines where shadows occur, particularly along the bottom and under the curves, to create depth. For color, utilize colored pencils or watercolors to layer shades of green, starting with a base layer and gradually adding darker tones to emphasize shadows and lighter highlights where light hits the surface. Don't forget to observe the zucchini in real life or from good reference photos, as this will help you notice subtle variations in color and texture that will make your drawing come alive!
Conclusion
Congratulations on completing your zucchini drawing! By following these step-by-step instructions, you have learned how to create a realistic and detailed representation of a zucchini. Remember to take your time, practice, and enjoy the process of drawing. With each drawing you create, your skills will continue to grow. So keep exploring different subjects and techniques, and don't be afraid to experiment. Happy drawing!
Fun Facts About Zucchini
- Zucchini is technically a fruit, not a vegetable, because it develops from the flower of the plant.
- The largest zucchini ever grown weighed over 65 pounds, according to the Guinness World Records.
- Zucchini flowers are edible and considered a delicacy in many cuisines.
- One medium zucchini has more potassium than a banana.
- Zucchini originated in the Americas but was developed into its modern form in Italy.
- The word "zucchini" comes from the Italian word "zucchino," meaning a small squash.
- Zucchini can be eaten raw, cooked, or even baked into desserts like zucchini bread.
- National Zucchini Bread Day is celebrated on April 25 in the United States.
- Young, small zucchinis are often more tender and flavorful than larger ones.
Suggestions for Scenes and Settings for Zucchini Drawings
- A close-up botanical study of a zucchini on the vine, surrounded by large, textured leaves and a yellow blossom.
- A rustic kitchen scene with a basket of zucchinis alongside other fresh vegetables on a wooden countertop.
- A whimsical garden still life featuring zucchinis of various sizes nestled among marigolds and sunflowers.
- A sliced zucchini on a cutting board, showing the inner texture and seeds, with a chef's knife nearby.
- A market stall display with zucchinis piled in crates, capturing the lively atmosphere of a farmer's market.
- A zucchini resting on a patterned tablecloth in bright sunlight, casting interesting shadows and highlights.
- A playful composition of zucchinis arranged to resemble musical instruments or abstract shapes.
- Zucchinis being grilled outdoors at a summer picnic, with smoke and grill marks adding texture to the scene.
- An imaginative scene where zucchinis become miniature boats floating down a stream, complete with tiny passengers.
- A classic still life with zucchinis, a jug of water, and a loaf of bread in the style of traditional Dutch painters.