How to Draw a Video Game Controller
Learn how to draw a video game controller in this step-by-step tutorial. Follow the clear and concise instructions to create your own gaming artwork.
Materials You'll Need
- Pencil
- Paper
- Eraser
Video game controllers are more than just tools for gameplay—they are iconic symbols that represent the world of interactive entertainment and creativity. From classic consoles to the latest systems, controllers come in various shapes and designs, each with its own personality and history. Learning how to draw a video game controller allows you to celebrate your favorite gaming memories, create fan art, or even design your own unique controller concepts. Whether you're passionate about gaming culture or simply want to add a fun, recognizable object to your sketchbook, this tutorial is a fantastic starting point.
In this step-by-step guide, we'll break down the process of drawing a video game controller into easy-to-follow instructions suitable for artists of all skill levels. We'll cover basic shapes, proportions, and details such as buttons and joysticks, making it approachable even for beginners. If you're eager to improve your drawing skills or learn how to draw everyday objects with more confidence, tackling a controller is a great exercise in symmetry and precision. By the end of this tutorial, you'll know exactly how to draw a video game controller and will have developed valuable techniques you can use in your future art projects.
Remember, every artist starts somewhere, and each drawing is an opportunity to grow and express yourself. So grab your pencil, gather your materials, and let's embark on this creative adventure together. With a bit of patience and practice, you'll be amazed at what you can achieve. Let's get started!
Materials Required
Before we begin, make sure you have the following materials handy:
- A pencil
- Eraser
- Paper
- Ruler
- Colored pencils or markers (optional)
Now that we have our materials ready, let's dive into the step-by-step process of drawing a video game controller.
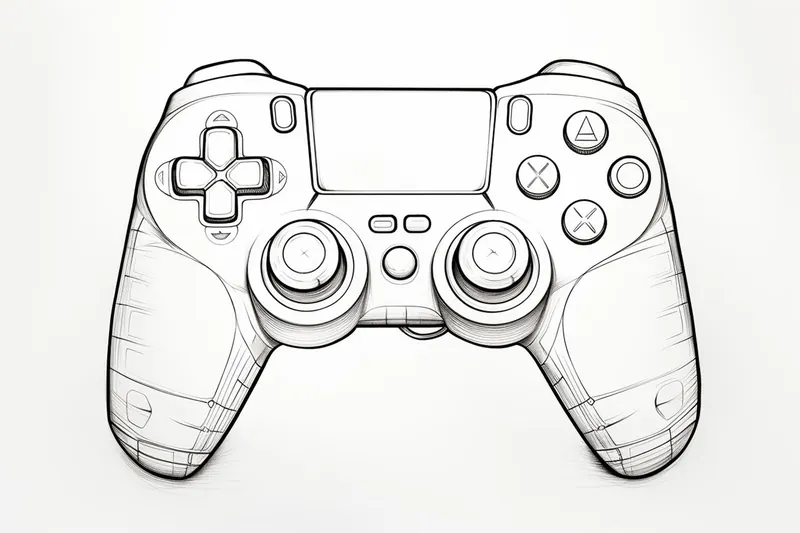
Step 1: Basic Shape
Start by drawing a rectangular shape for the body of the controller. Use light and loose strokes to create a rough outline. Keep the proportions in mind to ensure a realistic representation.
Step 2: Button Placement
Using your ruler, divide the rectangular shape into equal sections for the buttons. Typically, video game controllers have various buttons and directional pads. Draw small circles or squares for the buttons and an arrow pad for the directional input.
Step 3: Joysticks
Next, draw two small circles on the top corners of the rectangular shape. These circles represent the joysticks. Make sure they are aligned properly and have equal spacing.
Step 4: Analog Sticks
Inside the circles drawn in the previous step, draw the analog sticks. They usually consist of a small circular top and a base connecting to the controller. Add some details to make them stand out.
Step 5: D-Pad
In the center of the directional pad, draw a small round button or a square-shaped D-pad with arrows pointing in different directions. Be mindful of the size and shape to maintain accuracy.
Step 6: Button Details
Add small circles or squares inside each of the button shapes to represent the actual buttons. Take your time to make them look visually appealing and proportionate.
Step 7: Textures and Patterns
To make your drawing more realistic, add textures and patterns to the buttons and the controller body. Use light shading or cross-hatch lines to create depth and dimension.
Step 8: Shadows and Highlights
Now it's time to add shadows and highlights to make your drawing pop. Imagine a light source and shade the areas that would be in shadow while leaving the areas exposed to light. This will create a sense of three-dimensionality.
Step 9: Clean Up
Tip: As you draw your video game controller, consider using reference images from different angles to ensure accuracy in proportions and details, especially for complex elements like buttons and joysticks. This practice not only helps with realism but also allows you to observe unique designs and features that can inspire your own creative twists on the controller design.
Carefully go over your drawing, erasing any unnecessary lines and smudges. Use a kneaded eraser to gently lift off any excess graphite. This step will give your drawing a clean and polished look.
Step 10: Coloring (Optional)
If you want to take your drawing to the next level, add some color! Use colored pencils or markers to bring your video game controller to life. Refer to reference images to accurately replicate the colors.
And there you have it! You have successfully drawn a video game controller. With practice, you can enhance your skills and tackle more complex drawings in the future.
Challenge: Try drawing a video game controller as part of an action-packed gaming scene—imagine hands gripping the controller, intense facial expressions, and maybe even a background showing a glowing TV or the chaos of an ongoing game. Challenge yourself to capture the energy and excitement of gameplay by including dynamic poses and thoughtful lighting. Pay attention to the way the hands interact with the controller, the reflections on the plastic, and the subtle details that make the scene feel alive. This is a fantastic opportunity to practice drawing human anatomy alongside objects, and to tell a story with your art—let your imagination run wild!
Conclusion
Congratulations on completing this step-by-step guide on how to draw a video game controller! By following the instructions outlined in this article, you've learned how to create a realistic representation of a gaming controller. Remember to be patient and practice regularly to improve your drawing skills. Have fun creating your own artwork inspired by your favorite video games!
Fun Facts About Video Game Controller
- The first commercially successful video game controller was the simple joystick used for the Atari 2600.
- The original Nintendo Entertainment System (NES) controller introduced the now-standard D-pad.
- Sony's PlayStation DualShock controller was the first to feature dual analog sticks and vibration feedback.
- The Xbox Adaptive Controller was designed to make gaming more accessible for players with disabilities.
- The Sega Dreamcast controller was the first to include a visual memory unit (VMU) that could display information and mini-games.
- Wireless controllers became mainstream with the release of the Nintendo WaveBird for GameCube in 2002.
- The Wii Remote introduced motion controls to a wide audience, revolutionizing gameplay.
- Modern controllers often include gyroscopes and accelerometers for motion sensing.
- Some controllers, like the Steam Controller, allow for complete button remapping and customization.
Suggestions for Scenes and Settings for Video Game Controller Drawings
- A controller resting on a pile of your favorite video game cases, with nostalgic game titles peeking out.
- Drawing hands gripping the controller in the midst of an intense gaming session, with motion lines to show excitement.
- A futuristic controller design floating in a sci-fi landscape, glowing with neon lights.
- A controller surrounded by classic pixel art characters leaping out as if escaping the screen.
- [[A "controller evolution" lineup, showing controllers from retro consoles to the latest models like Nintendo Switch, Xbox Series X](https://yonderoo.com/how-to-draw-an-xbox-series-x/), and Game Boy](https://yonderoo.com/how-to-draw-a-game-boy/).
- A controller being customized with stickers, paint, or unique button colors, showing off personal flair.
- A magical or fantasy setting where the controller is a mystical artifact on a pedestal in a temple.
- A controller tangled up in a swirl of game cables, snacks, and energy drinks for a "gamer's desk" vibe.
- A controller with buttons morphing into tiny planets or galaxies, representing different game worlds.
- A split scene: one side shows the controller, the other side reveals the in-game action it controls.