Welcome to this step-by-step guide on how to draw a tundra. In this tutorial, we will explore the art of creating a realistic and captivating representation of the cold and desolate landscapes found in tundras. Whether you are an experienced artist or just starting out, this guide will provide you with the knowledge and techniques to bring a tundra to life on paper.
Materials Required
Before we dive into the drawing process, let’s gather the necessary materials. Here’s what you’ll need:
- Drawing paper or sketchbook
- Pencils of various hardness (2H, HB, 2B, 4B, 6B)
- Eraser
- Blending stump or cotton swabs
- Tortillon or paper towel
- Pencil sharpener
- Reference images of tundras (optional, but recommended)
Once you have these materials ready, let’s start drawing!
Step 1: Sketch the General Outline
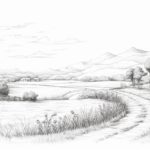
Begin by lightly sketching the basic outline of the tundra landscape using a 2H or HB pencil. Keep the lines loose and fluid, as we’ll refine them later. Pay attention to the overall shape of the tundra, with its rolling hills, barren trees, and vast open spaces. Do not worry too much about the fine details at this stage; focus on capturing the essence of the tundra.
Step 2: Add the Horizon Line
Draw a straight line across your paper to represent the horizon. This line will serve as a reference point for placing objects and determining the perspective of your drawing. Make sure it’s level and positioned at the desired height.
Step 3: Establish the Foreground and Background
Divide your drawing into foreground, middle ground, and background areas. The foreground will be the closest and most detailed part of your tundra, while the background will be more distant and less detailed. The middle ground will bridge the two, creating depth in your composition. Sketch these areas lightly, keeping in mind the perspective and proportions.
Step 4: Add Basic Elements
Start adding basic elements to your tundra, such as hills, rocks, and trees. Use reference images to help you get a sense of their shapes and forms. Keep the lines light and simple, focusing on capturing the overall silhouette of each element. Place them strategically within the different sections of your drawing, considering the composition and balance.
Step 5: Refine the Details
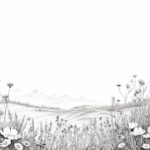
Now it’s time to add more detail to your tundra. Start by refining the shapes of the hills, rocks, and trees. Use a softer pencil (2B, 4B, or 6B) to create darker lines and shading. Pay attention to the texture of the terrain, adding small strokes and lines to mimic the uneven surfaces found in tundras. Take your time with this step, gradually building up the details.
Step 6: Create Depth with Shading
To create a sense of depth and volume in your tundra drawing, use shading techniques. Observe how the light falls on the landscape and determine the areas of light and shadow. Use the side of your pencil to create broad, soft strokes for lighter areas, and apply more pressure for darker shadows. Blend the shades together using a blending stump or a tortillon to achieve a smooth transition between the different values.
Step 7: Enhance the Texture
To add more realism to your tundra drawing, focus on enhancing the texture of the elements present. Use a combination of hatching and cross-hatching techniques to create the illusion of grass, moss, and snow on the ground. Vary the direction and density of your strokes to mimic the different textures found in tundras. This attention to detail will bring your drawing to life.
Step 8: Finalize the Drawing
Take a step back and evaluate your tundra drawing as a whole. Make any necessary adjustments to the composition, proportions, and details. Erase any remaining sketch lines that you no longer need. This is your opportunity to refine and polish your artwork before considering it complete.
Conclusion
Congratulations! You have successfully learned how to draw a tundra. By following these steps and incorporating your own creativity, you can create stunning tundra landscapes that capture the beauty and solitude of these unique environments. Remember to practice regularly and experiment with different techniques to further develop your skills as an artist.
With these skills, you can recreate the serene and awe-inspiring nature of tundras on paper and share your artistic vision with others. So grab your materials, find inspiration in the vastness of tundras, and start drawing!