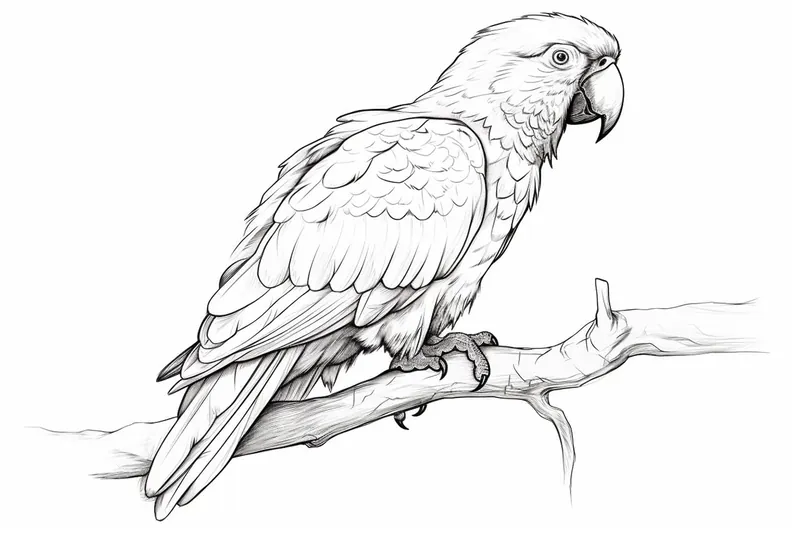
How to Draw a Parrot
Learn how to draw a parrot with this step-by-step tutorial. Discover the techniques to create a stunning parrot drawing and unleash your artistic skills.
Materials You'll Need
- Pencil
- Paper
- Eraser
Parrots are among the most vibrant and charismatic birds in the animal kingdom, known for their vivid feathers, playful personalities, and remarkable intelligence. With their colorful plumage and expressive features, parrots have inspired artists for centuries and make a fantastic subject for drawing. Learning how to draw a parrot not only allows you to explore a wide range of colors and textures, but also helps you practice capturing dynamic poses and intricate details, such as the bird's curved beak and striking eyes. Whether you are fascinated by wildlife art or simply looking for a fun and rewarding creative challenge, parrots offer endless inspiration.
This step-by-step tutorial is designed for artists of all skill levels, from complete beginners to more experienced illustrators seeking to refine their techniques. We will break down the drawing process into manageable stages, guiding you through sketching the basic shapes, refining the proportions, and adding vibrant color to bring your parrot to life. By following the instructions on how to draw a parrot, you'll develop your ability to observe, shade, and detail, all while building confidence in your artistic abilities. Drawing a parrot is a great way to practice patience and precision, as well as experiment with blending and layering colors for realistic effects.
Don't worry if you've never drawn a bird before—this guide is here to support you every step of the way. Remember, art is all about enjoying the creative process and expressing yourself, so take your time and don't be afraid to make mistakes. By the end of this tutorial, you'll have a beautiful parrot drawing to be proud of and new skills that you can use for future projects. Let's get started and unleash your creativity!
Materials Required
Before we get started, make sure you have the following materials:
- Drawing paper
- Pencil
- Eraser
- Colored pencils/markers (optional)
Now that you have everything you need, let's begin!
Step 1: Outline the Body
Start by drawing a small oval shape for the parrot's head. Then, draw a larger oval shape right below it for the body. The body should be slightly curved to give the parrot a natural posture. Remember to keep the lines light, as they will be erased later.
Step 2: Add the Beak
Draw a triangular shape at the bottom of the head oval. The beak should point downward and be slightly longer than the head. Make sure to draw the upper and lower parts of the beak separately, as the upper beak is usually larger than the lower one.
Step 3: Draw the Wings
On either side of the body, sketch the parrot's wings. Start by drawing two long, curved lines extending from the body. Then, add smaller curved lines within the shape to create the feathers. Keep in mind that the wings should appear slightly asymmetrical, as one wing is usually more visible than the other.
Step 4: Outline the Tail
Extend a long, slender curved line from the back of the body to create the parrot's tail. The tail feathers should fan out at the end, giving it a graceful appearance. Remember to keep the lines light and adjust the length of the tail according to your preference.
Step 5: Add Details to the Head
Now it's time to give the parrot's head more definition. Draw a small circle for the eye, placing it slightly above the beak and towards the side of the head. Add a smaller circle within the eye to represent the pupil. Then, draw a curved line above the eye to indicate the parrot's eyebrow. Finally, add a tiny triangle-shaped line below the eye to complete the beak structure.
Step 6: Include Facial Features
To make the parrot's face more expressive, add a curved line below the eye to represent the cheek. Then, draw a small curved line on the opposite side of the head, mirroring the cheek. This will give the parrot a three-dimensional look. Next, draw a short line below the beak to indicate the bird's mouth.
Step 7: Add Feathers and Patterns
With the main body of the parrot complete, it's time to add details. Using small, curved lines, draw the feathers on the wings, body, and tail. Take your time to create a texture that resembles the pattern of real parrot feathers. You can also add some squiggly lines on the body to indicate the markings and color patterns of your chosen parrot species.
Step 8: Erase Unwanted Lines
Now that your parrot drawing is taking shape, go over your artwork and erase any unnecessary guidelines or overlapping lines. Be careful not to erase the important details you've drawn, such as the outline, feathers, and facial features.
Step 9: Color Your Parrot (Optional)
If you prefer a colorful drawing, grab your colored pencils or markers and start coloring your parrot. Parrots come in a variety of vibrant shades, so feel free to get creative. Reference pictures of parrots can be helpful for choosing the right colors and patterns.
Tip: When drawing a parrot, start by lightly sketching the main body as an oval and the head as a circle to establish the bird's lively posture—parrots often tilt their heads or perch at dynamic angles, so don't be afraid to give your sketch some personality! Use short, curved strokes to suggest the layered texture of feathers, especially around the wings and chest. For the beak, pay close attention to its distinctive hook shape, drawing it in two parts: the upper curved beak and the slightly shorter lower section. When adding color, layer light tones first and gradually build up to the deepest shades to capture the parrot's vibrant plumage, using colored pencils or watercolor for smooth blending. Remember to leave a small highlight in the eye to bring out the parrot's alert, intelligent expression.
Conclusion
Congratulations! You have successfully learned how to draw a parrot. By following these step-by-step instructions and using your imagination, you've created a beautiful artwork. Remember, practice makes perfect, so keep exploring and experimenting with different techniques. Enjoy the process of learning and creating!
Fun Facts About Parrots
- Parrots are among the most intelligent birds, capable of solving complex puzzles and mimicking human speech.
- There are over 400 species of parrots worldwide.
- Some parrots, like the African Grey, can learn hundreds of words and use them in context.
- Parrots have zygodactyl feet, meaning two toes point forward and two backward, which helps them grasp branches and food.
- The smallest parrot species is the buff-faced pygmy parrot, measuring just 8 cm.
- Many parrot species are endangered due to habitat loss and the illegal pet trade.
- Parrots can live for decades; some macaws have been known to reach 60 years or more.
- Parrots use their strong, curved beaks to crack open nuts and seeds.
Suggestions for Scenes and Settings for Parrot Drawings
- A vibrant parrot perched on a lush jungle branch, surrounded by tropical leaves and flowers.
- A pair of playful parrots flying together against a bright blue sky with fluffy clouds.
- A close-up of a parrot's expressive face, focusing on its striking eyes and colorful feathers.
- A parrot interacting with its reflection in a hanging mirror inside a cozy birdcage.
- An adventurous parrot exploring a pirate ship, sitting on the captain's shoulder with treasure chests in the background.
- A group of parrots gathered around a fruit bowl, pecking at slices of mango, banana, and papaya.
- A rainforest waterfall scene with a parrot perched on a tree, mist rising in the background.
- A parrot in mid-flight, wings spread wide to showcase the patterns and colors of its plumage.
- A cartoon-style parrot wearing a tiny hat or glasses, adding a whimsical touch to your drawing.
- A parrot surrounded by musical notes, as if it's singing or mimicking sounds in a lively environment.