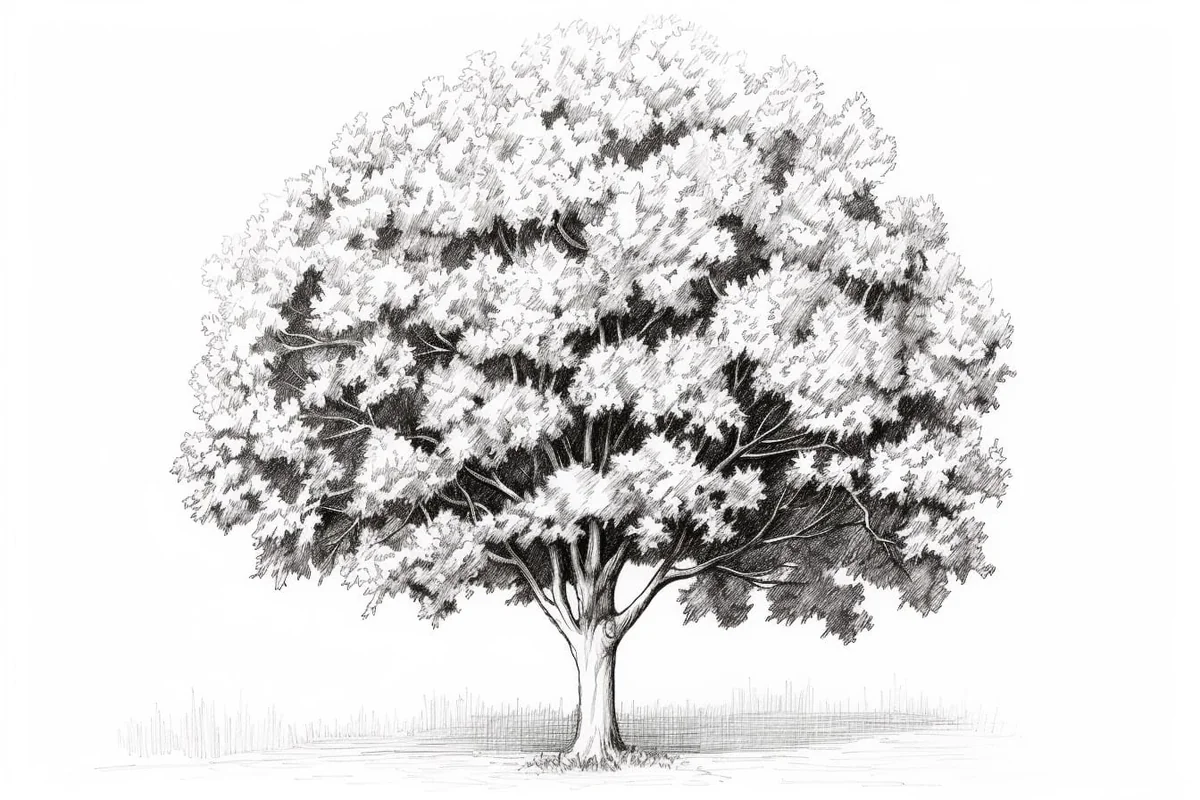
How to Draw a Maple Tree
Learn how to draw with this step-by-step tutorial.
Materials You'll Need
- Drawing paper
- Pencil (HB or 2B)
- Eraser
- Colored pencils
- Blending stump
Welcome to this comprehensive step-by-step guide on how to draw a maple tree! The maple tree is renowned for its stunning, multi-lobed leaves and its striking autumnal colors, making it a favorite subject for artists and nature enthusiasts alike. Drawing a maple tree allows you to explore the intricate details of its leaves, the textured bark, and the elegant branching structure, which can greatly improve your observational and sketching skills. Whether you want to create a realistic nature scene or a stylized botanical illustration, learning how to draw a maple tree offers a wonderful opportunity to connect with the natural world through art.
This tutorial is designed to be accessible for artists of all skill levels, from beginners who are just getting comfortable with pencil drawing to more advanced artists looking to refine their technique. We'll break down the process into manageable steps, starting with the basic shapes and gradually adding details like the distinctive pointed lobes of the maple leaves and the rough texture of the bark. You'll also learn how to capture the natural flow of branches and the overall silhouette of the tree, which are key elements to making your drawing feel lively and authentic. Techniques such as light sketching, shading, and layering will be demonstrated to help you bring depth and dimension to your artwork.
By following this guide on how to draw a maple tree, you'll not only enhance your artistic skills but also gain a deeper appreciation for the beauty and complexity of trees in general. Remember, practice is the key to improvement, so don't be discouraged if your first attempt isn't perfect. Drawing is as much about observation and patience as it is about technique. So, grab your pencils, find a comfortable spot, and enjoy the creative journey ahead. Let's get started and watch your maple tree come to life on the page!
Materials Required
Before we begin, make sure you have the following materials:
-
Pencil (preferably HB or 2B)
-
Drawing paper
-
Reference image of a maple tree (optional, but highly recommended)
-
Colored pencils (optional, for adding more detail and depth to your drawing)
Now that we have everything we need, let's start drawing our maple tree!
Step 1: Draw the Trunk
Begin by lightly sketching a vertical line to represent the trunk of the tree. The length of the line will depend on the size of the tree you want to draw. Use the tip of your pencil and make sure to keep the line straight.
Step 2: Add Branches
From the top of the trunk, draw several curved lines branching out to represent the tree's main branches. These lines should radiate outwards and vary in length and direction. Keep in mind that maple trees have a rounded shape, so try to capture that in the overall structure of the branches.
Step 3: Sketch the Leaves
Now it's time to draw the characteristic maple leaves. Start by drawing a small circle at the end of each branch. Then, using short, curved lines, connect the circle to the branch to form the shape of the leaf. Maple leaves typically have three to five lobes, so try to incorporate that into your drawing. Don't worry about making them perfect - the natural irregularities will add to the realism of your tree.
Step 4: Refine the Trunk and Branches
Using the basic outline as a guide, go back and add more definition to the trunk and branches. Add some texture to the bark by drawing small vertical lines or irregular shapes along the length of the trunk. For the branches, use curved lines to indicate the rough texture and add some thickness to them.
Step 5: Detail the Leaves
Next, focus on adding more detail to the leaves. Maple leaves are known for their distinct veining, so carefully draw these lines from the base of each leaf towards the tips. The veins should radiate outwards from the center of the leaf, following its shape. Take your time and make sure the veins are not too straight or too thick.
Step 6: Shade the Trunk and Branches
To give your tree more depth and dimension, it's time to add some shading. Start by shading the trunk and branches. You can do this by lightly applying the side of your pencil and gradually building up the darkness. Use short, horizontal strokes to mimic the texture of the bark. Pay attention to where the light source is coming from and shade accordingly to create highlights and shadows.
Step 7: Shade the Leaves
Now let's add some shading to the leaves. Start by shading the base of each leaf, where it connects to the branch. Then, using a lighter touch, add some shading along the edges of the lobes to create a sense of volume. Remember to leave some areas lighter to represent highlights. Experiment with different shading techniques to achieve a natural and realistic look.
Step 8: Add Final Details
Take a step back and evaluate your drawing. Are there any areas that need more definition or refinement? If so, now is the time to make those adjustments. Add any necessary details to the trunk, branches, and leaves to make them look more realistic. Don't be afraid to experiment and make changes until you're satisfied with the result.
Conclusion
Congratulations! You have successfully drawn a beautiful maple tree. Drawing trees can be a wonderful way to relax and connect with nature while honing your artistic skills. Remember, practice makes perfect, so keep drawing and exploring different techniques to improve your abilities.
We hope you found this step-by-step guide helpful in capturing the essence of a maple tree. Enjoy your artistic journey, and keep creating!
Fun Facts About Maple Trees
-
The maple tree is famous for its vibrant fall foliage, displaying brilliant shades of red, orange, and yellow.
-
Maple syrup is made from the sap of sugar maple trees, primarily harvested in North America.
-
There are over 130 species of maple trees worldwide, mostly native to Asia, Europe, and North America.
-
The iconic Canadian flag features a stylized red maple leaf, symbolizing the country's natural heritage.
-
Maple trees produce helicopter-like seeds called samaras that spin as they fall, aiding in wind dispersal.
-
Maple wood is prized for its hardness and fine grain, commonly used in furniture and musical instruments.
-
Some species of maple trees can live for over 200 years under ideal conditions.
-
Maple leaves have a unique shape with 3 to 9 lobes, which helps in identifying different species.
Suggestions for Scenes and Settings for Maple Tree Drawings
-
A solitary maple tree standing on a gently sloping hill during peak autumn, with vibrant red and orange leaves swirling in the breeze.
-
A peaceful forest scene featuring several maple trees with their branches interlacing, dappled sunlight filtering through the colorful canopy.
-
A close-up botanical study focusing on a cluster of maple leaves with detailed veining and texture, set against a simple, soft background.
-
A rustic park bench beneath a large maple tree, scattered fallen leaves covering the ground, evoking a quiet, reflective mood.
-
A whimsical scene of children playing under a maple tree, tossing leaves into the air, capturing movement and joy.
-
A stylized illustration of a maple tree in winter, bare branches outlined against a pale sky with a few remaining dried leaves clinging on.
-
A tranquil lakeside view with a maple tree reflecting in the water, surrounded by autumn foliage and distant mountains.
-
A night scene with a maple tree illuminated by soft lantern light, casting intricate shadows on the textured bark and leaves.
-
A cityscape park featuring a maple tree amidst urban elements like benches and lampposts, blending nature with modern life.
-
An imaginative fantasy setting where a giant maple tree forms a natural canopy over a small village, its glowing leaves lighting the scene.