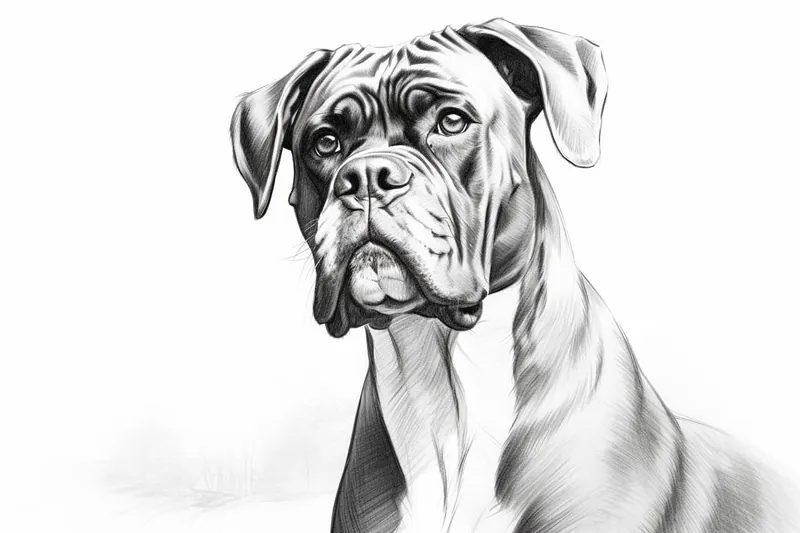
How to Draw a Boxer Dog
Learn how to draw a realistic boxer dog step-by-step with this helpful tutorial. Capture the strength and friendly nature of this popular breed in your artwork.
Materials You'll Need
- Pencil
- Paper
- Eraser
Welcome to this detailed tutorial on how to draw a boxer dog, a breed celebrated for its muscular build, expressive face, and playful personality. Boxer dogs have captured the hearts of dog lovers around the world due to their energetic nature, loyalty, and distinctive appearance marked by a strong jawline, broad chest, and alert eyes. Drawing a boxer dog allows artists to explore dynamic anatomy, capturing both strength and friendliness in a single image. Whether you are an aspiring artist looking to improve your animal drawing skills or a seasoned illustrator wanting to add a new subject to your portfolio, this tutorial is designed to guide you through the process with clarity and confidence.
Learning how to draw a boxer dog involves understanding the unique proportions and features that set this breed apart from others. This tutorial breaks down the complex shapes into simple, manageable steps, making it accessible for beginners while still offering techniques that experienced artists can appreciate. You'll work with foundational sketching methods, shading to emphasize muscle tone, and detailing to bring the dog's characteristic expressions to life. By the end of this guide, you will have developed not only a beautiful drawing but also enhanced skills in observing and rendering animal forms, which can be applied to many other subjects.
So, gather your materials and get ready to embark on an artistic journey that celebrates one of the most beloved dog breeds. Remember, every great drawing starts with a single line, and with patience and practice, you'll be able to create a stunning, lifelike boxer dog that reflects both its power and charm. Let's dive into this rewarding challenge together and see just how enjoyable it can be to learn how to draw a boxer dog!
Materials Required
Before we begin, make sure you have the following materials handy:
- Drawing paper or sketchbook
- Pencils (H and B grades)
- Eraser
- Pencil sharpener
- Fine-tipped pen or marker (optional, for outlining)
- Reference image of a boxer dog (printed or on a screen)
Now that you have everything you need, let's move on to the step-by-step instructions.
Step 1: Outline the Basic Shapes
Start by lightly sketching the basic shapes that make up the boxer dog's body. Begin with an oval shape for the head, followed by a larger oval shape for the chest. Connect the head and chest with a neck shape. Then, draw a long oval shape for the body and add a slightly curved line for the back. Finally, sketch two overlapping ovals for the hindquarters.
Step 2: Add Facial Features
Now, let's focus on the boxer dog's face. Within the oval shape for the head, draw two intersecting lines—one vertical and one horizontal—to create guidelines for the facial features. These lines will help you place the eyes, nose, and mouth accurately. Sketch two almond-shaped eyes along the horizontal line, leaving enough space between them. Add a small triangle shape for the nose just below the eyes. Then, draw a curved line for the mouth, starting from the bottom of the nose.
Step 3: Refine the Head and Face
Use the guidelines as a reference to refine the boxer dog's head and face. Add more details to the eyes by drawing the iris and pupil within each eye shape. Darken the area around the eyes to create depth. Next, add details to the nose by drawing nostrils and shading the area around it. Pay attention to the shape of the muzzle and the mouth, making sure they look proportional and realistic.
Step 4: Outline the Ears and Neck
Moving on to the ears, draw two long, curved shapes on either side of the boxer dog's head. Boxers have cropped ears, so make sure the tips of the ears are sharp and slightly pointed. From the back of the head, extend two curved lines to create the boxer dog's muscular neck. Add some lines to indicate the folds and wrinkles on the neck.
Step 5: Sketch the Body and Legs
Using the basic shapes as a guide, start sketching the body of the boxer dog. Pay attention to the contours and musculature of the breed. Draw curved lines to define the front legs, making them look strong and well-built. Add more details to the paws by sketching the individual toes. Then, move on to the hindquarters, drawing curved lines to indicate the shape of the back legs and the bend of the knees. Don't forget to add the paws and toes as well.
Step 6: Add the Tail and Tail End
Boxer dogs have a distinctive short and tapering tail. Sketch a short, curved line starting from the back of the hindquarters to indicate the tail. Then, draw the end of the tail, which is slightly curved inward.
Step 7: Refine the Outline
Now that you have the basic structure of the boxer dog, it's time to refine the outline and add more details. Use a darker pencil or a fine-tipped pen/marker to carefully trace over the sketch, adding more definition and precision to the lines. Pay attention to the muscle definition, the shape of the head, and the folds of the skin.
Step 8: Add Fur Texture and Shadows
To give your drawing a more realistic and three-dimensional look, start adding the boxer dog's fur texture. Use short, quick strokes with your pencil to create the appearance of short hair all over the body. Pay attention to the direction of the fur and vary the pressure to create depth. Additionally, add some shading to create shadows and volume, especially in areas where there are indentations or overlapping elements.
Step 9: Finalize the Details
In this last step, focus on adding the final details that will bring your boxer dog drawing to life. Pay attention to the facial features, adding highlights to the eyes and nose to make them appear shiny. Refine the shape of the ears and add some texture to them as well. Look for any areas that need more definition or shading and make the necessary adjustments.
Conclusion
Congratulations on completing your realistic boxer dog drawing! From the basic shapes to the final details, you've captured the essence of this wonderful breed on paper. Remember, practice makes perfect, so don't be discouraged if your first attempt doesn't turn out exactly as you'd hoped. The more you practice, the better you'll get. Keep exploring different techniques and dog subjects to further develop your artistic skills. Enjoy the process and have fun creating your own masterpieces!
Fun Facts About Boxer Dog
- Boxers were originally bred in Germany in the late 19th century for hunting and guarding.
- They are known for their distinctive square-shaped head and strong jawline.
- Boxers are highly energetic and require regular exercise to stay healthy and happy.
- This breed is famous for its playful and affectionate nature, making them great family pets.
- Boxers have a short, smooth coat that is easy to groom and comes in fawn, brindle, or white colors.
- They are known to be very intelligent and trainable, often excelling in obedience and agility competitions.
- Boxers have a natural protective instinct, making them excellent watchdogs.
- The breed is prone to certain health issues like hip dysplasia and heart conditions, so regular vet check-ups are important.
- Boxers are known for their "boxing" style of play, using their front paws to playfully spar.
Suggestions for Scenes and Settings for Boxer Dog Drawings
- A playful boxer dog catching a frisbee mid-air in a sunny park.
- Boxer dog relaxing on a cozy, patterned rug beside a fireplace indoors.
- A boxer dog standing proudly on a rocky hilltop with a sunset backdrop.
- Close-up portrait of a boxer dog with expressive eyes and detailed dog face texture.
- Boxer dog running alongside children on a beach with waves crashing nearby.
- A boxer dog tilting its head curiously while sitting in a flower-filled garden.
- Dynamic action shot of a boxer dog jumping over an agility obstacle.
- Boxer dog curled up in a dog bed surrounded by toys and blankets.
- A boxer dog and its owner sharing a tender moment during a morning walk.
- Boxer dog exploring a forest trail with dappled sunlight filtering through trees.