Do you want to add a little more fun to your birthday card or party invitation? Why not draw a birthday hat? In this step-by-step guide, I will teach you how to draw a birthday hat from scratch. Whether you’re an aspiring artist or just looking to unleash your creativity, follow along with these easy instructions to create a festive birthday hat that will surely put a smile on anyone’s face.
Materials Required
Before we begin, gather the following materials:
Now that we have everything ready, let’s get started on drawing our birthday hat!
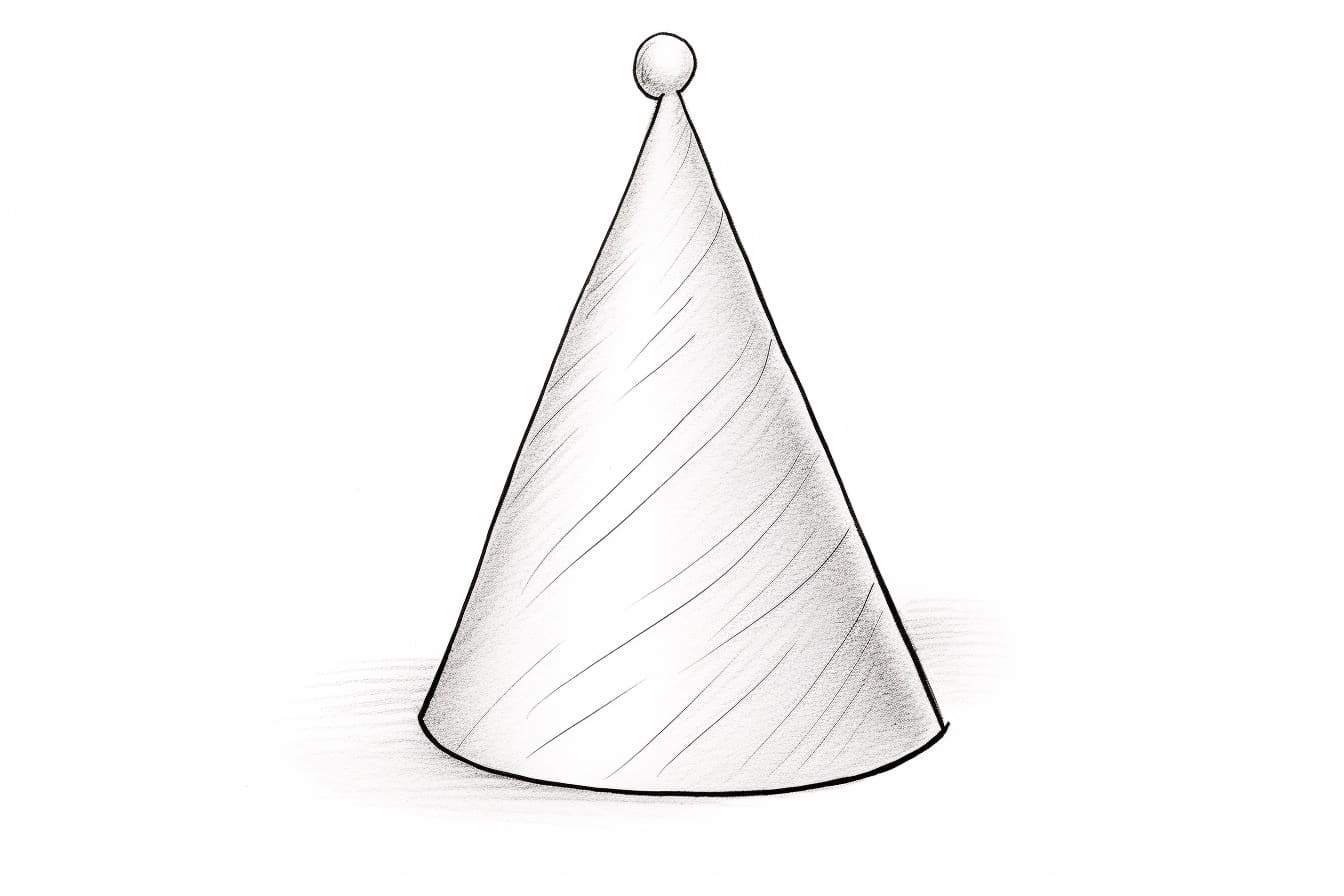
Step 1: Draw the Cone
To begin, draw a slightly curved vertical line towards the middle of your paper. This line will serve as the centerline of the cone. Then, starting from the top of the line, draw a curve that gradually widens and curves outward. This will form the body of the birthday hat. The wider you make the base of the curve, the larger the hat will appear. Remember to keep the lines light and easy to erase in case you need to make adjustments later.
Step 2: Add a Band
Now let’s add a band to our birthday hat. Draw a horizontal line slightly below the widest part of the cone. This line will go completely around the cone and serve as the base of the band. Next, draw a series of small vertical lines equally spaced along the horizontal line. These lines will create the appearance of a patterned band.
Step 3: Decorate the Band
Get creative with the band decoration! You can draw small circles, dots, stars, or any other design you like to make your birthday hat more festive. Feel free to experiment with different patterns and shapes. Remember, this is your birthday hat, so let your imagination run wild!
Step 4: Add a Tassel
For an extra touch, let’s add a tassel to our birthday hat. Draw a small circle or oval shape at the tip of the cone. Then, draw a series of curved lines coming out from the bottom of the circle or oval, extending down slightly past the base of the cone. Connect these lines at the bottom with a small, curved line to form the tassel.
Step 5: Color It In (Optional)
If you want to make your birthday hat even more vibrant and eye-catching, now is the time to grab your colored pencils or markers. Choose your favorite colors and carefully fill in the different parts of the hat. You can make the cone one color, the band another color, and the tassel a different color altogether. Let your creativity shine through as you add flair to your drawing.
Conclusion
Congratulations! You have successfully drawn a birthday hat from scratch. This simple and fun drawing can add a personalized touch to your birthday cards, party invitations, or any other birthday-related projects. Remember to have fun with it and let your imagination guide you as you experiment with different designs, colors, and patterns.
I hope you found this step-by-step guide helpful in creating your own birthday hat. Drawing is a wonderful way to express your creativity and bring joy to yourself and others. So, the next time you need to add a little birthday spirit to your artwork, give this tutorial a try.