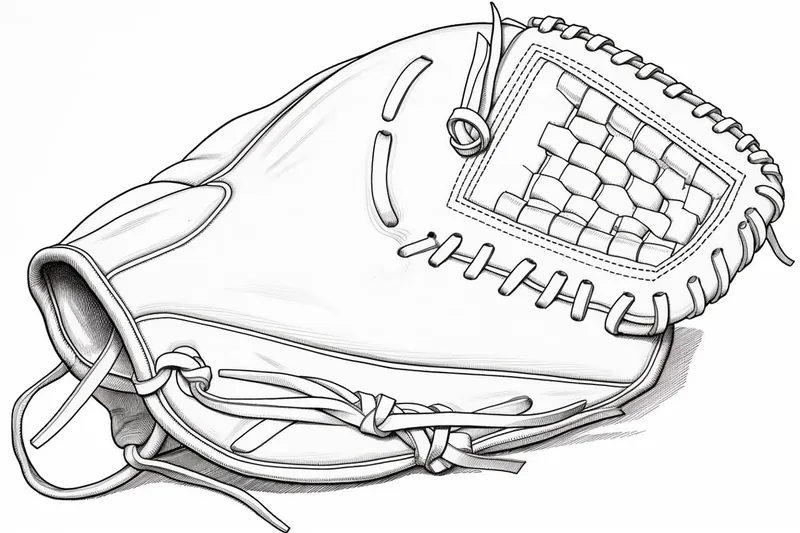
How to Draw a Baseball Glove
Learn how to draw a baseball glove with step-by-step instructions. This clear and concise guide will help you create a realistic and impressive drawing of a baseball glove.
Materials You'll Need
- Pencil
- Paper
- Eraser
Baseball gloves are iconic symbols of the sport, representing skill, teamwork, and the joy of the game. Whether you're a passionate baseball fan, an aspiring artist, or someone who simply appreciates detailed drawings, learning how to draw a baseball glove is a rewarding artistic challenge. The unique shape, intricate stitching, and textured leather make it an excellent subject to practice observation and shading techniques. Capturing the glove's contours and the subtle folds of the leather can really bring your drawing to life and add depth to your artwork.
This tutorial on how to draw a baseball glove is designed for artists of all skill levels. Even if you are a beginner, the step-by-step instructions will guide you through the process in an easy-to-understand way. You will learn how to break down the complex form into simple shapes, gradually adding details such as the webbing, laces, and creases. Along the way, you'll develop important skills like proportion, perspective, and texture rendering, which are essential for creating realistic drawings. By practicing these techniques, you'll not only create a beautiful baseball glove illustration but also enhance your overall drawing abilities.
So grab your pencil and paper, and let's embark on this creative journey together. With patience and practice, you'll be amazed at how your drawing transforms from basic outlines into a dynamic and lifelike baseball glove. Remember, every great artist starts with simple steps, and by following this guide on how to draw a baseball glove, you're taking the first step toward mastering detailed, realistic drawing. Keep your enthusiasm high, and enjoy the process—your artistic skills will grow with every stroke!
Materials Required:
Before we dive into the steps, let's gather all the materials you will need:
- Pencil
- Eraser
- Drawing paper
- Fine-tip black marker (optional)
- Colored pencils or markers (optional)
Now that we have our materials ready, let's begin our drawing journey!
Step 1: Sketch the Basic Shape
Start by lightly sketching the basic shape of the baseball glove. We will use simple geometric shapes to outline the glove's main form. Begin with an oval shape as the palm of the glove. Then, draw a smaller circle just above the oval for the thumb. Connect these two shapes with a curved line to represent the top of the glove. Finally, draw a long oval shape extending downward from the palm for the pocket.
Step 2: Add the Finger Slots
Next, let's add the finger slots to the glove. Draw five small ovals in a row on the top of the glove, just above the palm. These ovals represent the openings where the fingers will go. Make sure they are evenly spaced and sized.
Step 3: Refine the Shape
Now that we have the basic structure, let's refine the shape of the glove. Carefully outline the edges of the glove, making them appear more realistic and three-dimensional. Use smooth, curved lines to give the glove a natural and organic look. Pay attention to the details, such as the curves and folds in the leather.
Step 4: Add Details
To make the glove look more realistic, it's important to add some details. Start by drawing stitching lines on the edges of the glove. These lines should follow the shape of the glove and mimic the stitching found on a real baseball glove. Don't worry about making them perfectly straight or uniform - a little variation adds to the authenticity.
Step 5: Shade the Glove
Now it's time to add some shading to give the glove depth and make it look more three-dimensional. Identify the light source in your drawing, and shade the areas that would be in shadow accordingly. Use a lighter touch with your pencil to gradually build up the shading, creating a smooth and realistic effect. Pay attention to the folds and creases in the leather, as they will require more shading to create a sense of depth.
Step 6: Add Texture
To make the glove appear more realistic, let's add some texture to the leather. Use short, curved lines to create a cross-hatch pattern on the surface of the glove. This will simulate the texture of the leather and add visual interest to your drawing. Take your time and be patient as you add this detail, making sure to vary the direction and length of the lines to give it a natural look.
Step 7: Ink and Outline
If you want to give your drawing a bolder and more defined look, now is the time to ink and outline your sketch. Take a fine-tip black marker and carefully trace over the lines of your drawing. Once the ink is dry, erase any remaining pencil marks, leaving only the clean, dark lines of your baseball glove.
Step 8: Color (Optional)
If you prefer to add some color to your drawing, you can use colored pencils or markers to bring your baseball glove to life. Choose colors that closely resemble a real glove, such as tans, browns, or blacks. Apply the colors lightly at first and gradually build up the intensity as needed. Pay attention to the highlights and shadows to make your coloring more realistic.
Conclusion
Congratulations! You have successfully learned how to draw a baseball glove from scratch. With just a few simple steps, you were able to create a realistic and impressive representation of this essential baseball equipment. Remember to keep practicing and experimenting with different techniques to further enhance your drawing skills. Enjoy the process and have fun creating!
Fun Facts About Baseball Glove
- The first baseball gloves were introduced in the 1870s and were simple leather gloves without fingers for protection.
- Modern baseball gloves are designed with a webbing between the thumb and fingers to help catch and secure the ball.
- Gloves are typically made from high-quality leather, which becomes more flexible and comfortable with use.
- The size and style of a baseball glove vary depending on the player's position, with catchers and first basemen using specialized gloves.
- Breaking in a new baseball glove is essential for performance and can take several weeks of regular use or special conditioning techniques.
- Some professional players have custom-made gloves tailored to their hand size and playing style.
- The webbing patterns on gloves have evolved over time, with popular styles including the basket, trapeze, and modified trapeze webs.
- In the early days, some players used gloves with metal reinforcements, but these were
Suggestions for Scenes and Settings for Baseball Glove Drawings
- A close-up of a worn baseball glove resting on freshly cut grass with a baseball nestled inside, capturing the texture of both glove and grass.
- A vintage-style baseball glove hanging on a wooden fence at a rustic baseball field during sunset.
- An action scene showing a player's hand reaching out to catch a fast-flying baseball with the glove fully extended.
- A collection of different baseball gloves laid out on a locker room bench, showcasing various styles and colors.
- A child's small glove placed next to a professional player's glove, highlighting size and experience contrast on a dugout bench.
- A glove hanging from a chain-link fence with a blurred baseball diamond in the background on a bright game day.
- An artistic composition of a baseball glove with laces untied, surrounded by scattered baseball stitching patterns and chalk lines.
- A glove resting on a coach's clipboard with a lineup sheet and a pencil, symbolizing strategy and teamwork.
- A detailed drawing of the glove's inside pocket filled with dirt and signs of heavy use, emphasizing texture and wear.
- A glove caught mid-air against a clear blue sky, with sunlight highlighting its contours and stitching.