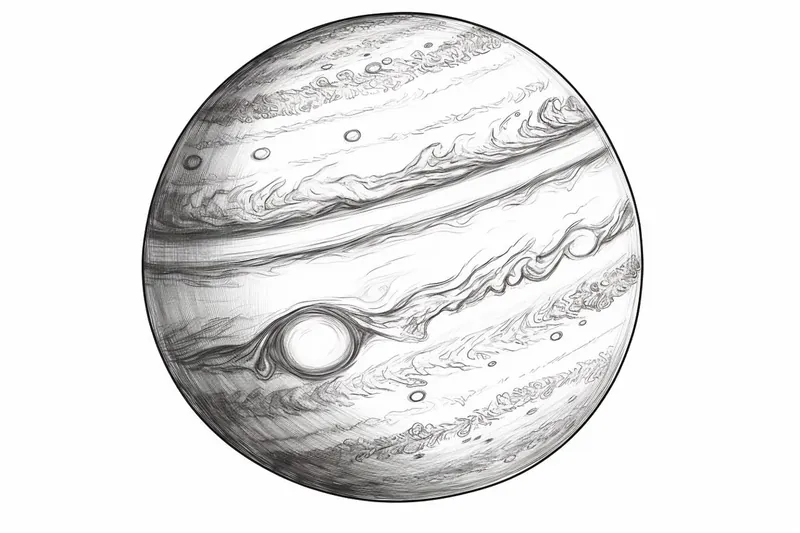
How to Draw Jupiter
Learn how to draw Jupiter, the mesmerizing gas giant, in this step-by-step guide. Capture the essence of this celestial body using simple techniques and basic materials.
Materials You'll Need
- Pencil
- Paper
- Eraser
Jupiter, the largest planet in our solar system, captivates astronomers and artists alike with its swirling bands of color, immense size, and iconic Great Red Spot. Unlike any other planet, Jupiter's dynamic atmosphere and stormy appearance make it a truly intriguing subject to draw. Learning how to draw Jupiter isn't just about capturing a planet—it's about exploring the unique textures, colors, and patterns that set this gas giant apart from its celestial neighbors. Whether you're fascinated by astronomy, enjoy drawing planets, or want to enhance your skills with a new challenge, Jupiter offers endless creative possibilities for artists of all levels.
Diving into how to draw Jupiter allows you to practice a range of artistic techniques, from blending and shading to layering colors and creating soft gradients. This tutorial is designed for beginners and intermediate artists, breaking down each step so that you can confidently render Jupiter's vibrant bands, swirling storms, and its famous red spot. With just a few basic materials, you'll discover how simple methods can be combined to create a stunning, realistic portrayal of this awe-inspiring planet. Not only will you improve your drawing skills, but you'll also gain a deeper appreciation for the wonders of our solar system.
So, gather your supplies and get ready to embark on a creative journey through the cosmos. Whether you're drawing for fun, for a school project, or to expand your artistic repertoire, this guide on how to draw Jupiter will help you bring the mysteries of space to life on your sketchbook. Remember, every artist's interpretation is unique—so don't be afraid to experiment, enjoy the process, and let your imagination soar!
Materials Required
Before we begin, gather the following materials:
- Drawing paper or sketchbook
- Pencil (HB or B)
- Eraser
- Colored pencils or markers (optional)
Having these materials on hand will ensure a smooth and enjoyable drawing process.
Step 1: Outlining the Basic Shape
Start by lightly sketching an oval shape at the center of your paper. This will serve as the foundation for Jupiter's main body. Remember to keep your lines light and faint, as they will be erased later on.
Step 2: Defining the Atmosphere Bands
Jupiter is renowned for its distinct, colorful atmosphere bands. To capture this characteristic feature, use your pencil to draw several horizontal lines across the surface of the oval shape. These lines will represent the different bands of gas swirling around the planet. Make sure the lines are not perfectly straight, as Jupiter's atmosphere exhibits some turbulence.
Step 3: Adding Details to the Atmosphere Bands
Now, within each band, add some irregular shapes and lines to create a more realistic representation of Jupiter's atmosphere. These shapes can vary in size, width, and direction, mimicking the stormy and chaotic patterns present on the planet's surface.
Step 4: Creating the Great Red Spot
One of Jupiter's most famous features is the Great Red Spot, a massive storm that has been raging for centuries. To depict this iconic feature, draw a large oval shape near the edge of the planet, on one of the atmosphere bands. This oval should be elongated and slightly tilted.
Step 5: Shading and Blending
Now that the main features of Jupiter are outlined, it's time to add depth and dimension to your drawing. Begin by shading the atmosphere bands using a darker pencil, such as a 2B or 4B. Apply the pencil strokes gently and gradually build up the tone, paying attention to the areas between the irregular shapes to create a smooth transition.
To further enhance the realistic look, use your finger or a blending stump to blend the graphite and create a softer, more atmospheric effect. This technique will help to smoothen out any rough lines and add a sense of depth to your drawing.
Step 6: Enhancing Colors (optional)
Tip: To enhance your drawing of Jupiter, consider using a reference image or multiple images of the planet to study its colors, patterns, and atmospheric details more closely. Observing the variations in light and shadow, as well as the textures within the atmosphere bands, will help you replicate its dynamic appearance more accurately. This practice not only improves your overall drawing skills but also deepens your understanding of the planet's unique characteristics.
If you wish to add a touch of color to your drawing, grab your colored pencils or markers. Jupiter's atmosphere is known for its vibrant hues, so feel free to experiment with shades of red, orange, yellow, and white. Apply the colors lightly and gradually build up the layers to achieve a realistic representation of the planet's atmosphere.
Step 7: Erasing Guidelines
Once you're satisfied with the shading and coloring, gently erase the initial light sketch lines that were used to outline the shape of Jupiter. Be careful not to smudge the graphite or colored pencil while doing so.
Conclusion
Congratulations! You have successfully learned how to draw Jupiter, one of the most awe-inspiring planets in our solar system. By following these step-by-step instructions, you've been able to capture the essence of this gas giant on paper. Remember, practice makes perfect, so don't be afraid to experiment and refine your drawing skills. Happy creating!
Fun Facts About Jupiter
- Jupiter is the largest planet in our solar system, with a diameter of about 143,000 kilometers—more than 11 times that of Earth.
- The planet is famous for its Great Red Spot, a giant storm that has been raging for at least 350 years.
- Jupiter has at least 95 known moons, including the four largest—Io, Europa, Ganymede, and Callisto—discovered by Galileo in 1610.
- Jupiter's magnetic field is the strongest of any planet in the solar system, about 20,000 times stronger than Earth's.
- A day on Jupiter is just under 10 hours, making it the fastest-spinning planet in the solar system.
- Jupiter is a gas giant, composed mostly of hydrogen and helium, and has no solid surface.
- Jupiter's moon Ganymede is the largest moon in the solar system—even bigger than the planet Mercury.
- The planet emits more heat than it receives from the Sun due to its internal energy source.
Suggestions for Scenes and Settings for Jupiter Drawings
- Draw a close-up of Jupiter's swirling atmosphere, highlighting the Great Red Spot with dramatic shading and vibrant colors.
- Depict Jupiter rising over the horizon of one of its moons, such as Europa or Ganymede, with the icy or cratered surface in the foreground.
- Illustrate a spacecraft, like the Juno probe, orbiting Jupiter and capturing detailed images of its stormy clouds.
- Create a cross-section view of Jupiter, showing its dense core, thick atmosphere, and swirling gas layers to explore its internal structure.
- Imagine an alien landscape on a floating platform in Jupiter's upper atmosphere, with swirling clouds and lightning storms in the background.
- Show Jupiter in a cosmic family portrait alongside its four largest moons—Io, Europa, Ganymede, and Callisto—for a dynamic solar system scene.
- Depict Jupiter as seen from the perspective of a distant asteroid, with faint sunlight illuminating its colorful bands in the darkness of space.
- Draw an abstract interpretation of Jupiter's storms, using bold lines, spirals, and energetic colors to convey the planet's turbulent weather.
- Illustrate a time-lapse sequence showing the movement of cloud bands and storms across Jupiter's surface over several hours.
- Create a scene where ancient astronomers observe Jupiter through an early telescope, capturing their wonder and the planet's majesty in the night sky.