How to Draw a Wedding Dress
Learn how to draw a wedding dress with this step-by-step tutorial. Follow along as an expert artist guides you through the process, from sketching the basic shape to adding intricate details.
Materials You'll Need
- Pencil
- Paper
- Eraser
Drawing a wedding dress is not only a delightful artistic endeavor but also a wonderful way to explore the elegance and intricate details that go into bridal fashion design. Wedding dresses symbolize one of life's most memorable moments, and capturing their beauty on paper allows artists to celebrate this special garment's grace and charm. Whether you're aiming to create a realistic portrayal or a stylized fashion sketch, learning how to draw a wedding dress can enhance your skills in illustrating fabric textures, delicate lacework, and flowing silhouettes.
This tutorial will guide you step-by-step through the process, making it accessible for artists at various skill levels. From beginners eager to practice basic shapes and proportions to more advanced drawers interested in mastering shading and details, understanding how to draw a wedding dress involves techniques like sketching soft folds, emphasizing light and shadow, and portraying intricate embellishments. By following these instructions, you'll develop a keen eye for fashion illustration and gain confidence in rendering complex designs with elegance.
Tip: As you work on your wedding dress drawing, consider using reference images of real wedding gowns to inspire your design and help you better understand the intricacies of fabric draping, texture, and embellishments. Observing various styles will not only enhance your ability to capture realistic details but also spark creativity that can lead you to develop a unique vision for your illustration.
So, whether you are an aspiring fashion illustrator, a hobbyist, or simply someone who appreciates wedding gowns, this tutorial invites you to grab your pencils and immerse yourself in the creative process. With patience and practice, you'll find that learning how to draw a wedding dress can be both rewarding and inspiring. Let's embark on this artistic journey together and bring your vision of bridal beauty to life on the page!
Materials Required
Before we begin, let's gather the materials you will need to complete your wedding dress drawing:
- A blank sheet of paper or a sketchbook
- Pencils of various hardness (HB, 2B, 4B, etc.)
- Eraser
- Ruler
- Compass (optional)
- Colored pencils or markers (optional)
Make sure to have all these materials ready, as they will be essential throughout the drawing process.
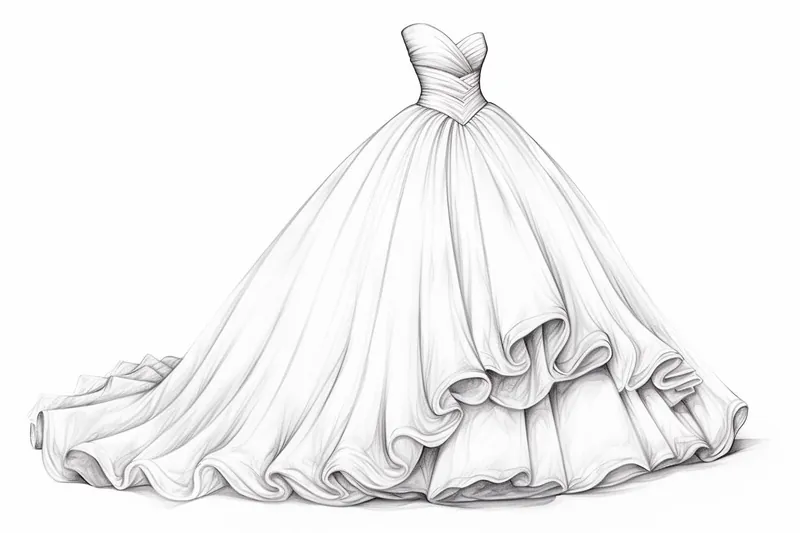
Step 1: Sketching the Basic Shape
To start, lightly sketch the basic shape of the wedding dress using a pencil. Begin by drawing a vertical line down the center of the page to serve as the dress's centerline. Then, lightly draw a horizontal line near the top of the page to indicate where the shoulders will be. From this line, draw two slightly curved lines downward to form the sides of the dress.
Step 2: Outlining the Torso
Next, outline the shape of the torso. Extend two curved lines outward from the centerline to create the bodice of the dress. Then, draw additional curved lines to connect the bodice with the sides of the dress. Take your time to ensure the lines flow smoothly and create an elegant shape.
Step 3: Adding the Skirt
Now, let's add the skirt to the wedding dress. Start by drawing two lines from the bottom of the bodice, extending towards the bottom of the page. These lines will serve as the center front of the skirt. From there, draw diagonal lines outward, creating a triangular shape at the front of the dress. Repeat this process on each side, mirroring the lines to maintain symmetry.
Step 4: Creating the Waistline
To define the waistline of the wedding dress, draw a curved line horizontally across the bodice. This line will help create a more realistic and flattering shape for the dress. Make sure the waistline is positioned where you desire it to be – it could be higher or lower depending on your preference.
Step 5: Detailing the Bodice
Now that the basic shape of the dress is complete, let's add some details to the bodice. Start by drawing the neckline of the dress. This can be a sweetheart neckline, V-neck, or any other style you prefer. Use light, curved lines to create a graceful neckline, making sure it complements the overall design.
Next, add any additional details to the bodice, such as lace patterns, embroidery, or beadwork. Consider referencing real-life wedding dress designs for inspiration, or let your creativity guide you. Take your time with this step, as the details can truly enhance the beauty of the dress.
Step 6: Enhancing the Skirt
To make the skirt of the wedding dress more visually appealing, let's add some volume and movement to it. Start by drawing a curved line at the bottom of each triangular section of the skirt. This will create the illusion of fabric folds and layers. Add as many curved lines as you'd like, depending on the level of detail you want to achieve.
Step 7: Refining and Finalizing
Now that you have all the main components of your wedding dress, take the time to review and refine your drawing. This is your opportunity to erase any unnecessary lines, adjust proportions, or make any other necessary changes. Pay attention to the overall balance and harmony of the dress, making sure all the elements work together seamlessly.
Step 8: Adding Colors (Optional)
If you'd like to add color to your wedding dress drawing, now is the time to do so. Use colored pencils or markers to bring your design to life. Consider using soft and muted colors for a traditional wedding dress or explore bold and vibrant hues for a more unique and modern look. Remember to blend and shade your colors to create depth and dimension.
Conclusion
Congratulations! You have successfully learned how to draw a wedding dress from start to finish. By following these step-by-step instructions, you should now have a beautiful drawing that captures the elegance and charm of a wedding dress. Remember, practice makes perfect, so don't hesitate to try again and experiment with different styles and designs. Happy drawing!
Fun Facts About Wedding Dress
- The tradition of wearing a white wedding dress was popularized by Queen Victoria in 1840, symbolizing purity and innocence.
- Wedding dresses can weigh anywhere from 5 to over 20 pounds due to heavy fabrics and intricate embellishments.
- The longest wedding dress train recorded was over 8,000 feet long, created in Cyprus in 2018.
- In some cultures, red wedding dresses are traditional, symbolizing good luck and prosperity, especially in China and India.
- The average cost of a wedding dress in the United States is around $1,600, but designer gowns can cost tens of thousands of dollars.
- Wedding dresses often feature lace, a fabric that dates back to the 16th century and is prized for its delicate, intricate patterns.
- The tradition of the bride wearing "something old, something new, something borrowed, something blue" often includes the wedding dress as the "something new."
- Many modern wedding dresses are designed with detachable trains or skirts to allow brides to change looks during their wedding day.
Suggestions for Scenes and Settings for Wedding Dress Drawings
- A bride standing in a sunlit garden surrounded by blooming flowers, showcasing a flowing lace wedding dress.
- A vintage-themed wedding scene with the bride wearing a classic, Victorian-inspired gown in an old mansion hallway.
- A modern city rooftop wedding at sunset, featuring a sleek, minimalist wedding dress with geometric patterns.
- An outdoor beach wedding with the bride in a light, airy dress fluttering in the ocean breeze.
- A fairytale forest setting with a whimsical gown adorned with floral appliqués and delicate embroidery.
- A winter wedding scene with the bride wearing a gown accented with faux fur and sparkling crystal details, surrounded by snow-covered trees.
- A fashion runway scene where the wedding dress is a high-fashion statement piece with exaggerated silhouettes and intricate beadwork.
- A bohemian-style wedding at a rustic barn, featuring a flowy dress with layered fabrics and lace inserts.
- A bride getting ready in a cozy, softly lit room, focusing on the delicate details of the bodice and veil.
- An artistic black-and-white sketch highlighting the contrast and shadows on a dramatic ball gown with multiple layers and textures.