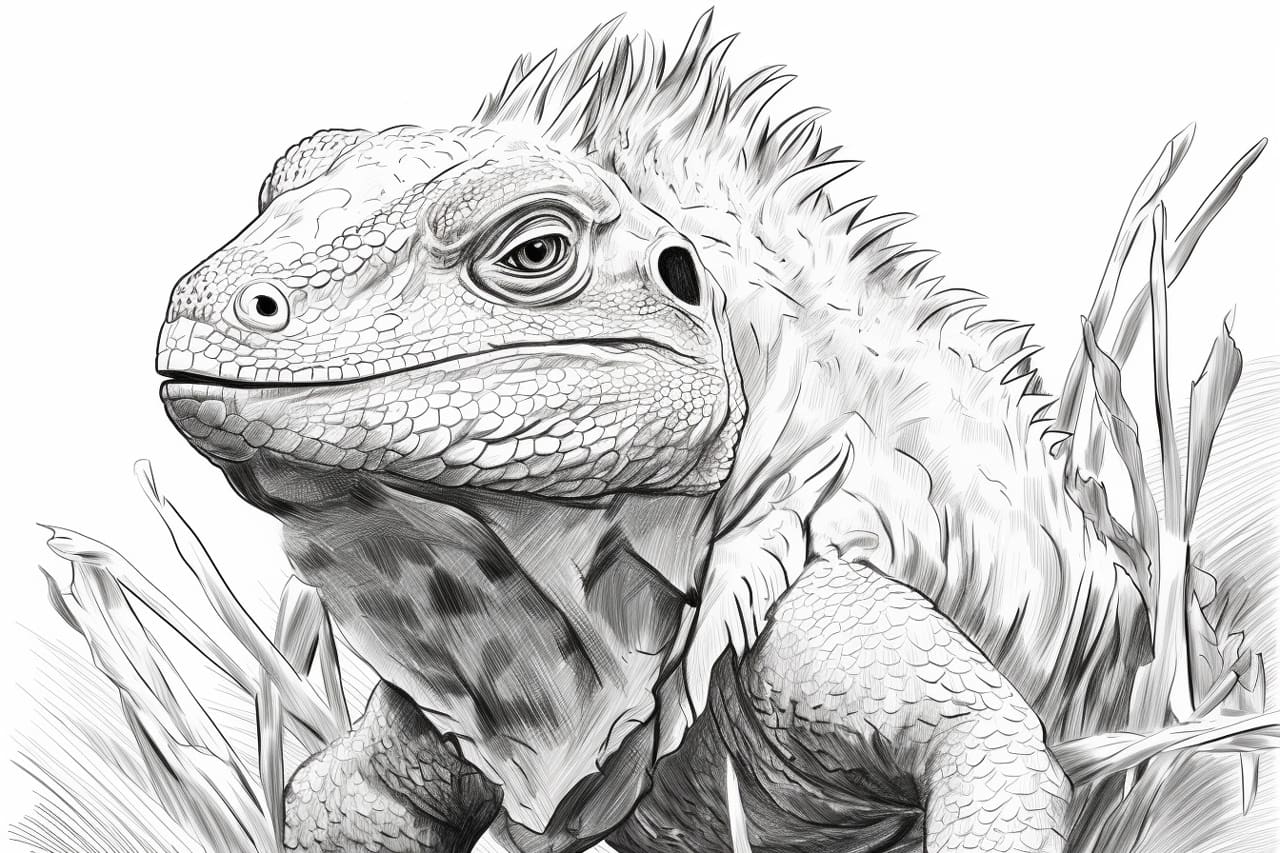
Drawing Tuatara can be a fascinating and rewarding artistic endeavor, offering a unique opportunity to capture the ancient beauty and distinctive features of these remarkable reptiles. With their spiky crests, sharp claws, and intricate scales, Tuatara present a wonderful challenge for artists looking to hone their skills in observation, detail, and texture. In this guide, we will explore the key characteristics of Tuatara and provide step-by-step instructions to help you create a stunning and lifelike representation of these living fossils on paper. So grab your pencils, sharpen your focus, and let’s dive into the world of drawing Tuatara together.
Materials Required
To draw a Tuatara, you will need the following materials:
- Paper: Choose a medium-weight paper suitable for drawing, such as drawing paper or sketch paper.
- Pencils: A set of drawing pencils ranging from 2H (hard) to 6B (soft) for creating different tones and details.
- Eraser: A kneaded eraser or a white plastic eraser for correcting mistakes and highlights.
- Sharpener: A pencil sharpener to keep your pencils sharp for precise details.
- Reference image: A picture of a Tuatara for inspiration and accuracy in your drawing.
- Optional: Colored pencils or markers if you want to add color to your drawing.
How to Draw a Tuatara: a Step-by-step Guide
Step 1: Gather Your Materials
- Collect your drawing materials, including paper, pencils (preferably HB, 2B, and 4B), eraser, and a sharpener.
- Find reference images of a Tuatara to use as a guide for your drawing.
Step 2: Start with Basic Shapes
- Begin by lightly sketching the basic shapes of the Tuatara’s body using simple geometric shapes like circles, ovals, and rectangles.
- Outline the head, body, limbs, and tail proportions accurately based on your reference image.
Step 3: Add Details to the Head
- Focus on the details of the head, including the distinct crest on top of the head and the eyes.
- Sketch the eye placement and nostrils, paying attention to their size and position.
Step 4: Develop the Body and Limbs
- Refine the body by adding scales and texture to give the Tuatara a realistic appearance.
- Draw the limbs with attention to the claws and the way they connect to the body.
Step 5: Work on the Tail
- Draw the tail of the Tuatara, paying close attention to its length and texture.
- Add details like scales and any markings that may be present on the tail.
Step 6: Refine the Details
- Go over your initial sketches and refine the details, adding depth and dimension to your drawing.
- Use different pencil grades to create shading and highlights, emphasizing the texture of the scales.
Step 7: Erase Unnecessary Lines
- Carefully erase any unnecessary or overlapping lines to clean up your drawing.
- Ensure that the final outline and details are crisp and well-defined.
Step 8: Add Final Touches
- Fine-tune your drawing by adding any final details or adjustments to enhance the overall look of the Tuatara.
- Take your time to review your work and make any necessary corrections before considering your drawing complete.
Step 9: Sign and Date Your Drawing
- Once you are satisfied with your Tuatara drawing, sign and date it in the corner to mark it as your own unique creation.
- Consider framing your artwork or sharing it with others to showcase your talent and creativity.
Conclusion
In conclusion, I want to commend you on your exceptional work in capturing the unique features of the Tuatara in your drawing. Your attention to detail and dedication to the craft are truly commendable. Remember that every drawing, no matter how small or seemingly insignificant, is a stepping stone towards honing your skills and developing your artistic style. Keep pushing yourself to explore new subjects and techniques, and never underestimate the power of practice and perseverance. Your passion for art shines through in your work, and I have no doubt that you will continue to grow and improve with each piece you create. Keep up the fantastic work, and never stop creating!
Fun Facts About Tuataras
- Tuataras are not actually lizards, but are the only surviving members of a group of reptiles that existed alongside the dinosaurs over 200 million years ago.
- They have a third eye, known as the parietal eye, on the top of their head which is sensitive to light and helps regulate their circadian rhythm.
- Tuataras have a very slow metabolism and can live for over 100 years, making them one of the longest-lived reptiles.
- They have unique teeth unlike any other reptile, with two rows of teeth on their upper jaw and one row on their lower jaw.
- Tuataras have a specialized joint in their jaw that allows them to open their mouth incredibly wide, allowing them to eat prey larger than their head.
- These reptiles are native to New Zealand and are considered a taonga (treasure) by the indigenous Māori people.
- Tuataras are primarily nocturnal, hunting for insects, small reptiles, and birds under the cover of darkness.
- They have a unique mating ritual where the male will perform a series of head-bobbing movements to attract a female.
- Tuataras have a slow reproductive rate, with females only laying eggs once every four years on average.
- Despite their ancient lineage, tuataras are considered vulnerable to extinction due to habitat loss and introduced predators in New Zealand.
Suggestions for Scenes and Settings for Tuatara Drawings
Certainly! Here are some specific suggestions for scenes and settings for drawings of Tuatara:
- Natural Habitat: Draw a tuatara in its natural habitat, which is typically rocky coastal areas or forests in New Zealand. Include native plants like ferns and flax bushes to create a realistic setting.
- Sunbathing on a Rock: Capture a tuatara basking in the sun on a rocky outcrop. Show the textures of the rocks and the tuatara’s scales to add depth to the drawing.
- Nighttime Forest: Illustrate a tuatara in a nocturnal setting, surrounded by native New Zealand trees like the Kahikatea or Rimu. Use dark, cool colors to convey the nighttime atmosphere.
- Burrow: Draw a tuatara peeking out from its burrow in the ground. Show the entrance of the burrow with dirt and rocks scattered around to emphasize its underground habitat.
- Historical Setting: Create a drawing of a tuatara in a prehistoric scene, alongside other ancient creatures like dinosaurs. This can add a creative and imaginative element to the artwork.
- Conservation Area: Depict a tuatara in a protected conservation area, highlighting the efforts being made to preserve this unique species. Include signs or fences to indicate the protected environment.
- Interaction with Humans: Show a tuatara in a zoo or wildlife sanctuary setting, perhaps being observed by visitors or a caretaker. This can add a human element to the drawing.
- Fantasy Setting: Let your imagination run wild and place the tuatara in a fantastical setting, such as a mystical forest or a magical realm. Experiment with vibrant colors and imaginative details.
Remember to research reference images of tuatara and their habitats to accurately capture their appearance and surroundings in your drawings. Have fun exploring different scenes and settings to showcase these fascinating creatures in your art!