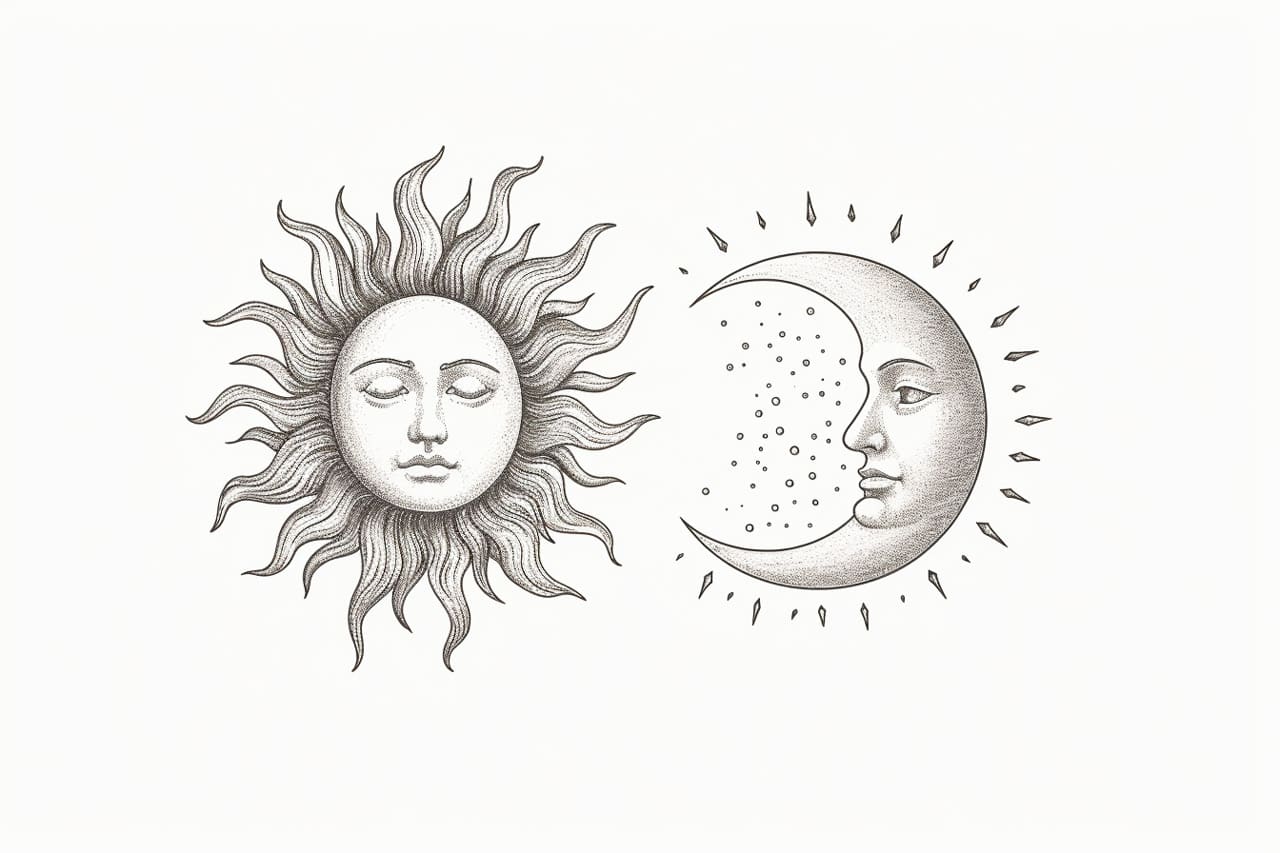
Learn how to draw a sun and moon with step-by-step instructions.
Are you interested in learning how to draw a sun and moon? Drawing celestial bodies can be a wonderful way to explore your artistic side and create stunning artwork. In this tutorial, we will guide you through the process of drawing a detailed and realistic sun and moon. Whether you are a beginner or an experienced artist, this step-by-step guide will help you master the art of drawing these celestial symbols.
Materials Required
Before we begin, gather the following materials:
- Drawing paper or sketchbook
- Pencils of various grades (HB, 2B, 4B, etc.)
- Eraser
- Ruler
- Blending stump or cotton swabs
- Colored pencils (optional)
Make sure you have all these materials on hand before starting. Now, let’s get started with the drawing process!
Step 1: Sketch Basic Shapes
Start by sketching a circle in the center of your paper. This will be the base for both the sun and the moon. Use a light pencil to draw this circle, as you will be erasing the lines later.
Step 2: Divide the Circle
Take your ruler and draw a straight line through the center of the circle, creating a horizontal guideline. Then, draw another line perpendicular to the first, creating a vertical guideline. These lines will help you maintain symmetry as you draw.
Step 3: Sun’s Face
Moving on to the sun, begin by drawing a smaller circle towards the top half of the larger circle. This will be the sun’s face. Make sure it is centered within the larger circle.
Step 4: Eyes, Nose, and Mouth
Draw two small circles for the sun’s eyes within the face circle. Place them symmetrically on both sides of the vertical guideline. Add a smaller curved line below the eyes to represent the sun’s nose. Finally, draw a smiling mouth by curving a line beneath the nose.
Step 5: Sun’s Rays
Now, let’s add the sun’s rays. Starting from the edge of the face circle, draw long and thin triangles radiating outwards. Make sure the rays are evenly spaced around the sun’s face. Continue adding rays until you are satisfied with the sun’s appearance.
Step 6: Moon’s Face
Moving on to the moon, draw a smaller circle towards the bottom half of the larger circle. This will be the moon’s face. Again, ensure that it is centered within the larger circle.
Step 7: Eyes, Nose, and Mouth
Similar to the sun, draw two small circles for the moon’s eyes within the face circle. Place them symmetrically on both sides of the vertical guideline. Instead of a nose, draw a curved line to represent the moon’s closed mouth. The moon’s face should have a calm and serene expression.
Step 8: Moon’s Craters
To make the moon appear more realistic, we will add craters. These are the small dents and holes on the moon’s surface. Draw irregular shapes of different sizes within the moon’s face. Make sure the craters are scattered in a random pattern, giving the moon a textured appearance.
Step 9: Finalize the Design
Take a moment to observe your drawing so far. Make any necessary adjustments or corrections to ensure symmetry and balance between the sun and moon. Once you are satisfied with the overall design, move on to the next step.
Step 10: Shading and Detailing
Now it’s time to add depth and dimension to your drawing. Start shading the sun’s face and rays using a darker pencil grade, such as 4B. Create shading by adding more pressure on the pencil and gradually blending the darker tones with lighter ones using a blending stump or cotton swabs.
For the moon, shade the face to create a smooth transition from light to dark. The shaded area should be on the side opposite the imaginary light source. Add more definition to the craters by darkening the shadows within them.
Step 11: Optional Coloring
If you want to add some color to your drawing, you can use colored pencils to enhance the sun and moon’s appearance. Choose warm shades for the sun, such as yellows and oranges, and cool tones for the moon, such as blues and grays. Use light strokes and layer colors gradually to achieve a soft and blended effect.
Conclusion
Congratulations, you have successfully learned how to draw a sun and moon! By following these step-by-step instructions, you have created a stunning celestial artwork. Remember to practice regularly to refine your drawing skills and explore different variations of sun and moon designs. Enjoy the process and let your creativity shine!