How to Draw a Spooky Tree
Learn how to draw with this step-by-step tutorial.
Materials You'll Need
- Drawing paper
- Pencil (HB or 2B)
- Eraser
- Colored pencils
- Markers
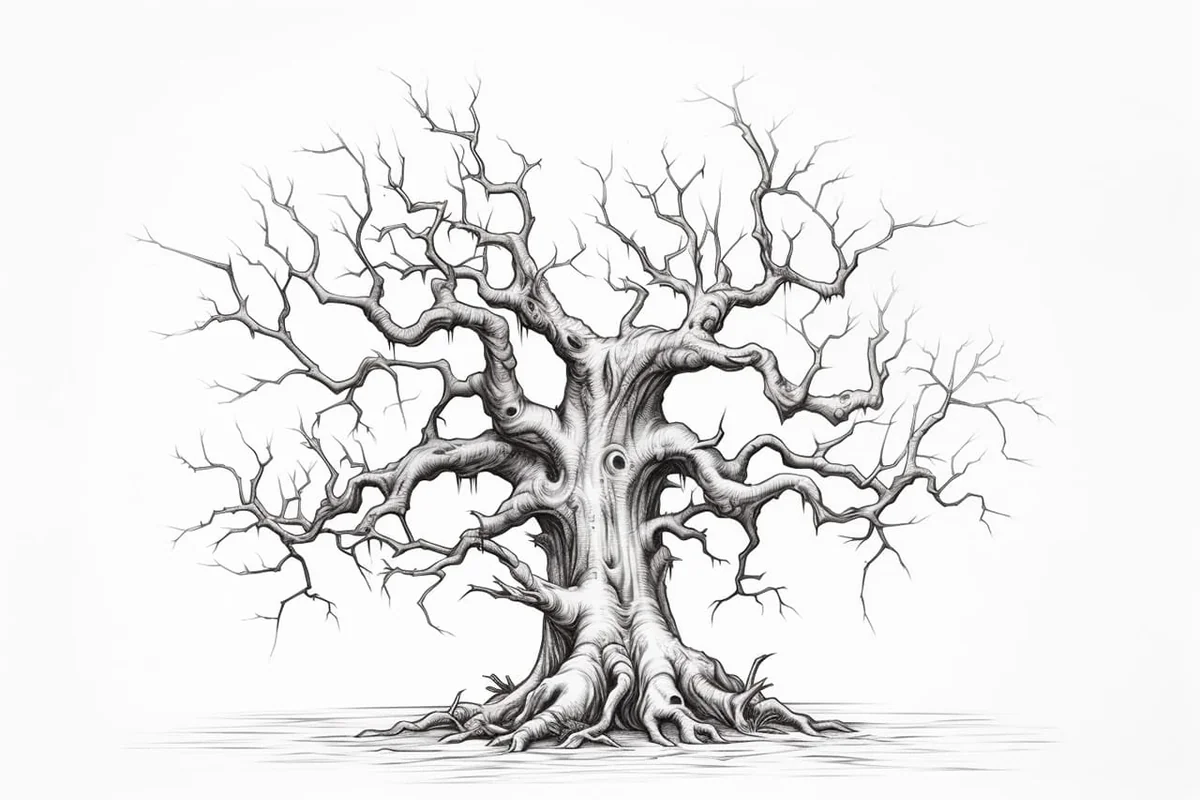
Do you want to add an eerie, mystical touch to your artwork? Learning how to****draw a spooky tree is the perfect way to create a dark and haunting atmosphere, whether you're crafting a Halloween scene, designing a mysterious forest, or simply exploring the art of twisted, gnarled trees. These eerie, lifeless trees stand tall with their twisting branches, jagged edges, and shadowy presence, making them a captivating subject for artists of all levels.
In this step-by-step tutorial, I'll guide you through the process of drawing a spooky, haunting tree, even if you have little to no drawing experience. We'll explore how to sketch eerie branches, add texture to the bark, and create a chilling background to enhance the mood. By the end of this tutorial, you'll have a hauntingly beautiful tree that can serve as the centerpiece for any spooky scene.
So grab your pencils, paper, and unleash your imagination—let's bring this creepy tree to life in the most delightfully eerie way possible! ✨
Materials Required
Before we begin, gather the following materials:
-
A pencil
-
Paper
-
An eraser
-
Black ink pen or fine liner (optional)
-
Colored pencils or markers (optional)
These materials will help you create a spooky tree with ease. Feel free to experiment with different art supplies to bring out your artistic style.


How to Draw a Spooky Tree Step-by-Step
Step 1: Outline the Tree Trunk and Main Branches
Start by sketching the trunk of the tree, keeping it twisted, uneven, and gnarled. Unlike ordinary trees, spooky trees have bent and crooked trunks, often with deep crevices and cracks. Use wavy, jagged lines instead of straight ones to create an eerie, haunted feel.
Next, extend long, claw-like branches reaching outward from the trunk. These branches should have an unnatural, skeletal look—thin, knotted, and tapering to sharp points. Keep your strokes loose and sketchy to maintain an organic, wild appearance.
Step 2: Add Smaller Branches and Twigs
Tip: To enhance the eerie atmosphere of your spooky tree drawing, consider using contrasting colors when adding details—like deep blacks for shadows and bright whites or yellows for highlights around the moon. This will not only make your tree stand out but also create a more dramatic effect that captures the viewer's attention. Additionally, don't hesitate to layer your shading for depth and texture, as this will help convey the haunting nature of your artwork.
Once the main branches are in place, extend them by adding thinner, twisted twigs. These should branch off in irregular directions, making the tree appear more chaotic and unsettling. Avoid symmetry—spooky trees thrive on asymmetry!
Some twigs may break off abruptly, while others may arch like bony fingers, reaching toward the sky. You can even add a few hollowed-out, knotted holes along the trunk, as if something sinister is lurking inside.
Step 3: Sketch the Canopy (If Your Tree Has One)
While many haunted trees are bare, some have thin, tangled foliage to add to their mysterious presence. If you'd like your tree to have a canopy, use loose, swirling lines to form clusters of scraggly leaves. Make the canopy uneven, with some parts sparse and others tangled, as if the tree is clinging to the last remnants of its life.
For an even spookier touch, allow the branches to peek through gaps in the canopy, creating eerie silhouettes against the night sky.
Step 4: Create a Moonlit Background
A spooky tree thrives under a full moon. Lightly sketch a large circular moon behind the tree, placing it slightly off-center for a dramatic effect.
To create a misty night sky, shade around the moon using soft, smooth strokes with your pencil. Blend the shading outward to create a gradual transition from light to dark. If you want to add movement to the scene, lightly sketch wisps of fog rolling in around the base of the tree.
Step 5: Add Texture to the Tree Trunk
Now, let's add some eerie texture to the trunk. Use jagged, overlapping lines to create deep cracks, bark ridges, and twisted knots along the surface. The more uneven and rough the texture, the older and creepier your tree will appear.
If you want to make the tree look hollow and haunted, sketch a large, dark opening in the center of the trunk—maybe even two small holes above it, forming a spooky face!
Step 6: Refine the Branches and Twigs
Return to the branches and twigs, adding more twists, knots, and jagged ends to make them look wilder and more unnatural. Some branches can end in sharp points, while others may curl or break off.
You can also add hanging vines or wisps of moss, giving the impression that the tree has been untouched for centuries.
Step 7: Shade the Canopy and Add Shadows
If your tree has leaves, add dark, uneven shading to the canopy, particularly where the branches overlap. Keep the strokes light and build up darker areas gradually. Leaves in the shadow should be deep and dark, while those near the moonlight remain slightly brighter.
For a bare tree, shade around the roots and base to add contrast and weight to the drawing. Make sure shadows fall opposite the moonlight to create a moody, dramatic effect.
Step 8: Enhance the Moon and Night Sky
To make the moon appear luminous, add highlights around its edges using a white pencil or eraser. Then, use a darker pencil or black ink to deepen the night sky surrounding it.
For extra atmosphere, add wispy clouds drifting across the moon, partially obscuring it. You can also draw stars scattered throughout the sky—just keep them small and faint to maintain the eerie feel.
Step 9: Add Spooky Elements
To give your drawing even more haunted character, consider adding:
-
A small flock of bats flying past the moon
-
Cobwebs draped across the branches
-
A ghostly figure peeking from behind the tree
-
A distant graveyard in the background
-
An owl with glowing eyes perched on one of the branches
These elements will enhance the spookiness of the scene and make your drawing even more captivating.
Step 10: Finalize and Ink Your Drawing
Once you're satisfied with your sketch, darken the lines and add final details. Use a fine-tip black pen or marker to go over the most important outlines, making the tree stand out against the background.
Make sure to emphasize: ✔ The sharp, jagged edges of the branches ✔ The deep, shadowy texture of the bark ✔ The moon's glow against the dark tree
After inking, erase any unnecessary pencil lines and check your shading. If needed, deepen the shadows and refine the highlights for more contrast.
Wrapping Up How to Draw a Spooky Tree
Congratulations! You have successfully drawn a spooky tree that will add an eerie vibe to your artwork. Remember, practice makes perfect, so don't be discouraged if your first attempt doesn't turn out as expected. Keep experimenting, adding your personal touch, and most importantly, have fun with it! Spooky trees are great for Halloween-themed drawings of creepy forests, and can make an otherwise simple forest truly stand out. Happy drawing!
Challenge: For this drawing challenge, I encourage you to take your spooky tree to the next level by creating a full eerie scene! Imagine your tree standing in a dark, haunted forest or on a desolate hill under a glowing full moon. Incorporate elements like swirling fog, distant shadows, or even a few lurking creatures peeking from behind the branches to add depth and intrigue. Consider varying the textures and lighting to enhance the atmosphere—perhaps a stark contrast between the shadowy tree and a bright moonlit sky. This challenge will not only allow you to practice your skills but also inspire you to think creatively about the environment surrounding your spooky subject. Happy drawing!
Gallery of Spooky Tree Drawings


