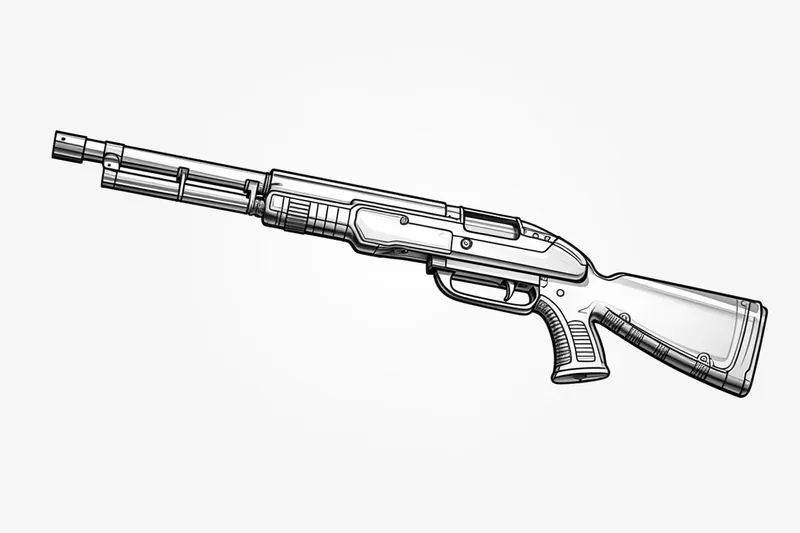
How to Draw a Shotgun
Learn how to draw a shotgun step by step in this comprehensive tutorial. From outlining the basic shape to adding details and shadows, create a realistic representation of a shotgun.
Materials You'll Need
- Pencil
- Paper
- Eraser
Welcome to this comprehensive tutorial on how to draw a shotgun, designed to guide you through each step of creating a detailed and realistic firearm illustration. Shotguns are fascinating subjects due to their unique design and the blend of mechanical and artistic elements they present. Whether you're interested in firearms art, want to improve your technical drawing skills, or are simply looking to challenge yourself with a complex object, learning how to draw a shotgun offers an excellent opportunity to develop precision and attention to detail in your artwork.Drawing a shotgun involves understanding its basic shapes, proportions, and intricate components such as the barrel, stock, trigger, and action mechanism. This tutorial is suitable for intermediate artists who have some experience with sketching and shading, but beginners can also follow along with patience and focus. Techniques like perspective, line work, and shading will be explored to help you capture the metallic textures and wood grain that characterize shotguns. By following this guide, you'll not only enhance your technical skills but also gain confidence in tackling detailed and structured subjects.So, if you've been wondering how to draw a shotgun with accuracy and style, you're in the right place. Remember, every great drawing starts with practice and observation, so don't be discouraged if your first attempts aren't perfect. With dedication and this step-by-step approach, you'll soon be proud of the realistic shotgun artwork you create. Let's dive in and bring this powerful firearm to life on paper!
Materials Required
Before we begin, gather the following materials:
- Pencil
- Eraser
- Drawing paper
- Fine tip markers or pens
- Ruler
- Reference image of a shotgun (optional but helpful)
Now that you have everything you need, let's dive into the step-by-step process of drawing a shotgun!
Step 1: Outline the Basic Shape
Begin by lightly sketching the basic shape of the shotgun. Start with a long, vertical rectangle to represent the barrel. Then, draw a smaller rectangle perpendicular to the first one, which will serve as the stock. These two rectangles should slightly overlap at the bottom, as the barrel extends past the stock.
Step 2: Adding the Trigger Guard and Trigger
Next, add the trigger guard just below the stock. It should be a small curved shape that protrudes from the stock towards the front of the shotgun. Inside the trigger guard, draw a small rectangle shape to represent the trigger.
Step 3: Sketching the Details of the Barrel
Now, let's focus on the barrel of the shotgun. Start by drawing a smaller rectangle shape towards the front of the barrel, which will serve as the muzzle. Above the muzzle, draw a slightly curved line to represent the front sight.
Moving towards the back of the barrel, draw a series of parallel lines to indicate the textured surface of the shotgun. These lines should extend from the muzzle to the stock.
Step 4: Adding the Stock Details
To draw the details of the stock, start by adding a curved line on the top of the stock to create the comb. Then, draw another curved line below it to represent the recoil pad. These lines should follow the shape of the stock and give it a more three-dimensional appearance.
Step 5: Refining the Outline
Now that the basic structure is in place, it's time to refine the outline of the shotgun. Use your pencil to darken the lines that form the major parts of the firearm, such as the barrel, stock, and trigger guard. Pay attention to any curves or angles and try to capture the overall shape as accurately as possible.
Step 6: Adding Texture and Details
To make your drawing more realistic, it's important to add texture and details to the shotgun. Use small curved lines to indicate the grooves on the barrel and stock. Pay close attention to the reference image, if you have one, to make sure you capture the texture accurately.
Additionally, add any engravings or markings that may be present on the shotgun. These can be small details that add to the overall authenticity of your drawing.
Step 7: Erasing Guidelines
At this point, you can erase any guidelines or construction lines that are no longer needed. Be careful not to erase any essential parts of the drawing, such as the outline or important details. Use a gentle touch with your eraser to avoid smudging or damaging the paper.
Step 8: Inking the Drawing
Once you are satisfied with the pencil sketch, it's time to ink your drawing using fine tip markers or pens. Start by outlining the entire drawing, emphasizing the major lines and details. Then, carefully fill in the darker areas of the shotgun, such as the barrel and stock, to create contrast.
Allow the ink to dry completely before erasing any remaining pencil marks. This will ensure that your drawing looks clean and professional.
Step 9: Adding Shadows and Highlights
Tip: As you work through the drawing steps, consider using a reference image to guide you, particularly for capturing intricate details and textures. Observing real shotguns can help you understand proportions, angles, and the play of light and shadow, enhancing the realism of your artwork. Don't hesitate to take breaks and step back to evaluate your progress, which can provide fresh insights and improve your overall composition.
To give your drawing more depth and dimension, add shadows and highlights. Identify the light source in your drawing and imagine where shadows would fall on the shotgun. Use hatching or cross-hatching techniques to create shading in these areas.
In contrast, use white or a light-colored pencil to add highlights to the reflective surfaces of the shotgun. This will make it appear more three-dimensional and lifelike.
Step 10: Final Touches
Lastly, take a step back and evaluate your drawing. Look for any areas that need refinement or adjustment. Add any additional details or touches that you feel will enhance the overall appearance of the shotgun.
Congratulations! You have successfully drawn a realistic representation of a shotgun. With practice, you'll continue to improve your skills and create even more impressive drawings.
Conclusion
Drawing a shotgun may seem daunting at first, but by breaking it down into simple steps, you can achieve great results. In this tutorial, we have covered the process of drawing a shotgun from start to finish, including outlining the basic shape, adding details, inking, and adding shadows and highlights.
Remember, practice makes perfect. As you continue to draw, you'll develop your unique style and improve your ability to capture the essence of any subject. So grab your materials, follow the steps, and have fun exploring the world of drawing shotguns!
Fun Facts About Shotguns
- The shotgun is one of the oldest firearms, with origins dating back to the 16th century.
- Unlike rifles, shotguns fire multiple small pellets called "shot," making them effective for hunting moving targets.
- Shotguns come in various gauges, with 12 gauge being the most popular for both hunting and sport shooting.
- The term "shotgun" originally referred to a smoothbore firearm designed to shoot shot rather than a single bullet.
- Shotguns are widely used in law enforcement and military for close-quarters combat due to their wide spread and stopping power.
- There are two main types of shotgun actions: pump-action and semi-automatic, each with distinct mechanisms for loading and firing.
- Shotguns are popular in sport shooting disciplines such as skeet, trap, and sporting clays, which simulate bird hunting.
- The recoil of a shotgun is generally stronger than that of a rifle due to the larger amount of shot and powder used.
- Shotguns can fire specialized ammunition like slugs for greater accuracy and range, making them versatile firearms.
Suggestions for Scenes and Settings for Shotgun Drawings
- A close-up of a classic wooden-stock shotgun resting on a rustic hunting cabin table, surrounded by natural textures like leaves and fur.
- Shotgun leaned against a weathered tree stump in a dense forest, with dappled sunlight filtering through the branches.
- An action scene depicting a hunter in mid-motion aiming a shotgun, with dynamic perspective and blurred background for motion effect.
- A detailed exploded view of a shotgun showing all mechanical parts separated but aligned for technical study.
- A vintage shotgun displayed on an antique gun rack with intricate engravings highlighted by soft indoor lighting.
- A shotgun lying on a bed of autumn leaves, with dew drops and subtle shadows emphasizing texture contrasts.
- A futuristic or steampunk-inspired shotgun design integrated with imaginative mechanical elements and glowing parts.
- A shotgun placed on a workbench surrounded by drawing tools and sketches, illustrating the artistic process behind the firearm drawing.
- An outdoor shooting range scene with multiple shotguns aligned on stands, capturing perspective and repetition.
- A dramatic black and white composition focusing on the interplay of light and shadow on the shotgun's metallic and wooden surfaces.