How to Draw a Moon
Learn how to draw a realistic moon step-by-step with this easy-to-follow tutorial. Explore the art of sketching and shading to create stunning lunar landscapes.
Materials You'll Need
- Pencil
- Paper
- Eraser
The moon has long captivated artists, poets, and dreamers with its luminous glow and mysterious presence in the night sky. Whether depicted as a glowing crescent or a full, cratered sphere, the moon is a symbol of wonder, cycles, and serenity. Learning how to draw a moon can add a magical touch to your artwork, whether you're illustrating a landscape, a fantasy scene, or simply practicing your skills. Drawing the moon allows you to experiment with shading, texture, and light, helping you better understand how to convey three-dimensional forms on a flat surface.
For both beginners and more experienced artists, learning how to draw a moon is an excellent way to practice fundamental drawing techniques such as blending, layering, and creating subtle gradients. This subject offers a forgiving entry point for those who are new to drawing, as the moon's surface is irregular and doesn't require perfect symmetry. At the same time, more advanced artists can challenge themselves by adding realistic details like craters, shadows, and the gentle glow of moonlight. No matter your skill level, drawing the moon is a rewarding project that enhances your observation skills and boosts your confidence in rendering natural objects.
So, gather your favorite drawing materials and get ready to embark on this creative journey. By following this step-by-step tutorial on how to draw a moon, you'll not only create a beautiful piece of art but also develop essential techniques that will serve you in many future projects. Remember, every artist's interpretation of the moon is unique—so enjoy the process, experiment with your style, and let your imagination shine as brightly as the moon itself!
Materials Required
To draw a moon, you will need the following materials:
- Drawing paper: Use a smooth-surfaced paper that is suitable for your chosen drawing medium.
- Pencil: A graphite pencil with a soft lead (e.g., HB or B) will work well for sketching and shading.
- Eraser: Make sure to have a good quality eraser for correcting any mistakes.
- Blending tools: You can use a blending stump, tortillon, or even a cotton swab for blending and smudging.
- Soft pastels or charcoal: These drawing mediums work great for creating the dark shadows and details of the moon.
- Fixative (optional): If you want to preserve your finished drawing and prevent smudging, you can use a fixative spray.
Now that you have all the necessary materials, let's begin drawing the moon!
Step 1: Draw the Moon's Outline
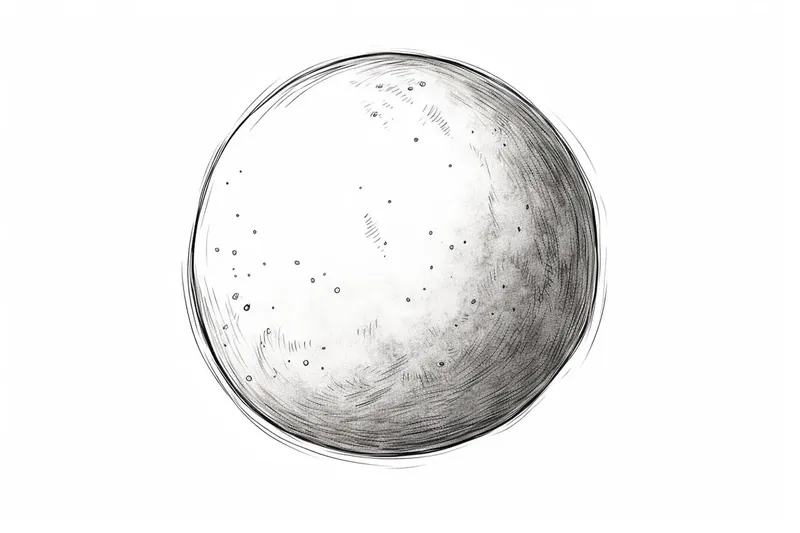
Start by lightly sketching a circle on your drawing paper using a pencil. This will serve as the base for the moon. Don't worry about making it too perfect at this stage; we will refine the shape later.
Step 2: Add Surface Divisions
To give the moon a realistic appearance, add divisions on its surface. These divisions are called craters and they are formed from asteroid impacts. Begin by lightly drawing some circular shapes of different sizes and irregularities within the moon's outline. Remember to vary their placement and sizes to create a more natural effect.
Step 3: Shade the Moon
Next, it's time to add some shading to the moon. Start by identifying the light source. Since the moon is usually illuminated from the upper left side, imagine a light coming from that direction. Use your pencil to shade the right side of the moon darker, gradually getting lighter towards the left side. This will create a three-dimensional effect.
Step 4: Blending and Smudging
To achieve a smoother transition of shades, use a blending tool such as a blending stump or tortillon. Gently blend the shaded areas, but be careful not to smudge the highlights too much. You can also use a cotton swab to achieve a similar effect if you don't have a blending tool.
Step 5: Add Highlights
Now, it's time to add some highlights to make the moon appear more luminous. Leave some areas untouched or lightly erase them to create brighter spots. These highlights will indicate the parts of the moon that are directly illuminated by the sun.
Step 6: Enhance the Craters
To make the craters stand out, darken their edges and add shadow areas around them using a pencil. This will create depth and make them look more realistic. Remember to vary the pressure of your pencil to achieve different levels of darkness and shading.
Step 7: Deepen the Shadows
To further enhance the three-dimensional look of the moon, deepen the shadows on the left side. Use a soft pastel or charcoal to add darker tones to the shaded areas. Gradually build up the layers of shading for a more realistic effect. Take your time and blend the shadows with a blending tool as needed.
Step 8: Refine the Details
Now that you have the basic structure of the moon, take a step back and evaluate your drawing. Look for any areas that need refinement or additional details. Pay attention to the overall shape, the placement of the craters, and the balance of light and shadows.
Step 9: Finalize the Drawing
Once you are satisfied with your drawing, you can finalize it by darkening the outlines and refining any remaining details. Use your eraser to gently remove any unwanted pencil marks or smudges. If you want to preserve your drawing, consider using a fixative spray according to the manufacturer's instructions.
Congratulations! You have successfully learned how to draw a realistic moon. With practice and experimentation, you can further develop your skills and create stunning lunar landscapes.
Tip: When drawing the moon, use a kneaded eraser to gently lift out highlights and create the illusion of glowing light, especially around the edges where the moon appears brightest. Start by shading the entire moon lightly, then use the eraser to dab out lighter patches and craters, mimicking the moon's varied surface. For soft gradients that capture the moon's subtle glow, blend your pencil marks with a blending stump or a cotton swab, working in small circular motions. Don't worry about making the surface perfectly smooth—those little textures and irregularities will make your moon drawing feel more natural and realistic!
Conclusion
In this step-by-step tutorial, we have explored the process of drawing a moon using simple techniques. From sketching the outline to adding shading and details, each step contributes to the final realistic effect. Drawing a moon can be a fun and relaxing activity, allowing you to explore your creativity and create unique artworks.
So, grab your drawing supplies and start creating your own moon drawings today. With patience and practice, you will surely master the art of drawing moons in no time!
Fun Facts About Moon
- The Moon is Earth's only natural satellite and is about one-quarter the size of Earth.
- The Moon always shows the same face to Earth due to synchronous rotation.
- The surface of the Moon is covered with craters formed by asteroid impacts.
- The Moon has no atmosphere, which means there is no weather or wind.
- The first human landing on the Moon was Apollo 11 in 1969.
- The Moon's gravity is about one-sixth that of Earth.
- The Moon is slowly moving away from Earth at a rate of about 3.8 centimeters per year (Scientific American).
- The dark areas on the Moon are called "maria," which are ancient volcanic plains.
- The Moon influences Earth's tides due to its gravitational pull.
- There is water ice at the Moon's poles, hidden in permanently shadowed craters.
Suggestions for Scenes and Settings for Moon Drawings
- A serene landscape with the full moon reflecting on a still lake at night.
- A mystical forest clearing illuminated by a glowing crescent moon overhead.
- An astronaut standing on the lunar surface, gazing at Earth in the distance.
- The moon peeking through drifting clouds above a quiet city skyline.
- An ancient castle perched on a hilltop, silhouetted against a large, bright moon.
- A pack of wolves howling at the full moon in a rugged mountain scene.
- A magical scene with floating lanterns rising into the sky under a harvest moon.
- A whimsical illustration of the moon as a smiling character surrounded by stars.
- A time-lapse sequence showing the phases of the moon across a single composition.
- An enchanted garden bathed in soft moonlight, with flowers and nocturnal creatures.