How to Draw a Kitchen
Learn how to draw a kitchen in a step-by-step tutorial. From planning the layout to adding details, this guide will help you create realistic kitchen drawings.
Materials You'll Need
- Pencil
- Paper
- Eraser
Welcome to this comprehensive tutorial on how to draw a kitchen, a subject that offers a wonderful blend of architectural structure and everyday life elements. Kitchens are central to homes, often filled with interesting shapes like cabinets, countertops, appliances, and various utensils, making them an excellent choice for artists keen to practice perspective, proportion, and detail. By learning how to draw a kitchen, you not only capture a familiar and relatable environment but also develop your ability to depict space, texture, and lighting in a realistic way.
This tutorial is designed for artists of all skill levels—from beginners wanting to build foundational drawing techniques to intermediate artists aiming to refine their skills in rendering interiors. We will guide you through the step-by-step process of sketching the basic layout, adding key kitchen elements such as refrigerators, sinks, and stoves, and incorporating details that bring the scene to life. You'll learn to use perspective tools like rulers and compasses, master shading techniques to create depth, and balance composition for a visually appealing drawing. Whether your goal is to create a cozy, homey kitchen or a sleek, modern space, this tutorial will equip you with the skills to confidently approach the subject.
Drawing interiors like kitchens can be challenging but incredibly rewarding, as it pushes you to observe the world around you more closely and translate those observations into art. As you progress, remember that each line and shape contributes to the overall harmony of your piece. With patience and practice, you will find yourself improving not only your technical skills but also your artistic eye. So, gather your materials, prepare your workspace, and let's embark on this creative journey together—mastering how to draw a kitchen and turning your artistic vision into reality!
Materials Required
To get started, gather the following materials:
- Drawing paper
- Pencil (HB or 2B)
- Eraser
- Ruler
- Compass (optional)
- Colored pencils or markers (optional)
Now that you have your materials ready, let's dive into creating your kitchen drawing!
Step 1: Plan the Layout
Before we begin drawing, it's important to plan the layout of your kitchen. This will help you visualize how the elements will fit together on paper. Consider factors such as the shape and size of the kitchen, the placement of appliances, and any additional features you want to include.
Step 2: Draw the Walls
Using your ruler and pencil, lightly draw the outline of the walls of your kitchen. Make sure to accurately represent the shape and size of your planned layout. If there are any windows or doors, add them at this stage.
Step 3: Add the Flooring
Draw the flooring of the kitchen using horizontal and vertical lines to create a tiled or wooden effect. Pay attention to perspective and ensure that the lines converge towards a vanishing point if you want to create a three-dimensional look.
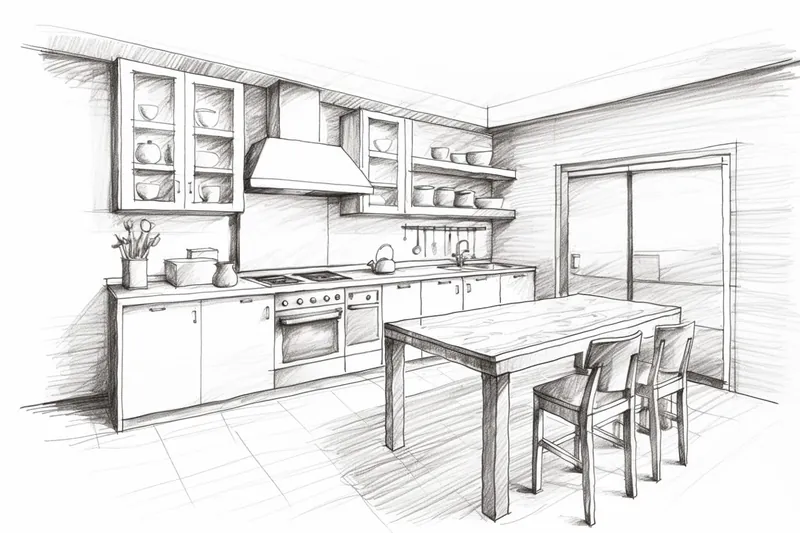
Step 4: Sketch the Cabinets and Countertops
Next, draw the kitchen cabinets and countertops. Start by drawing the basic shapes and outlines, considering the placement within the layout. Use straight lines and gentle curves to create a realistic representation. Add details such as cabinet handles and countertop edges.
Step 5: Outline the Appliances
Now it's time to draw the appliances in your kitchen. Begin by outlining the refrigerator, stove, and sink. Pay attention to the proportions and placement of each appliance within the kitchen layout. Use straight lines for the general shape and add specific details such as buttons and knobs.
Step 6: Add Details and Accessories
To make your kitchen drawing more realistic, add details and accessories. This could include items such as a kitchen island, chairs, a table, or decorative elements like plants or artwork on the walls. Take your time to sketch these elements accurately and in proportion to the rest of the kitchen.
Step 7: Shade and Add Texture
To give your kitchen drawing depth and dimension, it's important to add shading and texture. Use your pencil to create light and dark areas, paying attention to the placement of light sources. Consider the materials of different elements in the kitchen, such as the glossy surface of appliances or the matte finish of wooden cabinets.
Step 8: Optional - Add Color
If you prefer a colored kitchen drawing, this is the step to bring it to life! Use colored pencils or markers to add hues to your drawing. Consider the color scheme you want to use and apply it to each element of the kitchen. Take your time with this step to achieve a vibrant and cohesive look.
Conclusion
Congratulations on completing your kitchen drawing! By following these step-by-step instructions, you have learned how to plan the layout, draw the walls, add the flooring, sketch the cabinets and appliances, add details and accessories, and bring the drawing to life with shading and color. Remember to practice regularly to further improve your drawing skills. Enjoy the process of creating your own unique kitchen designs on paper!
Fun Facts About Kitchens
- The word "kitchen" comes from the Old English word "cycene", meaning a place for cooking.
- The modern kitchen triangle concept optimizes workflow between the sink, stove, and refrigerator, improving efficiency.
- Ancient kitchens often had open hearths, and the first known kitchen dates back over 6,000 years in the Indus Valley Civilization.
- Stainless steel became a popular kitchen material in the 20th century due to its durability and ease of cleaning.
- The average American spends about 37 minutes per day cooking in the kitchen, according to the Bureau of Labor Statistics.
- Kitchen design trends have evolved from separate rooms to open-plan layouts to encourage social interaction.
- The invention of the microwave oven in 1945 revolutionized kitchen cooking by drastically reducing meal preparation time.
- In Japan, the kitchen is often designed with compact, multi-functional appliances to maximize small spaces Japan Guide.
Suggestions for Scenes and Settings for Kitchen Drawings
- A cozy rustic kitchen with wooden cabinets, a farmhouse sink, and hanging pots above an island.
- A sleek, modern kitchen featuring stainless steel appliances, minimalist cabinetry, and a marble countertop.
- A bustling family kitchen scene with children helping to bake cookies, flour scattered on the countertops.
- An open-concept kitchen connected to a dining and living area, showing perspective and spatial relationships.
- A vintage-style kitchen with retro appliances, checkered flooring, and colorful cabinetry.
- A small urban apartment kitchenette with compact appliances and clever storage solutions.
- A kitchen at golden hour with sunlight streaming through a window, casting warm shadows and highlights.
- A chef's professional kitchen with large stoves, hanging utensils, and industrial shelving stocked with ingredients.
- A minimalist monochrome kitchen focusing on shapes, shadows, and textures without color distractions.
- A holiday-themed kitchen decorated with festive items, baking in progress, and cozy seasonal accents.
Fun Facts About Kitchen
- The word "kitchen" originates from the Old English term "cycene", meaning a place for cooking.
- The kitchen work triangle concept was developed to optimize the workflow between the sink, stove, and refrigerator.
- The earliest known kitchens date back over 6,000 years to the Indus Valley Civilization.
- Stainless steel became a popular kitchen material in the 20th century for its durability and ease of cleaning.
- The average American spends about 37 minutes daily cooking in the kitchen, according to the Bureau of Labor Statistics.
- Kitchen design trends have shifted from closed rooms to open-plan layouts to encourage social interaction.
- The invention of the microwave oven in 1945 revolutionized cooking by drastically reducing meal preparation time.
- In Japan, kitchens often feature compact, multi-functional appliances to maximize small spaces, as noted by Japan Guide.
Suggestions for Scenes and Settings for Kitchen Drawings
- A cozy rustic kitchen with wooden cabinets, a farmhouse sink, and hanging pots above an island.
- A sleek, modern kitchen featuring stainless steel appliances, minimalist cabinetry, and a marble countertop.
- A bustling family kitchen scene with children helping to bake cookies, flour scattered on the countertops.
- An open-concept kitchen connected to a dining and living area, showing perspective and spatial relationships.
- A vintage-style kitchen with retro appliances, checkered flooring, and colorful cabinetry.
- A small urban apartment kitchenette with compact appliances and clever storage solutions.
- A kitchen at golden hour with sunlight streaming through a window, casting warm shadows and highlights.
- A chef's professional kitchen with large stoves, hanging utensils, and industrial shelving stocked with ingredients.
- A minimalist monochrome kitchen focusing on shapes, shadows, and textures without color distractions.
- A holiday-themed kitchen decorated with festive items, baking in progress, and cozy seasonal accents.