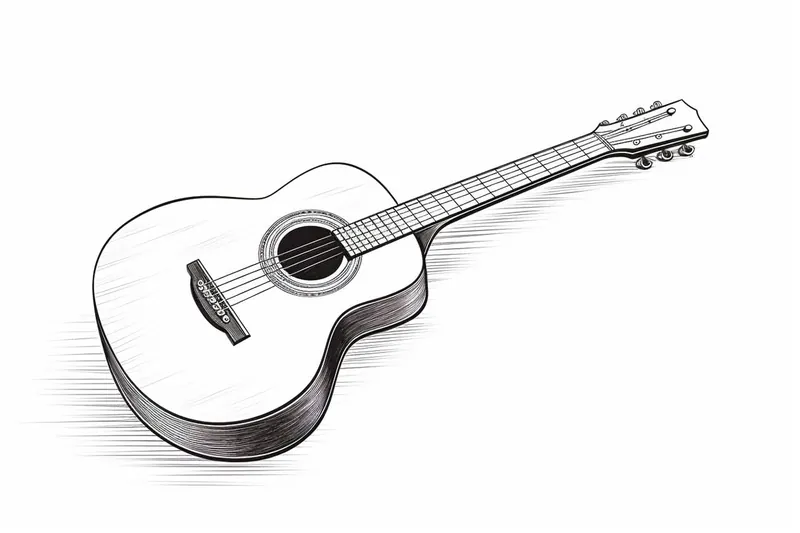
How to Draw a Guitar
Learn how to draw a guitar from scratch with this step-by-step tutorial. Perfect for artists of all levels, create your own detailed guitar drawing with expert guidance.
Materials You'll Need
- Pencil
- Paper
- Eraser
The guitar is not only one of the most iconic musical instruments in the world, but it also boasts a beautiful and instantly recognizable shape. From the elegant curves of its body to the intricate details of its strings and tuning pegs, drawing a guitar allows artists to explore a range of forms and textures. Whether you're a music enthusiast, an art student, or simply someone looking to expand your sketching skills, learning how to draw a guitar can be a rewarding and enjoyable artistic challenge. By capturing both the overall silhouette and the subtle details, you'll gain a deeper appreciation for the guitar's craftsmanship and design.
This tutorial on how to draw a guitar is designed to guide you step by step, making the process approachable for beginners while still offering valuable tips for those with more experience. You'll learn how to break down the guitar's complex shape into simple geometric forms, refine your outlines, and add depth with shading and highlights. Practicing these techniques will not only help you improve your drawing skills but also build your confidence in tackling other musical instruments or objects with intricate details. Drawing a guitar can be a fantastic addition to your art portfolio, a personalized gift for a musician, or simply a fun project to express your creativity.
Don't worry if you've never tried drawing a musical instrument before—this guide will walk you through each stage with clear instructions and helpful tips. Remember, every artist improves with practice, so take your time and enjoy the process. By the end of this tutorial, you'll have created a guitar drawing you can be proud of, and you'll have developed new skills that will serve you well in future artistic endeavors!
Materials Required
Before we begin, let's gather the materials you'll need for this drawing:
- Pencil
- Eraser
- Paper
- Ruler
- Fine-tipped marker or pen (optional)
- Colored pencils or markers (optional)
Now that you have everything ready, let's get started!
Step 1: Outline the Body
Start by drawing a long, curved shape for the body of the guitar. Imagine an hourglass shape, but with the middle section slightly elongated. Use light pencil strokes, as we'll be refining the lines later. Remember to keep the proportions in mind.
Step 2: Add the Neck
Extend a straight line from the top of the body for the neck of the guitar. Make sure it's centered and evenly aligned with the body. At the end of the neck, draw a slightly wider shape to represent the headstock.
Step 3: Outline the Headstock
The headstock is the top part of the guitar where the tuning pegs are located. Draw a shape similar to a paddle with rounded corners at the wide end of the neck. Add some detail by drawing the tuning pegs as small circles or rectangles along the top of the headstock.
Step 4: Draw the Fretboard
Extend a long, straight line from the bottom of the headstock to the body. This line represents the fretboard. On the body side of the fretboard, draw small rectangles or circles to represent the frets. Start with larger shapes near the body and gradually make them smaller as you move upward.
Step 5: Sketch the Soundhole and Pickguard
On the body of the guitar, draw a circle or an oval shape slightly below the center. This is the soundhole. Below the soundhole, draw a shape that covers the lower part of the body. This is the pickguard, which protects the guitar from scratches. Feel free to customize the shape of the pickguard based on the guitar design you prefer.
Step 6: Refine the Body and Neck
Using the initial shapes as a guide, refine the outline of the body and neck. Make the curves smoother, adjust any proportions that appear off, and erase any overlapping lines. This step is crucial in achieving a more accurate and polished look for your guitar drawing.
Step 7: Add Detail to the Headstock
Next, it's time to add more detail to the headstock. Draw a curved line from the top of the headstock to the neck, following the shape of the guitar strings. You can also add the brand name or logo of the guitar manufacturer at the top of the headstock. Use reference images to help you recreate these distinctive details.
Step 8: Shape the Body Contours
Now, let's add some depth to the body of the guitar. Draw two curved lines on each side of the body to create a three-dimensional appearance. These lines should follow the contour of the guitar and give it a more realistic look.
Step 9: Draw the Bridge and Saddle
At the end of the body, draw a rectangular shape for the bridge. The bridge holds the guitar strings in place. In the middle of the bridge, draw a smaller rectangle or oval for the saddle. The saddle is where the strings rest, and it helps with their height and angle.
Step 10: Refine the Fretboard
Go back to the fretboard and add more detail. Draw small dots or rectangles on the frets to represent their position markers. These markers help the guitarist find specific notes while playing the guitar. You can also draw small curved lines along the edges of the frets to represent the strings.
Step 11: Finalize the Details
Take a moment to review your drawing and make any necessary adjustments. Erase any remaining construction lines, smoothen out the curves, and darken the final lines. If you prefer, you can use a fine-tipped marker or pen to outline your drawing, giving it a more defined and finished appearance.
Tip: When drawing a guitar, start by lightly sketching the main body using two intersecting ovals—one larger for the lower bout and a smaller one for the upper bout—before adding the neck as a long, narrow rectangle. This geometric framework helps maintain proper proportions and symmetry, which are essential for capturing the guitar's elegant silhouette. Use a ruler or straight edge for the neck and fretboard to keep them perfectly straight, as even a slight curve can make the instrument look unrealistic. Once you're happy with the structure, gradually refine the curves and add details like the sound hole, bridge, strings, and tuning pegs, remembering that consistent string spacing and alignment will make your drawing much more convincing.
Conclusion
Congratulations! You have successfully drawn a guitar from start to finish. By following these step-by-step instructions, you've created a detailed and realistic representation of this musical instrument. Remember, practice makes perfect, so don't hesitate to keep refining your skills and experimenting with different styles. Happy drawing!
Fun Facts About Guitar
- The modern guitar evolved from ancient stringed instruments like the lute.
- The world's largest playable guitar is over 43 feet long, according to Guinness World Records.
- The six-string guitar is the most common, but there are also 12-string and 7-string guitars used in various music genres.
- Legendary guitarist Jimi Hendrix was known for playing his guitar upside down because he was left-handed.
- The world's most expensive guitar, a Fender Stratocaster, sold for $2.7 million at auction.
- The word "guitar" comes from the ancient Greek word kithara.
- Electric guitars were first popularized in the 1930s, revolutionizing modern music.
- There are more than 50 million guitar players worldwide.
- Guitar strings were originally made from animal intestines before modern materials like steel and nylon.
- The world's fastest guitar player can play over 600 beats per minute.
Suggestions for Scenes and Settings for Guitar Drawings
- A classic acoustic guitar leaning against a rustic wooden fence in a sunlit garden.
- An electric guitar resting on a stage before a concert, with spotlights and cables in the background.
- A close-up view of hands strumming a guitar, capturing the dynamic movement of the strings.
- A guitar surrounded by scattered sheet music, pencils, and a steaming cup of coffee in a cozy studio.
- A vintage guitar displayed in an antique shop window, reflecting the bustling street outside.
- A campfire scene with a group of friends singing while one person plays guitar under a starry sky.
- A guitar adorned with stickers and signatures, hinting at years of travel and memorable performances.
- A surreal composition where the guitar's body morphs into a landscape, with strings forming bridges or rivers.
- A child learning to play guitar, with a patient teacher guiding their hands in a warm, inviting room.
- An abstract interpretation focusing on the guitar's curves, strings, and shadows for a modern art piece.