How to Draw a Gardenia in 9 Simple Steps
Learn how to draw with this step-by-step tutorial.
Materials You'll Need
- Drawing paper
- Pencil (HB or 2B)
- Eraser
- Colored pencils
- Markers
- Blending stump
Drawing is one of the most fulfilling forms of artistic expression, allowing you to capture the beauty of the world around you. Whether you're an experienced artist or a beginner eager to explore your creative side, learning **how to draw a gardenia flower **can be both enjoyable and rewarding. Known for their stunning white blooms and intoxicating fragrances, gardenias are a favorite among gardeners and an inspiring subject for artists of all skill levels.
In this guide, we will take you through a step-by-step journey to create your own gardenia drawing. You'll discover how to start with a basic sketch and progressively add intricate details, culminating in a beautiful representation of this beloved flower. The goal is to build your confidence with each step and encourage you to find your unique style as you bring your gardenia to life on paper.
So, gather your drawing materials—whether it's pencils, pens, or colored markers—and let's embark on this artistic adventure together. With a little patience and practice, you'll be able to create stunning gardenia artworks that reflect your personal flair and appreciation for nature's beauty. Let's get started!


Materials Required
Before we begin, make sure you have the following materials:
-
Pencil (preferably an HB or 2B)
-
Eraser
-
Fine-tipped black pen or marker
-
Colored pencils or markers (optional)
Step 1: Start with a Basic Sketch
Begin by lightly sketching the basic shape of the gardenia. Start with an oval shape for the center of the flower, and then add smaller ovals around it to form the petals. Don't worry about getting the shapes perfect at this stage, as we will be adding more details later on.
Step 2: Outline the Petals
Using your pencil, go over the outline of the petals, making them more defined. Gardenia petals are usually smooth and symmetrical, so try to capture that in your drawing. It's okay if they are not all exactly the same size or shape – this will add a more natural and organic look to your finished drawing.
Step 3: Add the Details
Now it's time to add some details to our gardenia drawing. Start by sketching the veins on each petal, using light and feathery strokes. Gardenia petals often have a few prominent veins running from the base to the tip, so pay attention to that as you add the details.
Step 4: Define the Center
Next, focus on the center of the flower. Gardenias have a distinctive center with a cluster of long, slender stamens surrounded by a ring of petals. Use your pencil to lightly sketch these details, making sure to capture the overall shape and structure.
Step 5: Refine the Sketch
At this stage, take a step back and evaluate your sketch. Make any necessary adjustments to the shape and proportions of the flower. Pay attention to the overall balance and composition of your drawing.
Step 6: Outline with Pen or Marker
Once you are satisfied with your pencil sketch, it's time to go over the lines with a pen or marker. This will create a bold and defined outline for your gardenia drawing. Use a fine-tipped pen or marker for this step to ensure clean and precise lines.
Step 7: Erase the Pencil Guidelines
After outlining the drawing, let the ink dry completely. Then, gently erase any remaining pencil lines. Be careful not to smudge the ink as you erase.
Step 8: Add Shading (optional)
To add depth and dimension to your gardenia drawing, you can choose to add shading. Use your pencil or colored pencils to lightly shade the petals, focusing on areas where shadows would naturally fall. Blend the shading with a blending stump or your finger for a smooth and realistic effect.
Step 9: Final Touches
Take a step back and evaluate your drawing. Add any final details or adjustments as needed. This is the time to refine and perfect your drawing before considering it complete.
Tip: To capture the delicate beauty of a gardenia, start with a light pencil sketch to outline the general shape of the flower and its petals, focusing on their overlapping layers. Use a reference image to understand the flow and curvature of the petals—gardenias have a unique, slightly ruffled appearance that can be tricky to replicate. When adding details, switch to a finer pencil or pen to emphasize the petal textures and shadows; consider using short, curved strokes to mimic the natural folds. For color, if using colored pencils or markers, layer lighter shades first and gradually build up darker tones to create depth and dimension, paying attention to the light source in your drawing. Remember, patience is key—don't rush the process, and enjoy the journey of bringing this lovely flower to life!
Conclusion
Congratulations! You have successfully learned how to draw a gardenia. By following these step-by-step instructions, you were able to create a beautiful and realistic representation of this lovely flower. Remember, practice makes perfect, so don't be discouraged if your first attempt is not exactly how you envisioned it. With time and practice, your drawing skills will continue to improve. Keep experimenting with different techniques and styles to make your gardenia drawings truly unique. Happy drawing!
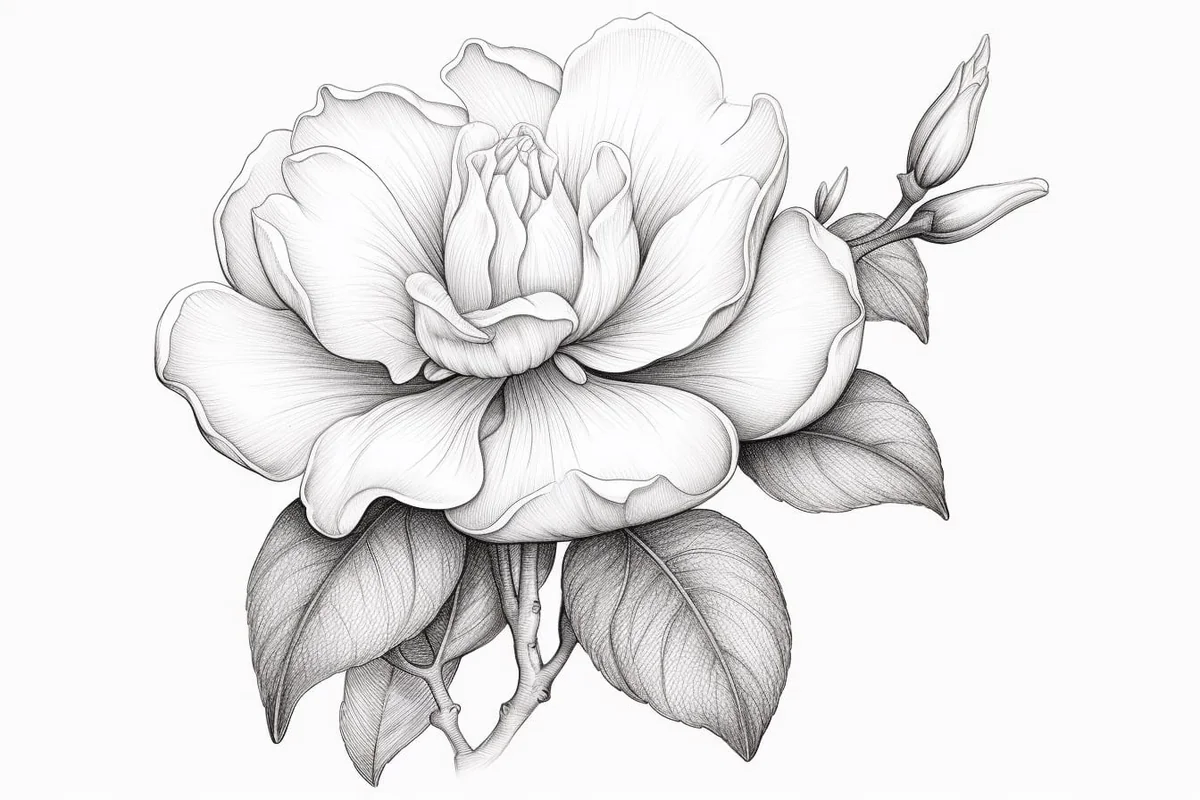
Galley of Gardenia Drawings


Fun Facts About Gardenias
-
Gardenias are known for their creamy white blossoms and intoxicating fragrance, often used in perfumes, essential oils, and romantic bouquets.
-
They belong to the coffee family (Rubiaceae)—yes, really! Though they won't give you a caffeine buzz, they'll definitely wake up your senses with their scent.
-
Native to tropical and subtropical regions of Africa, Asia, and the Pacific Islands, gardenias thrive in warm, humid climates and well-drained, acidic soil.
-
The gardenia flower symbolizes purity, sweetness, secret love, and grace, making it a favorite for weddings and heartfelt gifts.
-
Some species can grow as shrubs, while others can reach the size of small trees—with glossy dark green leaves that provide a striking contrast to their white blooms.
-
Gardenias are finicky but rewarding plants—they need the perfect balance of light, water, and humidity to bloom at their best.
-
In flower language (floriography), sending someone a gardenia can be a way to say "You're lovely" or "I think of you secretly."
-
Southern gardenias are iconic in the American South, often grown near porches and patios to let their scent drift in with the evening breeze.
-
Because of their visual elegance, gardenias are often featured in fashion illustrations, vintage botanical prints, and minimalist tattoo designs.
-
Though mostly seen in white, some gardenia varieties bloom in soft yellows or creamy shades, giving artists a bit of room for creativity in their palettes.
Suggested Scenes and Settings for Gardenia Drawings
-
Botanical Study Page: Create a vintage-style sketch showing the gardenia's bloom, leaves, and labeled parts—ideal for a journal or floral-themed art series.
-
Porch Garden Glow: Draw a gardenia bush beside a white wooden porch at sunset, with the petals glowing softly and a rocking chair nearby.
-
Morning Dew Close-Up: Illustrate a single gardenia bloom with drops of dew on its petals, catching the morning light like tiny gems.
-
Romantic Letter Scene: Picture a gardenia placed on an open handwritten letter, with a wax seal, ribbon, and soft shadows setting the tone.
-
Bridal Bouquet: Show a beautiful bouquet of gardenias in a bride's hands, paired with delicate greenery, lace, and pearls.
-
Night Garden Bloom: Design a moonlit scene with gardenias glowing in the dark, stars overhead, and soft fireflies flitting among the petals.
-
Floral Frame or Wreath: Create a decorative border or wreath made entirely of gardenia blooms and leaves, perfect for invitations or poetic illustrations.
-
Perfume Bottle Still Life: Illustrate a vintage perfume bottle with a gardenia blossom next to it—elegant, classic, and timeless.
-
Tea Table Arrangement: Show a dainty tea table in the garden, with a vase of gardenias, porcelain cups, and a breeze catching the curtains.
-
Fantasy Garden Gateway: For a magical twist, draw a gardenia-covered archway leading to a secret enchanted garden or fairy glade.