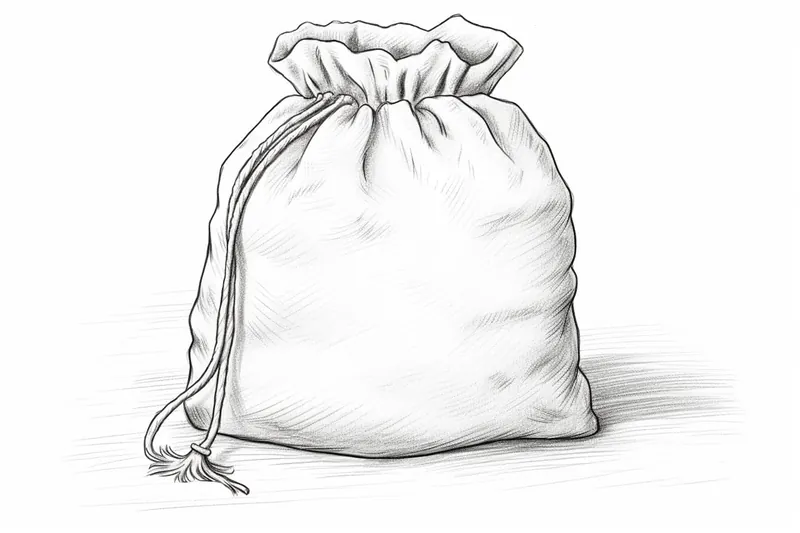
How to Draw a Bag
Learn how to draw a bag in a realistic and visually appealing way with this step-by-step tutorial. From basic shapes to adding texture and color, unleash your creativity and create stunning bag drawings.
Materials You'll Need
- Pencil
- Paper
- Eraser
Drawing is a timeless and fulfilling way to channel your creativity, allowing you to transform simple lines and shapes into compelling visual stories. In this tutorial, we focus on how to draw a bag—a versatile and interesting subject that offers ample opportunity to practice capturing form, texture, and perspective. Bags come in many styles, from sleek leather purses to casual backpacks, making them an excellent choice for artists eager to refine their observational skills and experiment with different design elements. Whether you want to illustrate fashion accessories, create still-life compositions, or simply improve your technical drawing abilities, learning to draw a bag opens the door to countless creative possibilities.
This tutorial is designed for artists at all skill levels, from beginners who are just starting to explore basic shapes and shading, to more experienced illustrators interested in enhancing their realism and detail work. You'll learn to break down the bag's structure into simple geometric forms, understand how light and shadow define its volume, and apply textural details that bring your drawing to life. Techniques such as contour drawing, proportional measurement, and layering shadows will be covered, helping you build confidence with each step. By following this guide, you'll gain valuable insight into composition and develop a sharper eye for subtle nuances that make your artwork stand out.
Embracing the challenge of how to draw a bag can be both rewarding and enjoyable, offering a perfect mix of creativity and technical practice. Remember, every stroke brings you closer to mastering this subject, so don't be discouraged by initial difficulties. With patience, attention to detail, and a willingness to experiment, you'll soon create drawings that capture the unique character and charm of any bag you choose to depict. So gather your materials, set up your workspace, and embark on this artistic journey with confidence and excitement—your next masterpiece awaits!
Step 1: Basic Shapes and Proportions
To begin drawing a bag, we'll start with its basic shape and proportions. Visualize the bag's structure and imagine it as a simple rectangular box. Use your pencil to lightly sketch a rectangular shape on your paper. This will serve as the foundation for the bag's body.
Step 2: Adding Details and Handles
Now, let's add some details to our bag drawing. Decide on the type of bag you want to draw, such as a tote bag or a backpack. Then, carefully observe reference images or real-life bags to understand the placement and shape of different elements.
Draw the handles of the bag. These can be simple loops or more complex shapes, depending on the style of the bag. Remember to consider the perspective and how the handles attach to the body of the bag.
Step 3: Texture and Surface Details
To make your bag drawing more realistic, it's important to add texture and surface details. Notice the material of the bag and how it reflects light and creates shadows. Use your pencil to add lines and shading to show the creases and folds in the fabric.
If you're drawing a leather bag, add small dots or crosshatching to create a textured appearance. Experiment with different shading techniques to achieve the desired effect.
Step 4: Adding Depth and Dimension
To give your bag drawing depth and dimension, you need to understand the concept of perspective. Consider the angle from which you are viewing the bag. This will determine how the sides and bottom of the bag appear in relation to each other.
Use your ruler to create parallel lines that converge at a single point, known as the vanishing point. This will help you maintain proper proportions and create a more realistic representation of the bag.
Step 5: Coloring and Enhancing the Drawing
Once you're satisfied with the overall structure and details of your bag drawing, you can choose to add color. Colored pencils or markers can be used to bring your artwork to life. Study the colors and patterns of the bag you are drawing, and use your artistic intuition to select the appropriate shades.
Remember to layer the colors gradually, starting with lighter tones and adding darker shades for depth. Blend the colors smoothly to create a polished and professional look.
Conclusion:
Drawing a bag can be a fun and rewarding artistic endeavor. By following these step-by-step instructions and using your creativity, you can draw a realistic and visually stunning bag. Remember to pay attention to proportions, details, texture, and perspective to bring your artwork to life. With practice and patience, you'll be able to master this skill and create beautiful bag drawings. So, grab your pencils and start sketching your favorite bags today!
Fun Facts About Bags
- The word "bag" originates from the Old Norse word "baggi", meaning a sack or pack.
- Bags have been used since ancient times, with the earliest known examples dating back to the Neolithic period, as detailed by the Encyclopedia Britannica.
- The iconic handbag became a fashion staple in the early 20th century, popularized by designers like Coco Chanel, according to the Vogue.
- Backpacks were originally designed for hikers and soldiers but are now widely used in everyday life, as explained by the History Channel.
- Leather is one of the most popular materials for bags due to its durability and aesthetic appeal, with insights available from the Leather International Magazine.
- The world's largest handbag was created in 2012 and measured over 17 feet long, a record documented by the Guinness World Records.
- Reusable shopping bags have become an eco-friendly alternative to plastic bags, helping reduce environmental waste, as noted by the EPA.
- The design and structure of bags often incorporate principles of geometry and perspective, making them a popular subject for artists learning to draw, as discussed by Artists Network.
Suggestions for Scenes and Settings for Bag Drawings
- A vintage leather satchel resting on an old wooden desk cluttered with letters and a fountain pen.
- A colorful backpack leaning against a tree in a sunlit park, surrounded by fallen autumn leaves.
- A sleek designer handbag placed elegantly on a marble countertop with soft natural light highlighting its texture.
- A rugged hiking bag set on rocky terrain with mountain peaks in the background, emphasizing adventure and durability.
- A tote bag filled with fresh flowers and groceries, sitting on the steps of a cozy urban café.
- A school bag casually thrown on the floor beside a pair of sneakers and scattered notebooks, capturing everyday life.
- A beach bag half-buried in sand near colorful seashells and a sunhat, evoking a relaxed summer vibe.
- A futuristic bag with geometric shapes and metallic accents displayed on a minimalist pedestal in a gallery setting.
- A woven market bag hanging from a bicycle handlebar, with a bustling city street as the backdrop.
- A classic briefcase opened on a polished office desk, revealing neatly organized documents and a laptop.