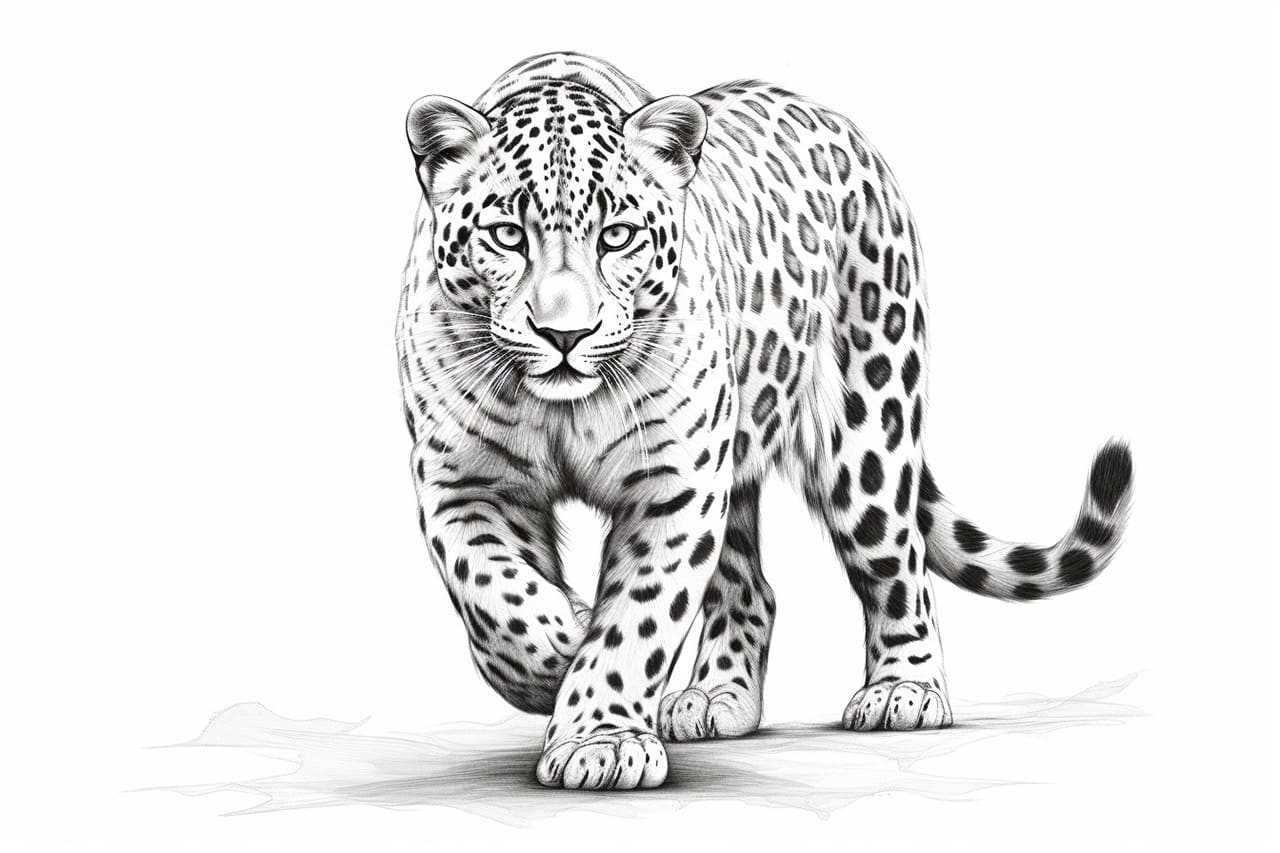
Leopards are some of nature’s most captivating creatures, celebrated not only for their striking spotted coats but also for their agile and elegant movements. As one of the most iconic big cats, their beauty and mystery inspire artists and nature lovers alike. If you’ve ever wanted to capture this enchanting animal on paper, you’re in for a rewarding experience. Drawing a leopard allows you to explore the intricate patterns of their fur and the expressive features that make them so mesmerizing.
In this guide, we will take you through a step-by-step process to help you create a lifelike depiction of a leopard. Whether you’re a beginner looking to sharpen your artistic skills or an experienced artist seeking to refine your technique, this tutorial will cater to all levels. With a little patience and practice, you’ll be able to bring the essence of this majestic animal to life on your canvas.
So, gather your drawing tools and prepare to embark on an artistic adventure. Let’s dive into the fascinating world of leopards and unleash your creativity as we explore the nuances of drawing this magnificent big cat!
Materials Required
To begin drawing a leopard, you will need the following materials:
- Pencil: Use a mechanical or regular pencil with an HB or 2B lead.
- Paper: Choose a smooth drawing paper that is suitable for pencil work.
- Eraser: Have a kneaded eraser and a regular eraser on hand.
- Blending Stump: This tool will help you achieve smooth shading in your drawing.
- Reference Image: Find a clear and detailed reference photo of a leopard to guide your drawing process.
- Optional: Colored Pencils or Markers (if you wish to add color to your drawing)
Now that you have all your materials ready, let’s dive into the step-by-step process of drawing a leopard.
Step 1: Sketch the Basic Shapes
Start by sketching the basic shapes that will serve as the foundation for your leopard drawing. Begin with a large oval shape for the body, and then add a smaller circle for the head. Connect these two shapes with a curved line to form the neck. Next, draw a long, curved line extending from the head, which will represent the back.
Step 2: Define the Face and Features
In this step, you will focus on the face and facial features of the leopard. Using your reference photo as a guide, sketch the eyes, nose, and mouth. Pay attention to the shape and placement of these features to capture the leopard’s expression accurately. Add small triangular shapes for the ears on top of the head. Don’t forget to add the distinctive rosette patterns on the face and neck.
Step 3: Outline the Body
Now it’s time to outline the body of the leopard. Use light, gentle strokes to draw the shape of the body, following the reference photo for guidance. Pay close attention to the curvature of the back, and don’t forget to include the tail, which should be long and tapering towards the end. Keep your lines loose and fluid, as you can refine them later.
Step 4: Add Details and Textures
Leopards have a unique coat pattern that consists of rosettes and spots. Start adding these patterns to your drawing by lightly sketching the shapes and placement of the spots. Focus on the areas of the body that are directly visible in your reference photo, and remember to maintain the overall shape and proportions. Use short, curved lines to create the texture of the fur.
Step 5: Refine and Shade
Now that you have the basic outline and details, it’s time to refine your drawing and add shading to create depth and dimension. Use an eraser to lighten any unnecessary lines from your initial sketch. Then, start shading the different areas of the leopard’s body using a pencil. Pay attention to the light source in your reference photo and shade accordingly to create highlights and shadows.
Step 6: Blend and Texture
To achieve a smooth and realistic appearance, use a blending stump to blend the pencil shading. This will help soften any harsh lines and create a more cohesive look. Be careful not to over-blend, as you still want to retain some texture in the fur. Use your pencil to add fine details and refine the pattern of the spots and rosettes.
Step 7: Finalize the Drawing
In this final step, take a step back and evaluate your drawing as a whole. Make any necessary adjustments or refinements to capture the essence of a leopard. Pay attention to the overall proportions, the flow of the body, and the placement of the spots. Take your time with this step, as small changes can make a big difference in the final result.
Wrapping Up How to Draw a Leopard
Drawing a leopard requires patience, attention to detail, and a willingness to practice. By following the step-by-step guide provided in this article, you can create a stunning drawing of this magnificent big cat. Remember to start with basic shapes, define the features, add details and textures, and finally refine and shade your drawing. With practice, your leopard drawings will continue to improve, capturing the beauty and grace of these incredible creatures.
So, grab your drawing supplies, find a reference photo, and let your creativity roar as you embark on this artistic journey of drawing a leopard.