How to Draw an Okapi
Learn how to draw an Okapi in this step-by-step drawing tutorial. Capture the beauty of this African animal with clear instructions and basic materials. Perfect for beginners and experienced artists alike.
Materials You'll Need
- Pencil
- Paper
- Eraser
The okapi is one of nature's most fascinating and elusive creatures, native to the dense rainforests of Central Africa. Often called the "forest giraffe," the okapi boasts a striking appearance with velvety brown fur, zebra-like stripes on its legs, and large, expressive eyes. Despite being closely related to the giraffe, its unique features make it a captivating subject for artists who are passionate about wildlife and biodiversity. Drawing an okapi not only helps you appreciate the subtle beauty of this rare animal but also deepens your understanding of animal anatomy and texture.
Learning how to draw an okapi is a rewarding experience whether you're a beginner eager to build your skills or an experienced artist looking to expand your portfolio with exotic wildlife. In this tutorial, you'll discover techniques for capturing the okapi's distinctive body shape, intricate patterns, and gentle expression. We'll break down the process into easy-to-follow steps, focusing on essential drawing techniques such as outlining, shading, and adding realistic details. This subject presents a perfect balance of challenge and enjoyment, helping you improve your observation and rendering abilities.
Regardless of your current skill level, don't hesitate to embark on this creative journey. With a bit of patience and practice, you'll soon have a beautiful okapi illustration to be proud of. Remember, every artist starts somewhere, and each drawing brings you closer to mastering your craft. So gather your drawing materials, follow along, and let's explore how to draw an okapi together!
Materials Required
To begin your Okapi drawing, gather the following materials:
- [Drawing paper or sketchbook](https://yonderoo.com/best-sketchbooks-for-artists/)
- Pencil (HB or 2B recommended)
- Eraser
- Fine-tip black marker or pen (optional)
- Colored pencils or markers (optional)
With these supplies ready, you'll be well-equipped to bring the Okapi to life on your page.
Step 1: Start with Basic Shapes
Begin by lightly sketching basic shapes to establish the Okapi's proportions. Start with an oval shape for the body, a circle for the head, and smaller circles for the ears. Connect these shapes with simple lines to outline the Okapi's body.
Step 2: Add Facial Features
Tip: As you work through the drawing steps, consider using reference images of okapis to enhance your accuracy in capturing their unique proportions, markings, and textures. Observing these details will not only improve your representation but also help you appreciate the subtle beauty of this remarkable animal, making your artwork more lifelike and engaging.
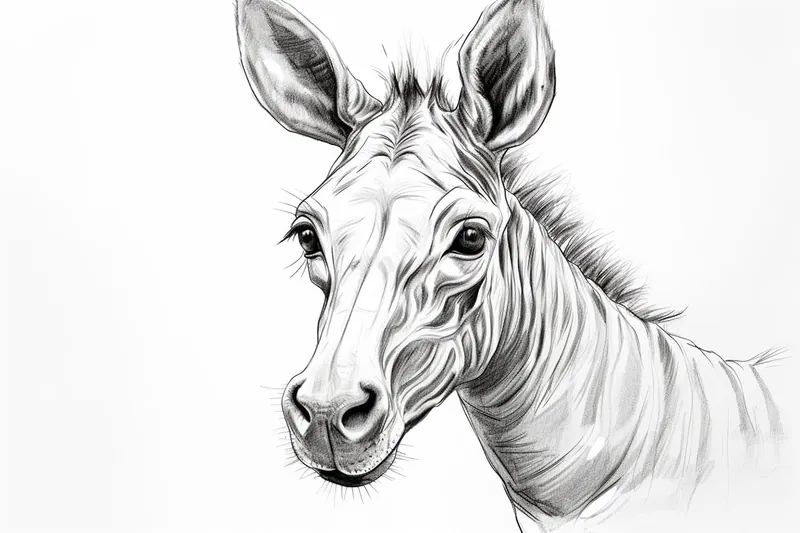
In this step, focus on the Okapi's face. Draw two almond-shaped eyes, leaving some space between them. Add a small, triangular-shaped nose in the center, and a horizontal line slightly below it to mark the mouth. Don't forget to include the distinctive white stripes on the face, extending from the eyes to the snout.
Step 3: Define the Body
Now it's time to add more details to the Okapi's body. Draw the characteristic short, rounded horns on top of the head. Add the ears by sketching their unique shapes. Use curved lines to define the Okapi's neck, back, and legs. Remember to leave some space for the legs to appear in a walking position.
Step 4: Sketch the Legs and Hooves
With the basic body outline in place, focus on drawing the legs and hooves of the Okapi. Use long, curved lines to create the front legs, starting from the chest and extending towards the ground. Add smaller, rounded shapes at the bottom to represent the hooves. Repeat this process for the hind legs, remembering that they should appear slightly longer than the front legs due to the Okapi's natural posture.
Step 5: Refine the Face and Neck
Return to the face and neck of the Okapi, and refine the details. Add depth to the eyes by drawing small circles within them and shade them partially. Define the shape of the nose and mouth using more precise lines. Pay attention to the unique pattern of the Okapi's face and add the required stripes and markings using short, curved lines.
Step 6: Add Body Details
In this step, focus on adding more details to the Okapi's body. Observe the reference image or your own imagination to draw the patches and markings on the Okapi's fur. These markings usually consist of irregular shapes and lines that can vary from one Okapi to another. Take your time to achieve a realistic and visually appealing result.
Step 7: Refine the Legs and Hooves
Refine the previously sketched legs and hooves by adding more details and definition. Pay attention to the muscular structure of the Okapi's legs and emphasize it through subtle shading and contouring. Add curved lines to mark the joints and differentiate between the different parts of the legs.
Step 8: Finalize the Outline
Now that your Okapi is taking shape, go over the entire drawing and finalize the outline. Erase any unnecessary guidelines and make sure the proportions and shapes are accurate. Use a darker pencil or a fine-tip black marker to trace over the final lines, creating a clean and defined outline.
Step 9: Add Shadows and Textures (Optional)
For those looking to add more depth and realism to their drawing, this step is for you. Study the reference image or imagine a light source, and add shadows accordingly. Use hatching or cross-hatching techniques to create shading and texture on the Okapi's body. Take your time with this step, as it can greatly enhance the overall appearance of your artwork.
Step 10: Color Your Okapi (Optional)
If you prefer to add color to your drawing, now is the time to do it. Use colored pencils or markers to bring your Okapi to life. Observe the actual colors of an Okapi or use your imagination to create a unique and vibrant representation. Layer the colors gradually, building up the tones and textures of the fur. Remember to use gentle strokes and blend the colors smoothly for a more realistic effect.
Once you've finished coloring your Okapi, step back and admire your masterpiece!
Did You Know?: Okapis have an impressively long, prehensile tongue—sometimes reaching up to 18 inches (45 cm)! This remarkable tongue isn't just for eating leaves high up in the forest understory; okapis use it to clean their eyes and even the insides of their ears. While you're drawing, notice how this adaptation is reflected in their elegant head shape and the gentle slope of their snout. Understanding these subtle anatomical features can help you capture the okapi's unique charm and add life to your artwork.
Conclusion
Congratulations on completing your Okapi drawing! By following these step-by-step instructions and using your creativity, you have successfully captured the essence of this facescinating African animal. Whether you're a beginner or an experienced artist, drawing an Okapi offers an opportunity to improve your skills and learn more about nature's diversity. So keep exploring the world of art and continue to challenge yourself with new subjects, techniques, and animals to draw.
Fun Facts About Okapi
- The okapi is the only living relative of the giraffe.
- Okapis have zebra-like stripes on their legs, but they are not related to zebras.
- They are native exclusively to the rainforests of the Democratic Republic of Congo.
- Okapis have long, prehensile tongues that can reach up to 18 inches, which helps them strip leaves from trees.
- Despite their size, okapis are extremely elusive and were unknown to the Western world until 1901.
- Okapis communicate using infrasound, which is below the range of human hearing.
- Both male and female okapis have large, flexible ears that can rotate independently to detect sounds.
- Only male okapis have ossicones, which are short, skin-covered horn-like structures.
Suggestions for Scenes and Settings for an Okapi Drawings
- An okapi quietly sipping water from a rainforest stream, lush greenery reflected in the water.
- A pair of okapis foraging among giant ferns and dense undergrowth, highlighting their camouflage.
- A close-up portrait of an okapi, focusing on its expressive eyes and intricate facial stripes.
- An okapi standing in a sun-dappled forest clearing, rays of light filtering through the canopy.
- A young okapi calf nuzzling its mother beneath towering tropical trees.
- An okapi cautiously crossing a muddy path, with colorful rainforest birds perched nearby.
- An okapi peering curiously through a curtain of hanging vines, with mist swirling in the background.
- A dramatic night scene with an okapi illuminated by moonlight, surrounded by mysterious shadows.
- An okapi resting among wildflowers and tall grasses, butterflies fluttering around its legs.
- A stylized composition combining the okapi with abstract jungle patterns and bold colors for a modern art piece.