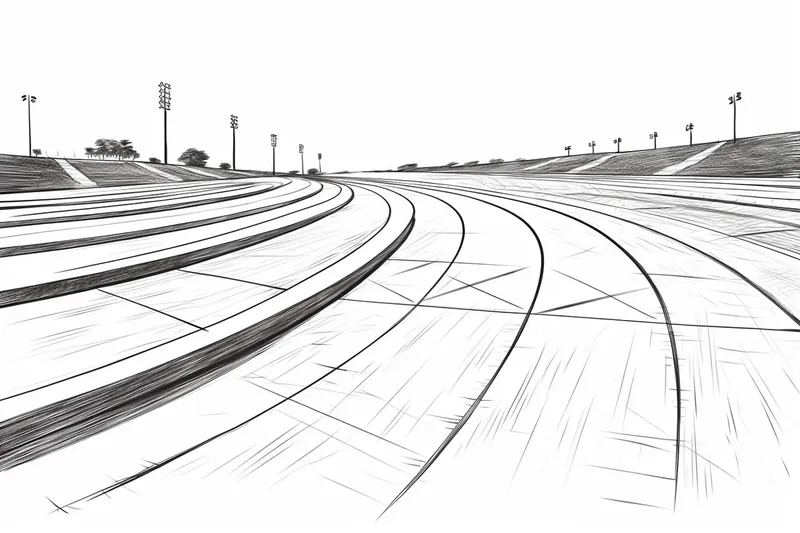
How to Draw a Track
Learn how to draw a track with this step-by-step guide. From basic shapes to shading, create a realistic track drawing with expert tips.
Materials You'll Need
- Pencil
- Paper
- Eraser
Tracks are a fascinating subject to draw, whether you're thinking of the winding lanes of an athletic running track, the straight lines of a racing circuit, or even the rustic charm of a railroad track stretching into the distance. Tracks often symbolize journeys, goals, and movement, making them a popular motif in both realistic and imaginative art. Learning how to draw a track not only helps you develop your technical drawing skills, but also allows you to explore perspective, depth, and symmetry in your artwork. This subject is a great way to practice basic shapes and lines while also challenging yourself to create a sense of space and direction on the page.
Whether you're a beginner wanting to improve your understanding of perspective or an intermediate artist hoping to add more detail to your scenes, drawing a track is a rewarding exercise. Tracks are often part of larger landscapes or action scenes, so mastering them can enhance your ability to build more dynamic compositions. In this tutorial, we'll break down the process into simple, manageable steps — from sketching out the initial guides to refining the details and adding realistic shading. Along the way, you'll pick up useful tips for keeping your lines clean and your proportions accurate.
If you've ever wondered how to draw a track that looks both realistic and visually striking, you're in the right place. All you need are some basic drawing materials and a little patience as you learn each step. Remember, every artist improves with practice, so don't be afraid to make mistakes and try again. Let's get started and see where your creativity takes you!
Materials Required
Before we begin, make sure you have the following materials on hand:
- Pencil (preferably HB or 2B)
- Eraser
- Ruler
- Drawing paper
Now that we have everything we need, let's dive into the step-by-step process of drawing a track.
Tip: To enhance the realism of your track drawing, consider studying reference images of actual tracks to better understand how perspective affects their appearance. Pay close attention to how the lines converge at a vanishing point and the subtle variations in width and curvature, which can help you create a more dynamic and visually appealing representation. Additionally, practicing different lighting conditions can dramatically change the mood of your drawing, so experiment with shading techniques to depict shadows and highlights accurately.
Step 1: Start with Basic Shapes
Begin by lightly sketching two straight lines that will act as the starting and finishing points of the track. These lines should be parallel and slightly curving towards each other, giving the impression of depth. Use a ruler to ensure the lines are straight.
Step 2: Draw the Outer Boundaries
Next, draw the outer boundaries of the track. Start from the starting point and draw a curved line that connects to the finishing point. This will form the outer edge of the track. Keep the curve smooth and symmetrical.
Step 3: Add the Inner Boundaries
Use the same technique as in Step 2 to draw the inner boundaries of the track. These lines should be parallel to the outer boundaries and slightly closer to the center. The width between the inner and outer boundaries will determine the width of the track.
Step 4: Create the Track Surface
Now it's time to add the texture and details to the track surface. Start from one end of the track and draw short, curved lines across the width of the track. These lines should be close together and follow the curve of the track. Repeat this process until you cover the entire track surface.
Step 5: Draw the Lane Dividers
To give the track a more realistic look, draw lane dividers along the inner boundaries. These dividers will separate each lane on the track. Use short, straight lines and make sure they are evenly spaced.
Step 6: Add Details to the Track Surface
To make the track surface look more realistic, add various details such as tire marks, skid marks, and small stones. Use small, irregular shapes and lines to create these details. Pay attention to the areas where cars would naturally leave marks, such as turns and braking points.
Step 7: Shade the Track
To add depth and dimension to your drawing, it's important to add shading. Determine the direction of the light source and shade the areas of the track that would be in shadow. Use light, circular motions with your pencil to create a smooth and even shading effect.
Step 8: Add Final Touches
Take a step back and evaluate your drawing. Look for any areas that may need adjustment or additional details. Use your eraser to lighten any lines that are too dark or correct any mistakes. Once you're satisfied with your drawing, you're ready to call it complete.
Mistake Alert: A frequent stumbling block when drawing tracks is misjudging the way parallel lines appear in perspective, especially when they seem to run straight off into the distance. Beginners often accidentally keep the sides of the track perfectly parallel on the page, which can make the drawing look flat and unnatural. This happens because our brains know tracks are parallel in real life, but in art, perspective causes those lines to converge as they recede. To avoid this, always establish a clear vanishing point on your horizon line and make sure both sides of your track angle toward it. Lightly sketch perspective guidelines first—these will help you maintain the illusion of depth and ensure your track looks like it truly stretches into the distance.
Conclusion
Congratulations! You've successfully learned how to draw a track. By following this step-by-step guide, you've created a realistic representation of a track with all its details and textures. Remember, practice makes perfect, so keep honing your drawing skills and explore different techniques to further enhance your artwork. Enjoy the process and have fun with your drawings!
Fun Facts About Track
- The standard outdoor running track is 400 meters in length.
- Railroad tracks are typically spaced 4 feet 8.5 inches apart, a measurement known as the standard gauge.
- The first modern Olympic running track was made of cinder and debuted in 1896.
- Formula 1 racing tracks, or circuits, can range from under 2 miles to over 4 miles in length.
- Indoor running tracks are usually 200 meters long and often feature banked curves.
- Railroad tracks are made from high-quality steel to withstand heavy loads and extreme weather.
- The oldest known running tracks date back to ancient Greece, where the stadion was used for footraces.
- Some of the world's most famous tracks, like the Indianapolis Motor Speedway, are nicknamed "The Brickyard" because they were originally paved with bricks.
- Modern synthetic running tracks are made from materials like polyurethane, which provide better traction and shock absorption.
Suggestions for Scenes and Settings for Track Drawings
- A sunrise over an empty running track, with long shadows stretching across the lanes.
- A train winding along a railroad track through a misty forest or mountain pass.
- A racing circuit with blurred cars zooming around a sharp bend, capturing the excitement of a race.
- An abandoned or overgrown track reclaimed by nature, with grass and flowers sprouting between the rails or lanes.
- A bird's-eye view of a stadium track during a major athletic event, bustling with runners and cheering crowds.
- A futuristic track lit by glowing neon lights, set in a sci-fi or cyberpunk cityscape.
- A child's toy train track winding through a miniature landscape of tiny houses and trees.
- A track disappearing into the horizon at sunset, symbolizing a journey or new beginnings.
- A muddy motocross track filled with tire tracks and flying dirt as riders compete in a race.
- An old, weathered wooden boardwalk track leading across a serene beach or marshland.