How to Draw a Poodle
Learn how to draw a poodle.

Materials You'll Need
- Pencil
- Paper
- Eraser
 Welcome to this artistic journey into the world of poodles! Known for their graceful demeanor and iconic fluffy coats, poodles are a favorite subject for artists who want to capture the charm and sophistication of this elegant breed. In this step-by-step tutorial, we'll guide you through the process of how to draw a poodle with a technique that's as unique as these beloved dogs.
Whether you're picking up a pencil for the first time or you're a seasoned artist looking to refine your skills, this guide is tailored for all levels. From outlining the basic shape to adding intricate details and texture, every step is designed to make the process enjoyable and achievable.
So, gather your favorite drawing supplies—pencils, markers, or colored pencils—and find a cozy spot to let your creativity flow. Let's dive into the art of drawing a poodle and bring this fluffy, elegant companion to life on paper!
Materials Required
Before we begin, make sure you have the following materials:
- A sheet of paper
- Pencil
- Eraser
- Fine-tip black pen or marker
- Colored pencils or markers (optional)
Now, let's dive into the steps to draw a poodle in detail.
How to Draw a Poodle: A Step-by-Step Guide to Capturing Fluffy Elegance
Step 1: Begin with the Basic Outline
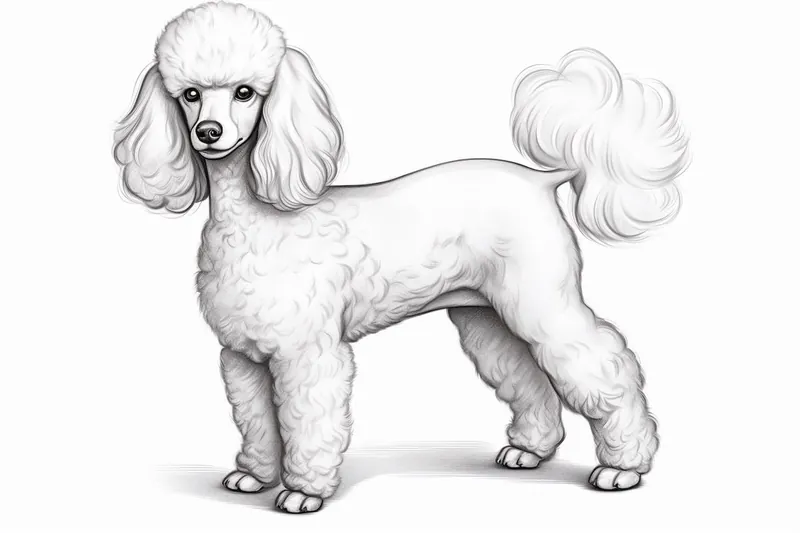
Let's start by laying the groundwork for your poodle masterpiece! Draw a large oval in the center of your paper—this will be the poodle's body. Above it, add a smaller circle for the head. Connect the head to the body with a curved line to form the neck. Finally, extend a long, curved line from the back of the oval to sketch the tail. Keep your lines light and easy to adjust.
Step 2: Sketch the Facial Features
Bring your poodle's face to life! Inside the head circle, draw two small circles for the eyes. Add an even smaller oval within each eye for the pupils, leaving a tiny white spot to make them sparkle. Below the eyes, sketch a round nose, and just beneath it, draw a slight curve to create a cheerful smile. Your poodle is already starting to show its friendly personality!
Step 3: Create the Signature Ears and Topknot
Poodles are famous for their droopy ears and fancy topknot. Draw two elongated, teardrop-shaped ears that hang down from either side of the head. These ears should taper slightly at the ends for a natural flow. Next, add a fluffy oval above the head circle for the topknot. Use small, curved lines to give the topknot a textured, cloud-like appearance.
Step 4: Define the Body Shape
Now, refine the outline of the poodle's body. Follow the initial oval shape, but use short, curved lines to mimic the fluffy texture of the poodle's coat. Extend these lines up to the neck and down the back to the tail. For the tail, use overlapping curves to create the appearance of soft fur.
Step 5: Sketch the Legs and Paws
A poodle's legs are slim and elegant, yet fluffy. Start by drawing two front legs extending from the bottom of the body, making them slightly curved to suggest movement. Add small, curved lines at the joints to emphasize the fur. Repeat the process for the hind legs, angling them slightly for a realistic stance. Finally, sketch small ovals at the base of each leg to represent the paws.
Step 6: Add Fluffy Fur Texture
Here's where the magic of the poodle's coat comes to life! Use short, overlapping curved strokes to create the curly, voluminous texture of the fur. Focus on the body, tail, and ears, layering the strokes to achieve depth. Take your time—this step is essential for capturing the poodle's unique look.
Step 7: Refine the Face
Return to the face to fine-tune the details. Darken the eyes, leaving a small white circle in each pupil for a lively sparkle. Draw a tiny triangular shape below the nose for the mouth and add fine lines around it for a subtle smile. Refine the fur around the face with delicate, curly strokes to frame the poodle's charming expression.
Step 8: Polish the Drawing
Step back and review your work so far. Erase any unnecessary guidelines and refine the overall shape. Once satisfied, go over your pencil lines with a fine-tip black pen or marker for a bold and polished look. Allow the ink to dry completely before erasing remaining pencil marks.
Step 9: Add Color and Bring Your Poodle to Life (Optional)
If you'd like to add color, now's the time to make your poodle pop! Use colored pencils, markers, or pastels to bring the drawing to life. Poodles can have coats in shades like white, black, apricot, or gray, so choose your palette based on your vision. Layer colors to add depth and texture to the fur, and don't forget subtle shading for a three-dimensional effect.
Tip: To capture the distinctive fluffy texture of a poodle's coat, start by using a soft pencil (like a 2B or 4B) to outline the overall shape of the body and head. Once you have your basic structure, switch to a fine-tipped pencil for detailing the fur. Instead of drawing solid lines, use short, quick strokes to mimic the soft curls of the poodle's coat, varying the pressure to create depth and dimension. Remember to observe references closely; notice how the light plays on the fur to inform your shading. Finally, consider using a blending stump or your fingertip to gently soften any harsh lines, adding a realistic touch to your drawing. Enjoy the process, and don't be afraid to experiment with different strokes!
Fluffy Finale: Your Poodle is Picture-Perfect!
Congratulations, artist! You've successfully drawn a delightful poodle that captures its elegance and fluffiness. From its cheerful expression to its signature coat, your drawing showcases your growing artistic skills.
Drawing a poodle is more than an artistic exercise—it's a chance to explore texture, expression, and personality in your artwork. Keep practicing and experimenting with different poses, colors, and styles to develop your talent further.
Remember, each drawing is a step toward mastery, so enjoy the process and let your creativity shine. Your poodle is just the beginning of a world filled with furry and fabulous possibilities. Happy drawing! ✨