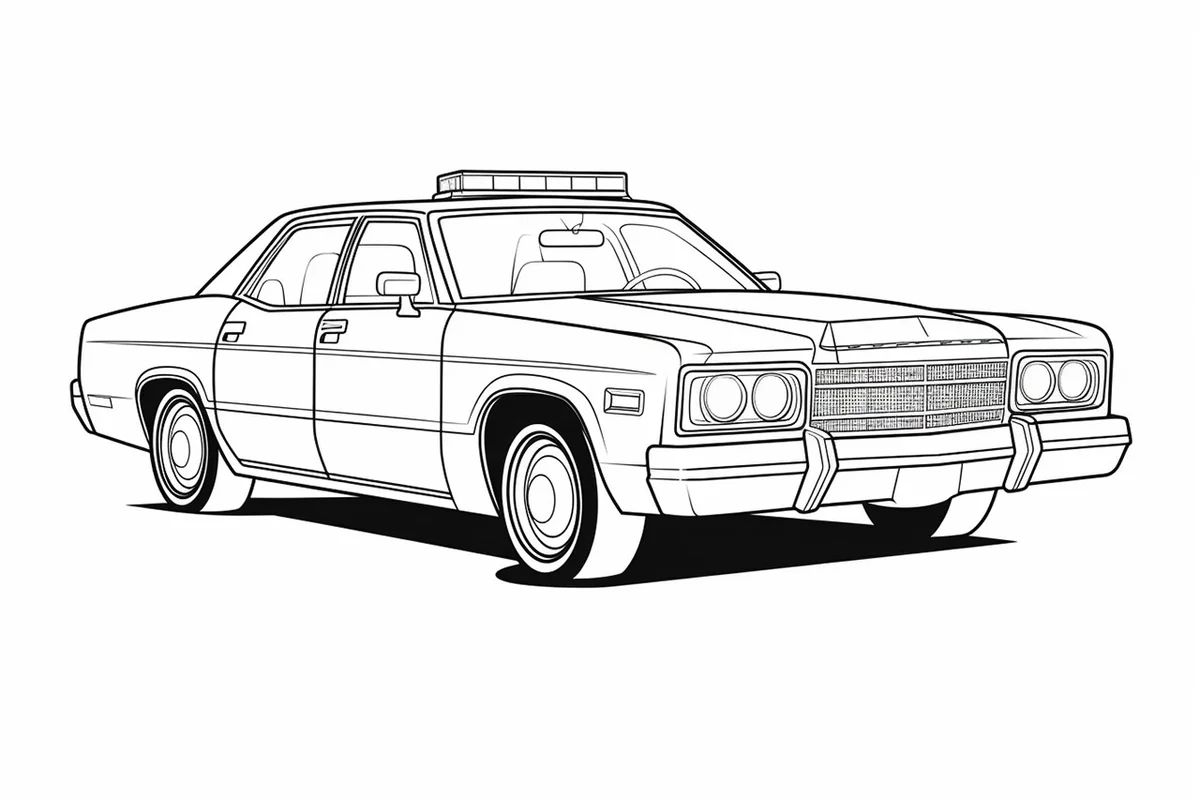
How to Draw a Police Car in 9 Easy Steps
Learn how to draw with this step-by-step tutorial.
Materials You'll Need
- Drawing paper
- Pencil (HB or 2B)
- Eraser
- Colored pencils
- Ruler
- Blending stump
Are you ready to dive into the world of drawing? In this tutorial, we will embark on an exciting journey to create a detailed and realistic drawing of a police car. Whether you're picking up a pencil for the first time or you're an experienced artist looking to refine your skills, this step-by-step guide is designed to cater to everyone. With clear instructions and helpful tips, you'll soon learn how to draw a police car on paper.
Drawing can be a rewarding and therapeutic activity, allowing you to express your creativity while honing your artistic abilities. A police car, with its distinct shapes and features, serves as an excellent subject for honing your skills. As we progress through this tutorial, you'll learn how to capture the unique characteristics of these vehicles—from their streamlined bodies to their iconic lights and markings.
So, gather your materials and get comfortable! We're about to embark on a creative adventure that will enhance your drawing skills and provide you with a sense of accomplishment. Grab your pencils, and let's get started on creating an impressive police car drawing!
Materials Required
Before we begin, let's gather the materials you will need for this drawing:
-
Eraser
-
Ruler
-
Reference image of a police car (a simple search online will provide you with plenty of options)
Now that we have all the necessary materials, let's dive into the steps of drawing a police car.
How to Draw a Police Car: A Step-by-Step Guide ✏️
Police cars are iconic vehicles known for their bold designs, flashing lights, and sleek body shapes. Whether you're drawing a modern patrol car, a high-speed interceptor, or a vintage police cruiser, getting the proportions, details, and shading right will make your drawing stand out with realism and precision.
In this step-by-step guide, you'll learn how to sketch, refine, and add depth to a detailed police car drawing. So, grab your pencil, eraser, and ruler, and let's get started! ✨
Step 1: Outline the Basic Shape
Before diving into the details, start with a basic framework for your police car.
-
Main Body: Sketch a large rectangle to represent the car's main structure.
-
Cabin: Add a smaller rectangle on top for the windshield and roof.
-
Light Bar: Draw a thin rectangle on top of the roof to mark where the siren lights will go.
Tip: Keep your lines light and loose so you can adjust them later.
Step 2: Define the Car's Proportions
To ensure accuracy and realism, refine the proportions of the car:
-
Use a ruler to create guidelines that help align features like windows, doors, and wheel placement.
-
Lightly sketch horizontal lines to keep the car symmetrical and proportionate.
-
Make sure the roof isn't too flat—police cars have slightly curved tops.
Tip: If you're drawing a modern police sedan, keep the car long and sleek. For a vintage cop car, give it a boxier look.
Step 3: Draw the Wheels
Wheels are crucial for making your car look realistic and grounded.
-
Sketch two large circles for the wheels, making sure they're evenly spaced and aligned.
-
Inside each wheel, draw a smaller circle for the rims.
-
Add tire treads or hubcap details if you want to add extra realism.
Tip: Cars tilt slightly backward or forward in motion—keep this in mind when placing the wheels!
Step 4: Refine the Body & Windows
Now, it's time to clean up the main shape and add structure to the car's frame.
-
Smooth out the body, giving it sleek curves or sharp edges depending on the car model.
-
Outline the windows and doors, making sure the front and rear windows are slanted slightly for a natural perspective.
-
Add a side mirror on the driver's side.
-
Sketch thin lines for door seams, keeping them parallel to the body shape.
Tip: Police cars often have reinforced panels—you can indicate this with extra detailing on the doors and bumpers.
Step 5: Draw the Lights & Siren
A police car isn't complete without its flashing lights!
-
Light Bar: Refine the thin rectangle on the roof into a detailed siren light bar.
-
Headlights & Taillights: Add rectangles or oval shapes at the front and back.
-
Additional Lights: Some police cars have small circular lights on the bumper or roof—add these if desired.
Tip: If you want to show flashing lights in action, draw glowing effects or motion lines around the siren!
Step 6: Add the Police Decals & Numbers
Make it clear that this is a police car by adding official decals and markings!
-
"POLICE" Logo: Draw large, bold letters on the side of the car.
-
Badge or Star: Some police cars have department logos on the doors.
-
Unit Number: Sketch a four-digit number on the roof, hood, or side panel.
Tip: If you're drawing a highway patrol car, you might also add a black-and-white color scheme!
Step 7: Refine the Details ️
At this stage, start polishing the smaller details that make the car realistic.
-
Grille & Bumper: Draw the grille lines on the front. For extra detail, add a push bar if your police car has one!
-
Side Mirrors & Handles: Add small rectangular handles on the doors and a side mirror on the driver's side.
-
Exhaust Pipe & Antennas: If your police car has antennas, exhaust pipes, or extra sirens, sketch them in now!
Tip: Look at real police cars for inspiration—every model has unique features!
Step 8: Shade & Add Shadows
Tip: To enhance your police car drawing, consider practicing different shading techniques to create dynamic textures and depth. Experiment with cross-hatching, stippling, or using a blending stump for smoother transitions, and remember to observe how light interacts with real cars—this will help you achieve a more realistic and three-dimensional appearance.
Shading is key to making your police car look three-dimensional.
-
Determine the light source—shade the opposite side to create contrast.
-
Use soft strokes to blend shadows into the car's body.
-
Darken the tires, undercarriage, and areas behind the wheels for added depth.
-
Create reflections on the windows using lighter shading.
Tip: Police cars often have shiny surfaces—leave some highlight areas blank to create a glossy effect!
Step 9: Finalize the Drawing ✍️
Now that everything is in place, it's time to clean up and finalize your police car drawing.
-
Go over the final outline with a fine-tip pen or dark pencil.
-
Carefully erase any unnecessary guidelines to make the car look crisp.
-
Add last-minute shading and check for any missing details.
Tip: If you want to make your police car stand out, add motion lines, background elements, or a cityscape behind it!
Your Police Car Drawing is Complete!
Congratulations! You've successfully drawn a detailed and realistic police car, complete with accurate proportions, decals, and shading.
Want to take it further?
-
Try drawing different types of police cars, like SUVs, muscle cars, or futuristic patrol vehicles!
-
Add a background scene—maybe your police car is speeding down the highway or parked outside a station!
-
Experiment with colored pencils or digital tools to create a fully shaded, high-contrast police car drawing!
The more you practice and refine your technique, the better your drawings will become. So keep sketching, stay creative, and bring more awesome vehicles to life! ✨
Gallery of Police Car Drawings


Fun Facts About Police Cars
-
The first police cars, used in the early 20th century, were electric-powered and known as "motorized patrol wagons."
-
Police cars often have special features like reinforced bumpers, heavy-duty suspension, and high-performance engines to support police work.
-
In the 1940s, police cars began using two-way radios, revolutionizing communication for officers on patrol.
-
Many police cars are equipped with onboard computers, license plate readers, and other technology to assist in law enforcement tasks.
-
One of the most famous police cars in popular culture is the Ford Crown Victoria, often depicted in movies and TV shows.
-
Modern police cars often feature a combination of red, blue, and white lights for high visibility during emergencies.
-
Globally, police cars can vary greatly in make and model, from SUVs to sports cars, depending on the region and needs.
-
In the UK, police cars are often referred to as "pandas," likely due to the black and white color schemes historically used.
-
Some police departments have experimented with electric and hybrid vehicles to promote sustainability and efficiency.
-
The interior of a police car is often called the "cockpit" due to its array of controls and equipment similar to that in an aircraft.
Suggestions for Scenes and Settings for Police Car Drawings
-
City Chase: Illustrate an exciting scene of police cars pursuing a speeding vehicle through bustling city streets.
-
Highway Patrol: Create a serene setting with police cars monitoring traffic on a long, open highway under blue skies.
-
Historic Patrol: Draw a vintage police car navigating the cobblestone streets of a historic town square from the early 1900s.
-
Rural Rescue: Depict a police car parked alongside a winding country road, assisting with a roadside incident.
-
Parade Escort: Show police cars leading a festive parade, with balloons and floats trailing behind them.
-
Covert Operation: Picture a scene where unmarked police cars are stationed discreetly, blending in with the cityscape.
-
Winter Patrol: Illustrate police cars moving through a snow-covered landscape, with snowflakes swirling around them.
-
Desert Patrol: Draw police cars kicking up dust as they navigate through a vast desert terrain under the glaring sun.
-
Oceanfront Duty: Create a scene of police cars patrolling a boardwalk alongside crashing ocean waves and beach-goers.
-
Hollywood Set: Imagine a dramatic film set with police cars staged for an action-packed movie shoot.