How to Draw a Harpy Eagle in 10 Simple Steps
Learn how to draw with this step-by-step tutorial.
Materials You'll Need
- Drawing paper
- Pencil (HB or 2B)
- Eraser
- Colored pencils
- Markers
- Blending stump
The Harpy Eagle is one of the most majestic and formidable birds of prey, known for its powerful talons, striking feathered crest, and piercing gaze. As one of the largest and most powerful eagles in the world, this incredible bird makes a captivating subject for artists, whether you're a beginner exploring wildlife drawing or an experienced artist refining your skills.
In this step-by-step tutorial, we'll guide you through the entire process of drawing a realistic Harpy Eagle, from sketching its strong, structured body to adding fine feather details and shading for depth. By the end of this tutorial, you'll have the techniques and confidence to bring this magnificent predator to life on paper.
So, grab your pencils, prepare your sketchbook, and let's embark on an artistic journey to draw the powerful and awe-inspiring Harpy Eagle!
Materials Required
Before we begin, make sure you have the following materials ready:
-
Pencils (HB, 2B, 4B, and 6B)
-
Sketching eraser
-
Blending stump
-
Colored pencils or markers (optional, for adding color to your drawing)
Step-by-Step Guide: How to Draw a Harpy Eagle in Its Rainforest Habitat
The Harpy Eagle is one of the most powerful birds of prey, soaring over the dense rainforests of Central and South America. With its massive wings, piercing eyes, and sharp talons, this apex predator is a symbol of strength and majesty. Capturing its imposing presence on paper requires patience, precision, and an understanding of texture and depth.
Follow this step-by-step guide to sketch, shade, and refine a stunning Harpy Eagle, complete with lush rainforest elements in the background for added realism.
Step 1: Sketch the Basic Shape
Start by lightly sketching the foundation of your Harpy Eagle:
✅ Draw a large oval in the center of your paper—this will be the eagle's body. ✅ Add a smaller oval on top for the head, leaving a little space in between for the neck. ✅ Lightly sketch guidelines for the wings and tail feathers, ensuring the pose matches the eagle's powerful stature.
Tip: Keep your pencil strokes light and loose to allow for easy adjustments later.
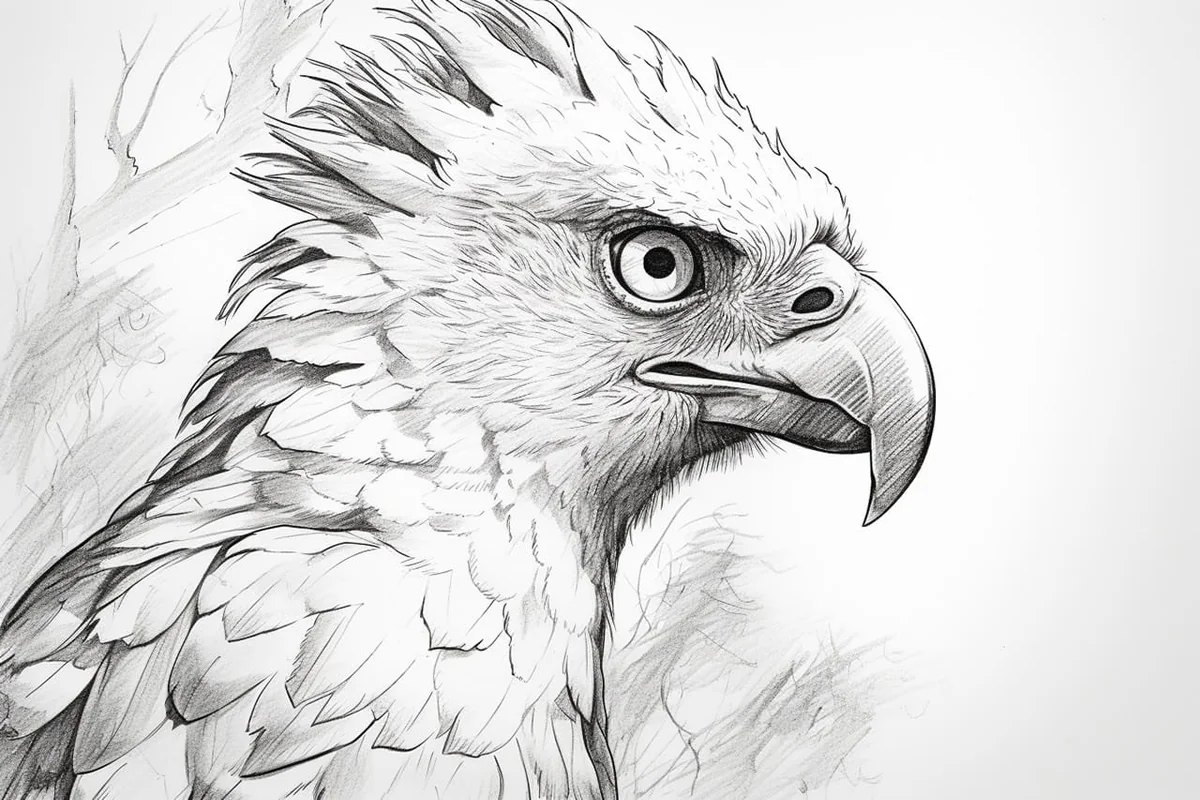
Step 2: Outline the Head and Facial Features
Now, refine the shape of the head to give your Harpy Eagle its distinctive look:
✅ Sketch the curved line of the beak, making it sharp and slightly hooked—this feature is crucial for the eagle's fierce appearance. ✅ Add two small circles for the eyes, ensuring they are positioned symmetrically. ✅ Outline the crown of feathers on the eagle's head—these slightly raised feathers give the Harpy Eagle its unique, regal look.
Tip: Use short, soft pencil strokes to define the feathery texture around the face.
Step 3: Define the Beak and Intense Eyes
The Harpy Eagle's eyes and beak are defining features that contribute to its predatory expression:
✅ Refine the beak, ensuring its sharp curve is well-defined. Add a small triangular shape near the base to indicate the nostrils. ✅ Draw the irises and pupils, making sure to leave a small white reflection spot to give the eyes a realistic shine. ✅ Lightly shade around the eyes to create depth, enhancing the intensity of its gaze.
Tip: The Harpy Eagle's staring expression is one of its most striking features, so take your time getting it right!
Step 4: Outline the Body and Broad Wings
Now, begin shaping the eagle's powerful body and wings:
✅ Extend the outline of the body, refining its broad, muscular chest. ✅ Sketch the large wings, ensuring they appear strong and slightly curved to reflect the bird's flight-ready stance. ✅ Add the long tail feathers extending behind the eagle, slightly fanned out for balance.
Tip: Harpy Eagles roost high in the rainforest canopy, so consider sketching a tree branch beneath its talons for a natural setting.
Step 5: Start Adding Feathers for Texture
✅ Use short, overlapping lines to create the dense, layered feathers of the chest and wings. ✅ The wing feathers should be longer and more structured, while the chest feathers are fluffier. ✅ Add curved, flowing lines on the tail to capture movement and depth.
Tip: Harpy Eagles have gray and white feathers, so use varying line weights to suggest different textures.
Step 6: Draw the Talons and Perch
✅ Sketch the powerful legs, keeping them thick and sturdy. ✅ Draw large, curved talons gripping onto a jungle tree branch, adding small cracks and bark texture to the branch. ✅ If desired, include moss, vines, or leaves to create a more rainforest-themed background.
Tip: The Harpy Eagle's talons are some of the largest of any raptor, so emphasize their size and curvature to show their strength.
Step 7: Add Depth with Shading and Texture
✅ Identify the light source and shade the opposite side of the bird accordingly. ✅ Darken the shadows under the wings, neck, and tail to create a three-dimensional effect. ✅ Use hatching and cross-hatching techniques to add texture to the feathers and tree branch. ✅ Blend shading lightly with a blending stump or tissue for a soft, natural gradient.
Tip: The contrast between the light chest and darker wings will make your drawing pop!
Step 8: Refine the Details and Clean Up the Sketch
✅ Go over your main outlines to ensure the drawing is clean and defined. ✅ Erase any unnecessary guidelines or rough sketches. ✅ Add fine feather details, small highlights, and extra texture to the talons.
Tip: If you want a bold, polished look, go over the final lines with ink or a fine-tip pen.
Step 9: Optional – Add a Rainforest Background
To enhance the scene, add a tropical rainforest setting:
✅ Sketch distant jungle trees and hanging vines in the background. ✅ Lightly shade the sky and distant foliage, keeping the background slightly blurred to maintain focus on the eagle. ✅ Add a light mist or soft clouds to create a mysterious rainforest atmosphere.
Tip: If using color, incorporate deep greens for foliage, warm browns for the branch, and grays and blues for a moody sky.
Step 10: Final Touches and Enhancements
✅ Step back and review your drawing—make any last adjustments to symmetry, shading, and fine details. ✅ Refine the contrast between light and dark areas, ensuring the eagle stands out. ✅ If using colored pencils or markers, gently blend colors for a realistic effect.
Now, your Harpy Eagle is complete—perched high in the rainforest canopy, surveying its domain!
Tip: To capture the essence of the Harpy Eagle, focus on breaking down its intricate features into manageable shapes. Start with basic geometric forms to outline the body and head; for instance, use an oval for the head and a larger oval for the body, then connect them with smooth curves. Pay special attention to the proportions—Harpy Eagles have a powerful build, so emphasize their broad wings and robust talons. As you add details, such as the textured feathers and the fierce expression, use varying pencil pressures to create depth and dimension. Finally, don't shy away from using reference images to understand the unique characteristics of their plumage—this will help you achieve a more realistic depiction!
Final Thoughts on Drawing a Harpy Eagle ✨
Congratulations! You've successfully drawn one of the world's most powerful eagles, capturing its commanding presence and rainforest habitat.
Keep practicing different angles—try drawing the eagle in flight or mid-hunt. Experiment with different shading techniques to refine your ability to create realistic depth. Challenge yourself by sketching other rainforest animals, such as monkeys or toucans, in the background for a dynamic jungle scene.
By honing your skills and exploring different styles, you'll be able to master the art of drawing birds of prey. So, keep sketching, stay inspired, and let your creativity take flight!