How to Draw a Great Dane
Learn how to draw a Great Dane in a step-by-step guide. This tutorial will help you capture the noble features of this majestic breed.
Materials You'll Need
- Pencil
- Paper
- Eraser
Welcome to this comprehensive tutorial on how to draw a Great Dane, one of the most beloved and recognizable dog breeds in the world. Great Danes are often referred to as the "Apollo of Dogs" due to their impressive stature, graceful lines, and dignified charm. These gentle giants have captivated dog lovers and artists alike with their tall, athletic builds, long legs, and expressive faces. Their sleek coats and distinct features make them a wonderful subject for artists who want to practice drawing animals with unique proportions and personality.
Learning how to draw a Great Dane can be a rewarding artistic challenge, whether you are a beginner looking to improve your skills or an experienced artist hoping to add a stunning canine portrait to your portfolio. Drawing a Great Dane allows you to practice important techniques such as sketching accurate body proportions, capturing subtle facial expressions, and rendering short fur textures. This tutorial will break down the process into manageable steps, making it accessible for artists of all levels while emphasizing observation, patience, and creativity.
By the end of this guide, you'll have the confidence to create a realistic and lively depiction of a Great Dane that truly reflects their gentle and noble spirit. Remember, every artist develops their style through practice and experimentation—so don't be afraid to make mistakes and have fun along the way. Gather your sketching materials and let's embark on this creative journey together!
Materials Required
Before diving into the drawing process, gather the following materials:
- Pencils: A range of graphite pencils, including HB, 2B, and 4B.
- Paper: A high-quality drawing paper that can handle shading and erasing.
- Eraser: A kneaded eraser or a soft vinyl eraser for correcting mistakes.
- Blending tool: A paper stump or a blending tortillon for creating smooth transitions.
Now that we have our materials ready, let's begin!
Step 1: Establish the Basic Shapes
Start by lightly sketching the basic shapes that form the structure of a Great Dane. Begin with a large oval for the body and add a smaller oval for the head. Remember to keep these shapes loose and light, as they will serve as a guide for the detailed drawing that follows.
Step 2: Outline the Body
Using the basic shapes as a guide, start outlining the body of the Great Dane. Pay attention to the curves and proportions of the breed. Great Danes have a deep chest, a tapering waist, and a strong rear end. Use light, curved lines to capture these features and give your drawing a sense of motion.
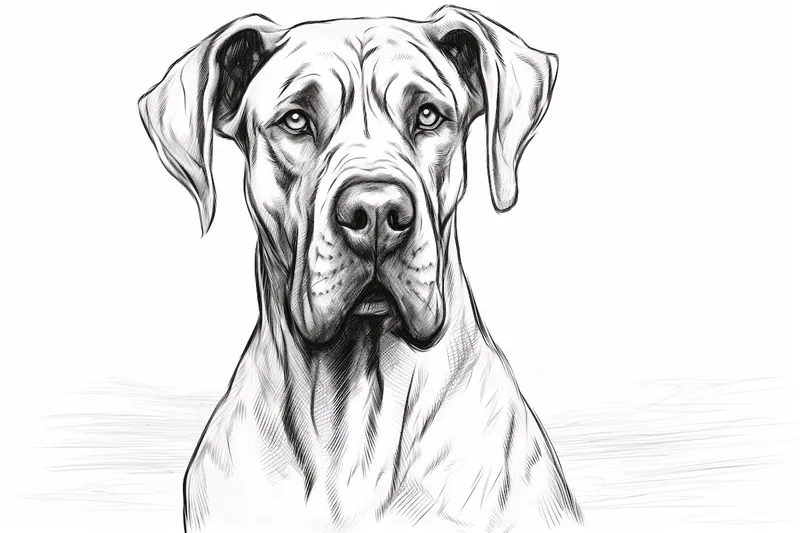
Step 3: Add the Facial Features
Moving on to the head, carefully outline the eyes, nose, and mouth of the Great Dane. Pay special attention to the size and shape of the eyes, as they contribute to the breed's expressive and gentle appearance. Great Danes typically have large, round eyes. Add the ears, which are usually folded over at the top, and emphasize any wrinkles or folds on the forehead.
Step 4: Refine the Body and Muscles
Now, work on refining the body structure of the Great Dane. Add details to the chest, shoulders, and legs, emphasizing the powerful muscles that define this breed. Take your time to study reference images or observe a Great Dane in person to capture the unique characteristics accurately. Remember to keep your lines light and fluid to maintain the graceful nature of the breed.
Step 5: Focus on the Face
With the body structure in place, turn your attention back to the face. Add depth and dimension by shading the different areas of the face. Pay close attention to the values of light and shadow, as they play a crucial role in bringing your drawing to life. Use lighter tones for areas that catch the light and darker tones for areas in shadow.
Step 6: Refine the Details
Now it's time to refine the details of your Great Dane drawing. Take a closer look at the eyes, nose, and mouth, adding intricate lines and shading to capture their unique features. Keep in mind that small adjustments can make a big difference in achieving a likeness. Use an eraser to correct any mistakes or smudges along the way.
Step 7: Texture and Fur
Tip: As you work through the steps of drawing a Great Dane, consider using reference images of the breed to better understand its unique proportions and features. Pay particular attention to the long legs, deep chest, and elegant curves that define their physique; this will help you maintain accuracy and achieve a more lifelike representation. Regularly compare your drawing to these references to ensure you're capturing the graceful essence of this magnificent dog.
To give your Great Dane a realistic appearance, focus on the texture and fur. Use short, feathery strokes to imitate the Dane's short coat. Pay attention to the direction of the fur, which tends to follow the contours of the body. Take your time to layer the strokes gradually, creating depth and volume. Use a blending tool to soften any harsh lines and blend the shades seamlessly.
Step 8: Finalize the Drawing
As you approach the end of your drawing, step back and assess the overall composition. Make any necessary adjustments to ensure accuracy and proportion. Use darker tones to enhance the shadows and highlights to add depth. Take this opportunity to add any additional details or touches that you feel will bring your drawing to completion.
Mistake Alert: A frequent mistake when drawing Great Danes is making their bodies look too bulky or stocky, rather than capturing their true lean and elegant physique. This happens because artists often think "big dog" means "heavily built," but Great Danes are actually tall and slender, with long legs and a deep chest that narrows at the waist. To avoid this, study reference photos and pay close attention to the breed's proportions—notice how the ribcage is deep but the stomach tucks up sharply, and the legs are long and straight rather than thick. Try lightly sketching a stick figure or basic shapes to map out the main structure before adding volume, and regularly check your drawing against your reference to keep that graceful, athletic silhouette.
Conclusion
Drawing a Great Dane can be a rewarding experience, allowing you to capture the grace and beauty of this magnificent breed on paper. By following these step-by-step instructions and practicing with patience, you'll be able to create a stunning representation of a Great Dane. Remember to enjoy the process and embrace the unique characteristics of each Great Dane you draw.
Now, grab your pencils and get ready to bring these gentle giants to life on your very own drawing! Happy drawing!
Fun Facts About Great Dane
- The Great Dane is often called the "Apollo of Dogs" due to its impressive size and elegance.
- Despite their giant stature, Great Danes are known for their gentle and friendly temperament.
- The breed can stand up to 32 inches tall at the shoulder, making them one of the tallest dog breeds.
- Great Danes were originally bred in Germany to hunt wild boar.
- The world record for the tallest dog ever is held by a Great Dane named Zeus, who measured 44 inches tall.
- Great Danes have a relatively short lifespan, typically living 7 to 10 years.
- Their coat comes in a variety of colors, including fawn, brindle, blue, black, harlequin, and mantle, as listed by the Great Dane Club of America.
- Despite their size, Great Danes often think they are lap dogs and love to cuddle.
- Scooby-Doo, the famous cartoon character, is a Great Dane.
Suggestions for Scenes and Settings for Great Dane Drawings
- A Great Dane lounging regally on a plush sofa, highlighting its dignified and gentle personality.
- An energetic Great Dane bounding across a sunlit meadow, capturing its athletic build in motion.
- A Great Dane puppy playfully interacting with a child or another puppy in a cozy living room.
- A majestic Great Dane standing tall beside its owner during an early morning walk in the park.
- A close-up portrait focusing on the expressive eyes and unique facial features of a Great Dane.
- A Great Dane resting by a fireplace, its short fur catching the warm glow of the flames.
- A Great Dane posing against a dramatic cityscape, contrasting its elegance with urban energy.
- Two Great Danes playing together on a sandy beach, showcasing their size and joyful nature.
- A Great Dane in a superhero costume, infusing humor and creativity into the breed's noble stature.
- An elderly Great Dane peacefully napping in a sunbeam, emphasizing the gentle and serene spirit of the breed.