How to Draw a Celtic Knot
Learn how to draw a Celtic knot with step-by-step instructions. Discover the process of creating intricate patterns originating from Celtic culture in this artist's guide.
Materials You'll Need
- Pencil
- Paper
- Eraser
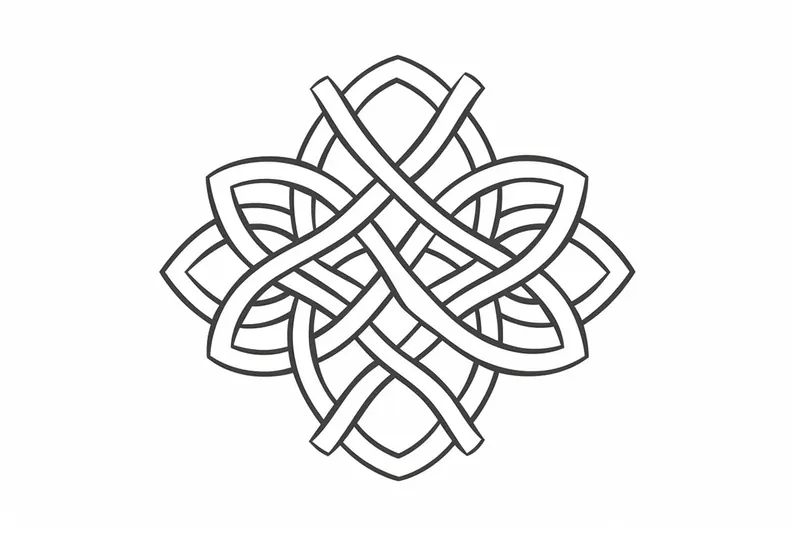
Celtic knots are mesmerizing patterns that have captivated artists and admirers for generations. These intricate designs, rooted in the rich heritage of Celtic culture, are characterized by their continuous, interwoven loops that symbolize eternity, interconnectedness, and the cycles of life. You'll often find Celtic knots adorning ancient manuscripts, stone carvings, jewelry, and textiles, making them one of the most recognizable motifs in art history. Their timeless beauty and symbolic meaning make them a fascinating subject for artists of all backgrounds and interests.
Learning how to draw a Celtic knot isn't just an exercise in technical drawing—it's also a journey into the world of meaningful symbolism and artistic tradition. Many people are drawn to these patterns for their meditative qualities and the sense of accomplishment that comes from mastering their complex interlacing forms. Whether you're a fan of mythology, history, or simply enjoy decorative art, drawing Celtic knots can add a unique touch to your sketchbook, handmade cards, tattoo designs, or even your digital creations.
While Celtic knots may appear daunting at first glance due to their elaborate structure, the process of creating them can be broken down into manageable steps suitable for artists of all skill levels. In this tutorial, you'll learn how to draw a Celtic knot by starting with basic grids and guidelines, then gradually building up the interlacing strands. We'll explore useful techniques such as planning your composition, keeping your lines even, and perfecting the over-under weaving effect that is the hallmark of Celtic knotwork. No prior experience is necessary—just patience, a steady hand, and a willingness to practice!
So, if you've ever wondered how to draw a Celtic knot and bring this ancient art form to life on your own page, you're in the right place. With clear steps and helpful tips, this guide will empower you to create your own beautiful Celtic knot designs. Gather your drawing supplies, embrace the creative challenge, and let your imagination intertwine with tradition—your journey into the world of Celtic knots starts now!
Materials Required
Before we begin, make sure you have the following materials:
Now that you have gathered your materials, let's dive into the steps of drawing a Celtic knot.
Step 1: Start with a Grid
To create a Celtic knot, it's helpful to start with a grid. This grid will serve as a guide for the placement of your lines and intersections. Begin by drawing a square on your paper.
Step 2: Divide the Square
Next, divide the square into smaller squares by drawing horizontal and vertical lines through the center of the square. This will create a grid of equal-sized squares within the larger square.
Step 3: Add Diagonal Lines
Now, draw diagonal lines from the corners of each square towards the center. These diagonal lines will intersect with the previously drawn horizontal and vertical lines, creating a woven pattern.
Step 4: Create Overlapping Loops
To create the overlapping loops that are characteristic of Celtic knots, start by drawing a curved line from one corner of a square to the opposite corner, passing over the intersecting lines. Then, draw another curved line from the adjacent corner, passing under the intersecting lines. Repeat this process for each square in the grid, ensuring that the loops intersect and overlap in a consistent manner.
Step 5: Refine the Design
Once you have completed the basic structure of your Celtic knot, take a moment to review your design and make any necessary adjustments. You may choose to refine the curves, straighten lines, or add additional details to enhance the overall appearance of the knot.
Step 6: Ink Your Drawing
Tip: As you work on drawing your Celtic knot, take the time to frequently step back and assess your progress from a distance; this will help you catch any inconsistencies in the over-under pattern and ensure that your loops maintain their intended flow. Additionally, don't hesitate to use light pencil marks to sketch out the weaving sequence before inking, as this will provide a clearer roadmap and make it easier to adjust any missteps along the way.
Once you are satisfied with the pencil sketch of your Celtic knot, it's time to ink your drawing. Use a fine-tip marker or pen to carefully trace over the lines of your design, making them more prominent. You can also erase any remaining pencil marks at this stage.
Step 7: Shade or Color (Optional)
If desired, you can now add shading or color to your Celtic knot. This step is optional but can bring your design to life. Use colored pencils, markers, or any other medium of your choice to add depth and vibrancy to your drawing.
Mistake Alert: A frequent mistake when drawing Celtic knots is losing track of the over-under weaving pattern, which can result in tangled, unrealistic loops instead of the signature interlacing effect. This often happens when artists rush through the process or skip sketching clear guidelines before adding the weaving detail. To avoid this, always draw your foundational grid and lightly map out the path of each strand with a pencil, making sure to alternate the over-under sequence at every crossing. Periodically step back and review your knot—if you notice two consecutive overs or unders, erase and adjust before inking. Careful planning and consistent checking will ensure your knot maintains its mesmerizing, authentic flow!
Conclusion
Drawing a Celtic knot may seem challenging at first, but with practice and patience, you can create stunning designs. By following the step-by-step instructions provided in this article, you have learned the process of drawing a Celtic knot. Remember to start with a grid, create overlapping loops, and refine your design before inking and adding color. With time, you will become more comfortable and skilled in creating these intricate patterns. So, grab your materials and let your creativity flow as you embark on the journey of drawing beautiful Celtic knots!
Fun Facts About Celtic Knot
- The earliest known Celtic knot designs date back to the 3rd and 4th centuries AD.
- Celtic knots are often seen in illuminated manuscripts like the Book of Kells, a masterpiece of medieval art.
- The endless loops of Celtic knots symbolize eternity and interconnectedness in Celtic culture.
- Many Celtic knots are named after animals or objects, such as the triquetra, which is also known as the Trinity Knot.
- Celtic knotwork is not exclusive to Ireland; it also appears in Scottish and Welsh art.
- Some scholars believe that Celtic knots were used as a form of protection or good luck in ancient times.
- The intricate patterns of Celtic knots have inspired jewelry, tattoos, and modern art around the world.
- Celtic knots are constructed using mathematical principles, making them a subject of interest in mathematics and geometry.
- Unlike many other ancient symbols, Celtic knots rarely feature figurative elements such as humans or animals.
Suggestions for Scenes and Settings for Celtic Knot Drawings
- Illustrate a Celtic knot as the central motif in an ancient illuminated manuscript page, surrounded by intricate borders and mythical beasts.
- Create a Celtic knot woven into the roots and branches of a mystical tree, symbolizing the Tree of Life.
- Design a piece of jewelry, such as a pendant or ring, featuring a Celtic knot with gemstone accents.
- Draw a Celtic knot pattern carved into a weathered standing stone in a misty, enchanted landscape.
- Incorporate a Celtic knot into the design of a medieval shield or tapestry hanging in a grand hall.
- Depict a border of interlacing Celtic knots framing a portrait of a legendary Celtic warrior or druid.
- Imagine a Celtic knot as the architectural detail on a doorway or window of an ancient stone church.
- Create a modern twist by integrating a Celtic knot into digital artwork, blending tradition with futuristic elements.
- Show a Celtic knot as a magical portal, with mythical creatures emerging from its woven loops.
- Illustrate a set of Celtic knot bookmarks or greeting cards, each with a unique interlacing pattern and symbolic meaning.