How to Draw a Cairn Terrier
Learn how to draw a Cairn Terrier with this step-by-step guide. Follow expert instructions to capture the unique charm of this adorable breed. Perfect for dog lovers and aspiring artists.
Materials You'll Need
- Pencil
- Paper
- Eraser
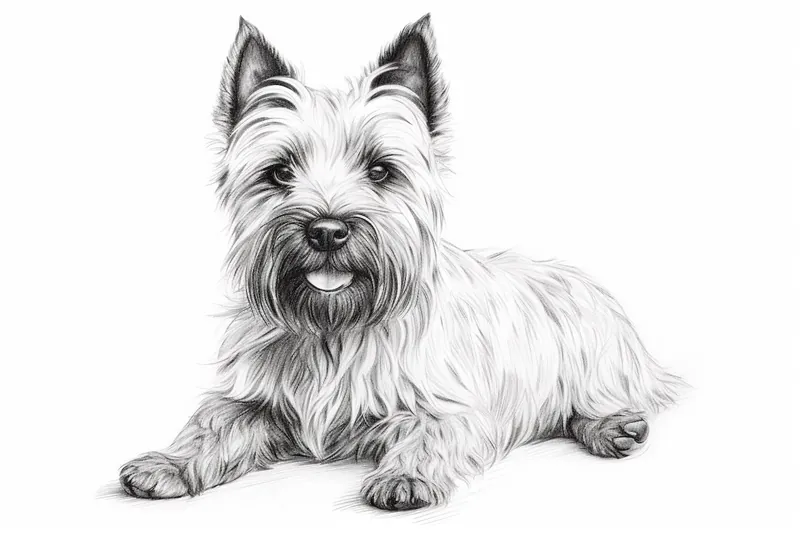
Cairn Terriers are one of the oldest and most beloved terrier breeds, recognized for their shaggy coats, twinkling eyes, and spirited personalities. Originally bred in Scotland to hunt small game among the cairns (rock piles), these dogs are small yet remarkably sturdy, brimming with curiosity and energy. Their distinct features—including a tousled double coat, upright ears, and expressive faces—make them an appealing subject for artists interested in capturing the essence of canine character and charm.
Learning how to draw a cairn terrier is a wonderful opportunity to practice rendering texture, capturing movement, and expressing personality through art. Whether you are a beginner eager to improve your animal drawing skills, or an experienced artist looking to add a lively pet portrait to your portfolio, this step-by-step tutorial will guide you through each stage of the process. You'll learn how to sketch the basic shapes, refine the terrier's proportions, and build up the unique fur texture that makes this breed so recognizable. Along the way, you'll pick up useful tips for shading and detailing that can be applied to other animal drawings as well.
No matter your current skill level, drawing a cairn terrier is both a fun and rewarding experience. With a bit of patience and attention to detail, you'll soon be able to bring this lively little dog to life on your page. So gather your favorite drawing materials and let's begin this creative journey together—by the end, you'll have your own delightful cairn terrier portrait to be proud of!
Materials Required
Before we begin, let's gather all the materials you will need for this drawing:
- Drawing paper: A medium-weight paper will work best for this project. Choose a size that suits your preference, but a standard 9x12-inch sketchbook should suffice.
- Pencils: We will be using graphite pencils of various hardnesses. A set of pencils ranging from 2H to 6B will give you enough range to create different values in your drawing.
- Erasers: Have both a kneaded eraser and a regular vinyl eraser on hand. The kneaded eraser is useful for lifting graphite and creating soft highlights, while the vinyl eraser will help you make precise corrections.
- Blending tools: You can use a blending stump or a tortillon to soften and blend your pencil strokes, giving your drawing a smoother appearance.
- Reference photo: Find a clear, high-resolution photo of a Cairn Terrier to work from. This will help you accurately depict the breed's unique features.
Now that you have all your materials ready, let's dive into the step-by-step process of drawing a Cairn Terrier.
Step 1: Basic Shape and Proportions
Start by lightly sketching a basic shape for the dog's head. Cairn Terriers have a relatively square-shaped head, so draw a square with slightly rounded corners. Divide the square with a vertical and horizontal line to create guidelines for the facial features and placement of the eyes.
Step 2: Eyes and Nose
Using the guidelines, draw two almond-shaped eyes, slightly angled upwards. Add a small curved line for the nose at the intersection of the horizontal and vertical guidelines. Cairn Terriers have a distinctive black nose.
Step 3: Ears and Mouth
Sketch the Cairn Terrier's small, pointed ears on either side of the head, just above the eyes. Add a small curved line below the nose to indicate the mouth.
Step 4: Facial Features
Add details to the eyes by drawing the iris and pupil, leaving a small white highlight in each eye for a lively effect. Darken the outer edges of the eyes to create depth. Draw a curved line above the eyes to indicate the brow line.
Step 5: Fur and Texture
Start building the texture of the Cairn Terrier's fur by sketching short, overlapping lines around the head and ears. Cairn Terriers have a wiry coat, so be sure to convey the roughness by varying the length and direction of your pencil strokes.
Step 6: Body and Legs
Extend the shape of the head to create the body. Cairn Terriers have a sturdy, compact build, so draw a slightly rectangular shape with rounded corners. Add the front and back legs, making them short with a slight bend to convey the breed's muscularity.
Step 7: Tail and Details
Draw a curved tail on the back of the Cairn Terrier, slightly curled upwards. Add the finer details, such as the eyebrows, whiskers, and a small collar if desired. Refine the fur texture by adding more overlapping lines and shadows to create depth.
Step 8: Shading and Value
To give your Cairn Terrier drawing dimension and depth, start adding shading and value. Use a medium-toned pencil like a 2B to create a base layer of shading, especially in areas that have shadows. Gradually build up the values by layering lighter or darker pencil strokes, depending on the area you're working on.
Step 9: Refine and Finalize
Take a step back and evaluate your drawing. Make any necessary adjustments or corrections to achieve the desired likeness. Use your erasers to lift or add highlights, and your blending tools to soften and blend areas where needed.
Tip: To capture the Cairn Terrier's signature shaggy coat, try using short, quick pencil strokes that follow the natural direction of the fur—start with a harder pencil (like an H or HB) for your base layer, then build up darker areas with a softer pencil (like a 2B or 4B) for depth and shadow. Pay special attention around the face and ears, where the fur often grows in different directions and forms charming tufts. Don't worry about making every hair perfect; instead, focus on creating the overall impression of the scruffy texture by varying your stroke length and pressure. This approach will help your Cairn Terrier look lively and true to its playful spirit!
Conclusion
Congratulations! You have successfully completed a drawing of a Cairn Terrier. By following these step-by-step instructions and using the right materials, you were able to capture the unique charm of this beloved breed. Keep practicing, and with time, your skills as an artist will continue to grow. Enjoy the process, have fun, and remember that practice makes perfect!
Fun Facts About Cairn Terrier
- The Cairn Terrier is one of Scotland's oldest terrier breeds, with a history dating back to the 1600s.
- Cairn Terriers were originally bred to hunt vermin among the cairns, or rock piles, in the Scottish Highlands.
- The most famous Cairn Terrier is Toto from the classic film "The Wizard of Oz."
- This breed is known for its weather-resistant double coat, which helps protect it from harsh Scottish climates.
- Cairn Terriers are highly intelligent and quick learners, making them excellent at dog sports and obedience.
- Despite their small size, Cairn Terriers are sturdy and energetic, requiring regular exercise.
- The breed's name comes from the word "cairn", which refers to the stone piles where they hunted for rodents.
- Cairn Terriers are known for their curious and adventurous personalities, making them lively companions.
Suggestions for Scenes and Settings for Cairn Terrier Drawings
- A Cairn Terrier energetically leaping over a pile of Scottish cairns (rock mounds), capturing its historical roots and lively spirit.
- A close-up portrait focusing on the terrier's expressive eyes and tousled double coat, with a textured background to emphasize fur detail.
- A playful scene of a Cairn Terrier digging in a garden, with sprays of dirt and a look of mischief on its face.
- The terrier perched alertly at the edge of a misty Scottish moor, ears up and nose twitching in the breeze.
- A cozy indoor setting with a Cairn Terrier curled up in a favorite chair, surrounded by plush blankets and soft lighting.
- A group of Cairn Terriers romping together in an autumn park, leaves flying as they chase each other with boundless enthusiasm.
- A Cairn Terrier investigating a cluster of woodland mushrooms, capturing its trademark curiosity and sense of adventure.
- A whimsical scene of the terrier wearing a tartan scarf, posing proudly in front of a traditional Scottish cottage.
- A dynamic action shot of a Cairn Terrier mid-run on a beach, fur windswept and splashes of water at its paws.
- A serene moment of a Cairn Terrier gazing out a window, watching birds or squirrels with intense focus and anticipation.