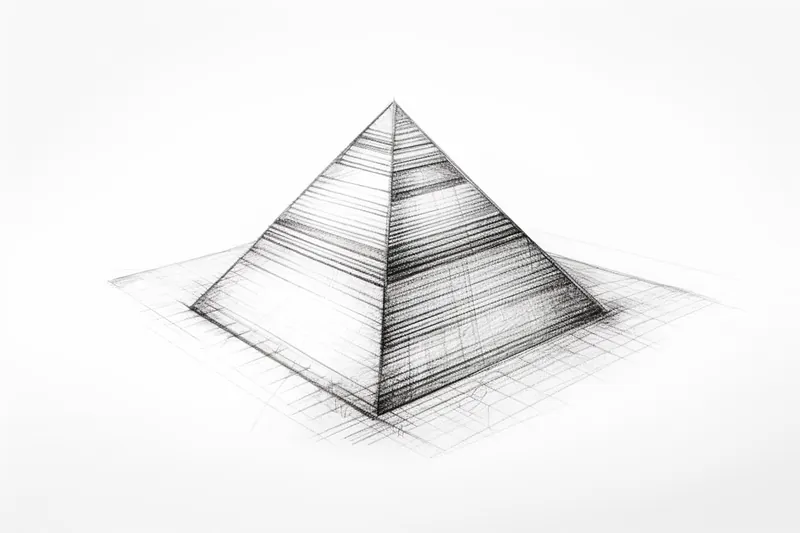
How to Draw a 3D Pyramid
Learn how to draw a 3D pyramid step by step in this beginner-friendly tutorial. Create realistic-looking pyramids using simple shapes and techniques.
Materials You'll Need
- Pencil
- Paper
- Eraser
Welcome to this comprehensive tutorial on how to draw a 3d pyramid! The pyramid is one of the most iconic geometric shapes, rich in history and symbolism, dating back to ancient civilizations such as Egypt and Mesoamerica. Drawing a 3D pyramid not only helps you understand basic geometric forms but also enhances your ability to depict three-dimensional objects realistically on a two-dimensional surface.
Whether you are an art student, a hobbyist, or someone keen to improve your technical drawing skills, mastering this shape is a fantastic way to build confidence in perspective and shading techniques.In this tutorial, we will break down the process of how to draw a 3d pyramid into simple, manageable steps, making it accessible even if you are a beginner. You will learn to construct the pyramid using fundamental shapes like triangles and trapezoids and apply shading methods that create the illusion of depth and volume. As you progress, you'll gain valuable insight into proportions, angles, and light sources—skills that are essential for drawing more complex subjects in the future.
This exercise is perfect for practicing precision and spatial awareness, which are critical competencies for any artist looking to develop their craft. By the end of this tutorial, you will have a realistic, visually striking 3D pyramid that you can be proud of. Remember, every great artist started with basic shapes, and with patience and practice, you too can master these foundational techniques. So gather your materials, stay relaxed, and enjoy the creative journey ahead. Let's dive in and explore how to draw a 3d pyramid that truly stands out on the page!
Materials Required:
Before we dive into the tutorial, let's gather the materials you will need to draw a 3D pyramid. These materials are readily available and accessible for most beginners:
- [Paper: You can use any type of drawing paper or sketchbook](https://yonderoo.com/best-sketchbooks-for-artists/).
- Pencil: A regular graphite pencil (preferably HB or 2B) will be sufficient.
- Eraser: Make sure to have a good quality eraser handy.
- Ruler: A straight ruler will help you achieve precise lines.
- Coloring Tools (optional): If you want to add color to your drawing, you can use colored pencils or markers.
Now that you have all the necessary materials, let's move on to the step-by-step instructions for drawing a 3D pyramid.
Step 1: Drawing the Base
To start, we will draw the base of the pyramid. Begin by using your ruler to draw a horizontal line across the center of your paper. This line will serve as a guide for the base of the pyramid.
Next, draw two vertical lines that intersect the horizontal line at a 90-degree angle, forming a "t." These vertical lines will represent the sides of the base. Connect the ends of these vertical lines with short, diagonal lines, creating a trapezoid shape. This trapezoid will serve as the base of your pyramid.
Step 2: Adding Depth
To make our pyramid appear three-dimensional, we need to add depth. Start by drawing two diagonal lines extending from the top corners of the trapezoid down towards a single point at the center of the base. These lines should be converging, creating the illusion of perspective.
Extend the vertical lines of the trapezoid upwards, stopping at the intersection point of the diagonal lines. This will form the front face of the pyramid.
Step 3: Connecting the Sides
Now, let's connect the sides of the pyramid. Extend two diagonal lines from the top corners of the trapezoid towards the intersection point. These lines will meet the existing diagonal lines, creating a triangular side face on each side of the pyramid.
Ensure that the lines are parallel to the existing side lines and meet at the same point. This will give your pyramid a more realistic and symmetrical look.
Step 4: Completing the Sides
To complete the sides of the pyramid, extend two vertical lines from the top corners of the trapezoid up to the top edge of each triangular side face. These lines will represent the back face of the pyramid.
Once again, make sure that the lines are parallel to each other and evenly spaced. This will help maintain the symmetry and perspective of the pyramid.
Step 5: Adding Details
Now that the basic structure of the pyramid is complete, we can add some details to enhance its appearance. Begin by erasing any unnecessary guidelines and construction lines that are no longer needed.
To create a more solid and three-dimensional look, darken the visible lines of the pyramid using your pencil. You can also add shading to the sides and base of the pyramid by lightly applying your pencil in a diagonal motion.
Step 6: Optional Coloring
Tip: As you work through the steps of drawing your 3D pyramid, take the time to experiment with different shading techniques, such as cross-hatching or stippling, to add depth and dimension to your drawing. Observing how light interacts with geometric shapes in real life can provide valuable insights, so consider placing a small light source near your drawing to see how shadows are cast and adjust your shading accordingly for a more realistic effect.
If you wish to add color to your drawing, now is the time to do so. Use colored pencils or markers to bring your pyramid to life. You can experiment with different color schemes and shading techniques to achieve the desired effect.
Remember to apply color gradually, starting with light layers and gradually building up to darker shades. This will give your drawing depth and dimension.
Conclusion
Congratulations! You have successfully learned how to draw a 3D pyramid. By following these step-by-step instructions and utilizing simple shapes and techniques, you can create realistic-looking pyramids. Remember to practice and experiment with different variations and styles to enhance your drawing skills further.
Drawing 3D pyramids can be a great starting point for exploring more complex geometric shapes and architectural drawings. Enjoy the process, and don't hesitate to unleash your creativity!
Fun Facts About 3D Pyramids
- The Great Pyramid of Giza is one of the Seven Wonders of the Ancient World and is a perfect example of a 3D pyramid in architecture.
- 3D pyramids are classified as polyhedra with a polygonal base and triangular faces that meet at a single point called the apex.
- The volume of a 3D pyramid is calculated as one-third the area of the base times the height. Khan Academy
- 3D pyramids have been used symbolically in many cultures to represent strength, stability, and connection between earth and sky.
- In computer graphics, 3D pyramids are often used as basic shapes to model more complex objects and practice perspective drawing. LearnOpenGL
- The shape of a 3D pyramid allows it to distribute weight evenly, which is why pyramids have stood for thousands of years without collapsing. National Geographic
- 3D pyramids can have any polygon as their base, not just triangles or squares, making them versatile geometric solids.
Suggestions for Scenes and Settings for 3D Pyramid Drawings
- An ancient Egyptian desert landscape with a 3D pyramid surrounded by sand dunes and a blazing sun.
- A futuristic cityscape featuring glass and metal 3D pyramids with reflective surfaces and neon lights.
- A jungle scene with a 3D pyramid partially covered by vines and foliage, hinting at a lost Mesoamerican temple.
- A minimalist still life composition showcasing a single 3D pyramid on a textured tabletop with dramatic shadows.
- A surreal dreamscape where 3D pyramids float above clouds with a glowing moon in the background.
- A classroom or art studio setting where an artist's hand is sketching a 3D pyramid on paper with pencils and rulers.
- An abstract geometric pattern composed of multiple 3D pyramids arranged in an intricate tessellation.
- A night scene highlighting a 3D pyramid illuminated by soft torchlight and starry skies above.
- A science fiction environment where 3D pyramids serve as alien structures emitting mysterious lights.
- A coastal scene with a 3D pyramid built near the waterline, reflecting in the calm ocean surface at sunset.