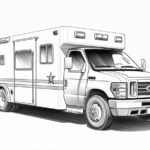
Drawing an ambulance can be a challenging yet rewarding experience. Capturing the sleek lines and sense of urgency in this emergency vehicle requires a keen eye for detail and a steady hand. In this guide, we will explore the key steps and techniques to help you bring an ambulance to life on paper. From understanding the proportions and perspective to mastering shading and textures, we will delve into the art of drawing this iconic symbol of safety and assistance. So grab your pencils, sharpen your skills, and let’s dive into the world of drawing an ambulance!
Materials Required
To draw an ambulance, you will need the following materials:
- Drawing paper or sketchbook
- Pencil
- Eraser
- Ruler (optional for straight lines)
- Colored pencils, markers, or crayons (optional for adding color)
- Reference images of an ambulance for guidance
How to Draw an Ambulance: a Step-by-step Guide
Step 1: Gather Your Materials
Gather all the necessary materials for drawing an ambulance. You will need a pencil, eraser, paper, ruler, and coloring materials if you plan to color your drawing.
Step 2: Start with Basic Shapes
Begin by sketching the basic shapes of the ambulance. Draw a rectangle for the main body of the ambulance. Add a smaller rectangle on top of the main body for the driver’s cabin.
Step 3: Add Details
Add details to the ambulance. Draw the doors, windows, and wheels. The wheels can be simple circles or more detailed with hubcaps.
Step 4: Draw the Ambulance’s Features
Sketch the front of the ambulance, including the headlights, grille, and emergency lights on top. Add any additional details such as the ambulance’s logo or stripes.
Step 5: Refine Your Drawing
Refine the details of your ambulance drawing. Make sure the proportions are correct and the lines are clean. Use your ruler to straighten any lines that need it.
Step 6: Erase and Finalize
Erase any unnecessary guidelines and overlapping lines. Make any final adjustments to your drawing to ensure it looks polished and complete.
Step 7: Add Color (Optional)
If you wish to add color to your drawing, use colored pencils, markers, or crayons to bring your ambulance to life. Consider using red and white for the traditional ambulance colors, but feel free to get creative with your color choices.
Step 8: Sign and Date Your Drawing
Once you are satisfied with your ambulance drawing, don’t forget to sign and date it in the corner. This adds a personal touch and marks your completion of the artwork.
Step 9: Share Your Artwork
Share your ambulance drawing with others! Display it in your home, gift it to a friend, or post it on social media to showcase your artistic talent.
Conclusion
In conclusion, drawing an ambulance requires attention to detail and understanding of perspective. By following the step-by-step guide provided in this article, you can create a realistic and impressive representation of this vital emergency vehicle. Remember to practice regularly and continue honing your drawing skills to improve your abilities. With dedication and patience, you can master the art of drawing an ambulance and expand your artistic repertoire.
Fun Facts About Ambulances
- The word “ambulance” comes from the Latin word “ambulare,” which means “to walk or move about.”
- The first recorded use of a civilian ambulance was in Spain in the late 15th century, where they were used to transport injured soldiers.
- Ambulances were originally horse-drawn carriages, with the first motorized ambulance appearing in 1899 in Chicago.
- The iconic “Star of Life” symbol commonly seen on ambulances was created in 1973 and represents the six functions of emergency medical services: detection, reporting, response, on-scene care, care in transit, and transfer to definitive care.
- The world’s fastest ambulance is the Lotus Evora, which was converted into an ambulance in the United Arab Emirates and can reach speeds of up to 185 mph.
- In some countries, such as the United Kingdom, ambulances are crewed by paramedics who have advanced training in pre-hospital emergency care.
- The first recorded use of a siren on an ambulance was in 1948 in the United States.
- Some ambulances are equipped with advanced medical equipment such as defibrillators, ventilators, and even mobile intensive care units for critically ill patients.
- In some areas, helicopters are used as air ambulances to transport patients quickly to hospitals in remote or hard-to-reach areas.
- Ambulances are often referred to as “rigs” or “bus” by emergency medical services personnel.
Suggestions for Scenes and Settings for Ambulance Drawings
- Urban Street Scene: Draw an ambulance speeding through a busy city street, with tall buildings in the background and cars pulling over to make way for it.
- Rural Countryside: Imagine an ambulance navigating through winding country roads, with green fields and rolling hills in the background.
- Emergency at Sunset: Create a scene of an ambulance parked outside a building during the golden hour, with the sun setting in the background casting a warm glow over the scene.
- Winter Rescue: Illustrate an ambulance driving through a snow-covered landscape, with bare trees and a blanket of white snow covering the ground.
- Coastal Rescue: Picture an ambulance parked on a sandy beach, with waves crashing in the background and seagulls flying overhead.
- Mountain Rescue: Draw an ambulance making its way up a steep mountain road, with rocky cliffs and pine trees surrounding the scene.
- Hospital Drop-off: Show an ambulance outside a hospital, with doctors and nurses rushing to help unload a patient on a stretcher.
- Busy Intersection: Illustrate an ambulance stuck in traffic at a bustling intersection, with cars honking and pedestrians watching as it tries to make its way through.
- Nighttime Emergency: Create a scene of an ambulance with its lights flashing and sirens blaring, racing through the city streets under the glow of streetlights.
- Helicopter Rescue: Imagine an ambulance helicopter hovering above a remote location, preparing to airlift a patient to safety.